[gim] gutted some li-ion laptop batteries to replace his roomba’s battery pack. He had to pick up a li-ion charger and add a protection circuit to deal with the li-ion cells, but ended up with a new lighter pack for his roomba. If you head this way, the protection circuit is a vital component to prevent fires/explisions/etc. Looks like a great resource for robot power or even R/C projects.


10 thoughts on “Li-ion For Your Roomba”
Leave a Reply to craigCancel reply
Please be kind and respectful to help make the comments section excellent. (Comment Policy)


The common way to do this, because it’s not a new thing for Roomba owners, is to use a bunch of mobile-phone power-packs. Then yo get the protection-circuit built in and can use the normal charger.
Complete kits for this is regularly sold on ebay for about half the price of a new battery.
in the roomba
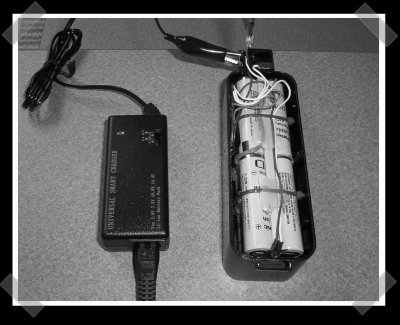
the charging roomba
the lion sleeps tonight…
aweema-weh aweema-weh aweema-weh aweema-weh…
that was amazing.
This sure is great for home defense.
If someone breaks in, have your roomba follow the intruder around until the Li-ion explodes.
I say someone should find a way to make these things hunt for cockroaches or mice. Id love to see one with a taser on the end come through my living room chasing a mouse…
Ebay sells C style rechargeable batteries for rebuilding a roomba battery or any rechargable battery for that matter.
This will not change the weighting which is positioned where it is and that way by design. Incidentally this was discovered in adding a plug to the flashlight on a old 14.4 yolt Ryobi combo kit and it cleans in my basement workshop like a champ.
This setup was free for a crapped out Roomba battery … but won’t get under couches and beds.
I have replaced the internals of my Roomba battery wi LiIon without a hitch. I am using the internals from a HP DV9K laptop battery, 8 cell 6400 mAh monster. It now runs 2hrs+ :-) As long as you keep the battery safety/balancing circuit, you’re safe, it checks that no over/under voltage situations happens. My roomba charges with 1,3 Amps max, which is below that of the HP laptop would do, so the cells is cool to the touch, nothing to worry wbout. The voltages fits nice too, a fully charged NiMH pack is 12×1,4 volts = 16.8 volts, and the LiIon pack is 4×4.2 volts = 16.8 volts, so it’s a perfect match for the charger circuit!. My roomba even senses when the batteries are getting low, homing for the charging cradle again without the power dying on the way – problems other LiIon-adpoters have, since theyre safety electronics in the cells work differently. Just a single word of advice if you’re going this way – do NO at any single moment, disconnect the cells from the controller on the battery pack when re-orienting them – the smart battery controller will blow a chemical fuse on the controller, making the battery useless, unless replaced (done that, got the t-shirt etc.) Happy hacking folks.
Per Jensen, this is a most interesting post. I am considering doing the same to my Roomba battery packs. I have two NiMH 4000 series packs that are several years old but were barely used, and one brand new one that was never used, and all won’t charge. Two different Roomba chargers give me the flashing red light on the robot, which after a time goes green, but all three packs make the robot play the same dead battery tune a second or so after turning it on. Very disappointing, and very bad battery economy IMO, so for that reason I’m considering going liIon. I’m confused by your word of advice, however. What do you mean by “do not disconnect the cells from the controller on the battery pack when reorienting them”? I assume you’re referring to the charge controller on the LiIon pack, but what does “reorienting them” mean? If a typical 4S1P pack with a charge controller is used, would not the controller come pre-attached to the cells? If not, what cell/controller combo would you recommend I purchase? Thanks for your help.
This worked spectacularly, thanks for posting this fix. I chose a 3300mahr 35C 4s1p Lipo pack and the DROK® 14.4V/14.8V/16.8V 4-series Lithium Battery Pack Overcharge/Over-discharge/Overcurrent/Short-circuit Protection Circuit Board for battery management. Both are working perfectly. The 3300 pack barely fits in the case lengthwise if you grind off one screw mount with a Dremel and place the DROK board alongside the battery where it won’t touch either the battery or the case wall. I also removed the over-temp sensor from the old pack and slid it inside the sleeve of the Lipo pack just to be safe. If you use the DROK board be sure to place a jumper or zero ohm resistor on the Automatic Activation Function pads and be careful with the solder as the SMT pads are damn near microscopic (see location in the Amazon ad). These boards do not come with this jumper preinstalled for some reason. My ten year old but barely used Roomba 4130 (barely used due to a failed wheel sensor and constantly failing NiMH packs) is now working quite happily on its new Lipo pack (and repairs to both wheel sensors). She’s lighter and peppier than before and finishes a whole room without draining the battery. She also parks herself normally and the flashing red light even goes green when the charge is finished. These tasks were always difficult before and Roomba refused to repair it after the warranty expired. All-in-all, I couldn’t have hoped for a better fix.
PS: You can make your own triangle screw driver by taking a six-point star-bit from one of those cheap Chinese 30-piece tool kits and grinding off three points with a Dremel grinding wheel.
OK guys, I too, have have been hit by the self-destructing battery phenomenon. My Roomba worked flawlessly but only twice. After the second cleaning it parked itself perfectly, then charged automatically for no more than two hours, then poof. So, a word of advice. Don’t lipo-ize your Roomba battery packs. It isn’t worth the risk.