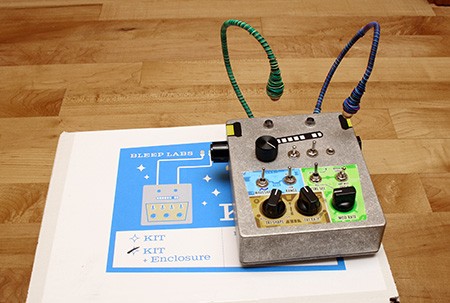
The ThingamaKIT is an anthropomorphic analog synthesizer kit from Bleep Labs. Using “LEDacles”, photoresistors, knobs, and switches, it generates interesting high pitched vocalizations. Bleep Labs sent us a review unit and this article shares our experiences building and using the kit. We’ve also included a tutorial on making some hacks, modifications, and circuit bends to it. Skip to the end to see a video of our hacked kit in action.
Using the ThingamaKIT
While it may not be that useful for serious musical composition, the ThingamaKIT makes some nice bleeps and blips, even without modification.The LED to photoresistor input/feedback method is enjoyable to play with, by repointing the LEDacles and waving hands around the photoresistor. The ThingamaKIT is very easy to start using; just twiddle knobs, and it starts making its characteristic ridiculous sounds.
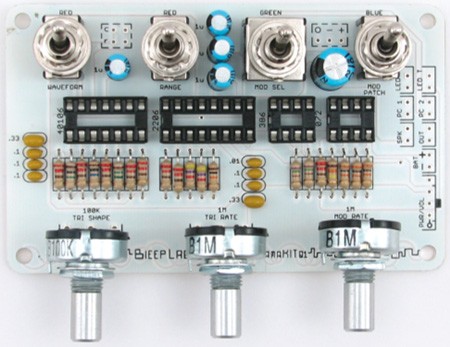
The ThingamaKIT is an simple but fun circuit, and schematics are provided. Three Schmitt trigger oscillators, like the ones used in the previous Hack a Day synth article are used to control the first LEDacle. Because they have different frequencies, the LEDacle blinks in an interesting manner. A Schmitt trigger and op amp generate a triangle wave for the other LEDacle, with controllable waveshape and speed. Another Schmitt trigger generates the modulating wave, with a frequency based on either Photocell 2 or a potentiometer. The main oscillator, the XR2206, has a pitch controlled by Photocell 1, except when the output from the modulation is high, then it switches to a different pitch.
Embedded above is Bleep Labs official demo video.
Building the ThingamaKIT
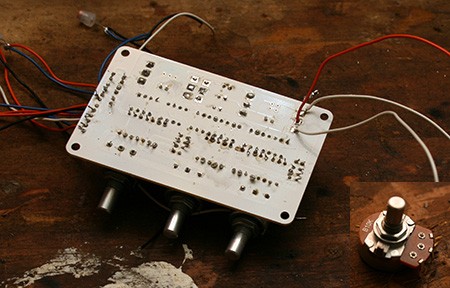
The instructions for building the ThingamaKIT are printed well and easy to follow. [Surachai]’s build time lapse, shown above, gives a nice overview of the process. We had no problem finding components and soldering them to the board. Though troubleshooting instructions are provided in the manual, our device worked fine, and we did not need them.
If you are assembling the ThingamaKIT with the intent to hack it as shown in the rest of this article, there are a couple things you should do differently than shown in the instructions.
- Cut the 4” wires a little longer, closer to 6”. You’ll need the extra length when fitting components.
- Do not install the waveshape switch, unless you want to test the default ThingamaKIT unit without modifications.
- Do not proceed to the casing steps until you have made modifications.
Hacking the ThingamaKIT
Bleep Labs has designed the ThingamaKIT to be easily circuit bendable, and there are many fun hacks that can be done with this unit. A few are briefly presented in the extra information given with the kit. While playing around with it and assembling it, we also discovered several more. We’ll show you a few different hacks and circuit bends that you can do with an assembled ThingamaKIT.
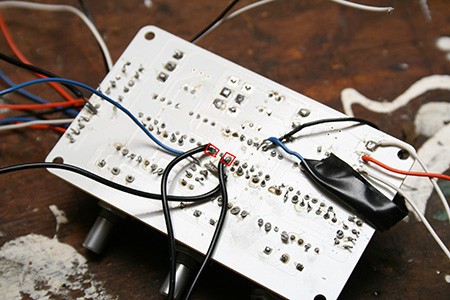
Adding an audio input
Our favorite hack for the ThingamaKIT is to add an audio input. The ThingamaKIT will completely warp any audio input, crushing it to lo-fi fuzz and crunches. Here is its emotional rendition of The Police’s “Every Breath You Take”:

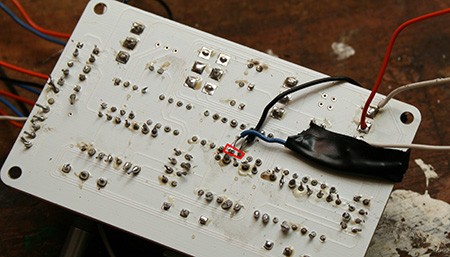
To do this, you’ll need a 3.5mm audio jack, like the kind used in the previous synthesizer how-to article and a SPDT (three way) switch. Solder a wire to the signal lug and a wire to the ground lug on the jack. Then, solder the signal wire (the blue wire) to the left hand pad of the .01 uF capacitor, which is outlined above in red. Our solder joints look like a warzone, but it all works. We swear.

There are two places the ground wire can be soldered, and each has a different sound; we installed a switch so that both could be used. Solder the ground wire to the center lug on the SPDT switch. Solder one of the outside lugs to the board’s ground, and another to the other pin of the .01 uF capacitor, as outlined in red above.
To use the audio input, flip the SPDT switch to either outside position, then patch some audio to the input. Music, drum machines, other synthesizers and more all work to make an interesting sound.
Adding a waveshaper knob
In its default configuration, the ThingamaKIT only has a switch to select between triangle and square wave main oscillators. By replacing this knob with a potentiometer, you can transition smoothly between the two waveforms. However, there will be a significant attenuation (decrease in volume) when the potentiometer is near its center, as both outputs will have increased impedance. This is not easily corrected, except with active amplification, or a dual potentiometer with two different tapers, which we have been unable to find.

To do this mod, you first need to remove the waveshape switch if you have already attached it. The easiest way to remove it is with a desoldering iron. Simply squeeze the bulb, place the hot iron over each pad (pads to remove are outlined in red on the image above), and release the bulb. Do this for each pad until all solder is removed, then remove the switch. Keep the switch, as it will be useful if you want to do the sine wave hack.
Next, solder three wires to a 10K potentiometer, such as the one pictured above. The red wire goes to the middle lug, and the other two go to either end on the board.
The waveshaper knob is complete, and you can now easily fade between square and triangle waves.
Adding a sine wave switch
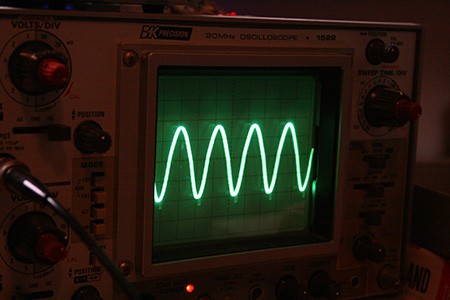
While reading the datasheet (PDF) for the XR2206, the signal generator that the ThingamaKIT uses, we noticed a very easy way to change the triangle wave output into a sine wave, which has a softer sound.
If you are doing this with the waveshaper hack above, start by taking the old switch, and removing one lug from its side. Then bend the other two down slightly, as shown. This will allow the switch to fit where the old one did on the panel, without being in contact with the board. Solder two short wires to the remaining lugs. Then, stick a piece of electrical tape over the top of the pads on the board where the potentiometer is now wired, and put the switch there, using a bit of hot glue to hold it in place.
To one wire, solder a 220 ohm resistor inline; an extra is helpfully provided in the kit. Wrap the resistor in electrical tape to cover the exposed leads, then solder the two wire ends to pins 13 and 14 of the XR2206 as outlined in red above. The sine wave mod is complete!
Adding a spike wave switch
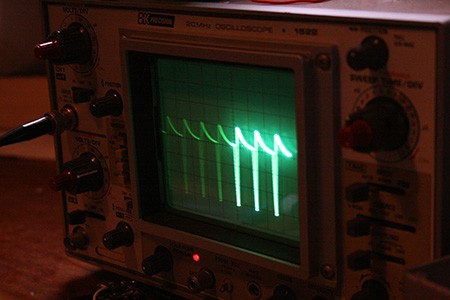
Another bend we found while poking around in the unit caused the main oscillator to create a “spike” waveform. It produces a nice lo-fi, glitchy sound. To add this bend, take any normal SPST (two way on-off switch) and solder a wire to each lug.
Then, connect it to pins 8 and 6 on the XR2206, as outlined in red. The spike wave mod is done.
Packaging it all up
To finish up our ThingamaKIT, we followed the instructions provided with the kit, but with a few modifications. A couple of extra holes had to be drilled for the new potentiometer (5/16”), the spike wave switch (5/16”), and the audio input (1/4”).

We had some difficulty getting all of the new components fitted into the case, but with some rearranging we managed. Be sure not to push the photoresistors up higher on the face then is shown on the drill jig, or you will have trouble fitting them around the LEDacles. The volume potentiometer was also mounted a little low, and we had to put the speaker toward the controls side rather then the LEDacle side of the case to fit it in.

Check out the demo video below to see our glorious leader in action.
Further hacks
To hack your ThingamaKIT further, Dr. Bleep has some recommendations in the manual: using the extra oscillators on the board to add effects, replacing the variable photocells with resistors and buttons to make a keyboard, making a patchbay, and getting complete control over LEDacle 1 with potentiometers.
That concludes our ThingamaKIT hacking. Have any of you built one? To see other custom ThingamaKITs, check out the Flickr group.


wow this thing is so bad ass
seriously i want one so bad! whenever i do get one i am so trying these :)
I’m excited to see so many musical hacks lately. I think it ought to be a subcategory on the site. There’s a lot of people doing a lot of very interesting and bizarre things with music and tech out there. More, please!
Is it possible to add a midi input/output? I wanna connect my keyboard to it. :D
AWESOME!
@3: I was just about to ask the same thing!! that would be even more AWESOME.
wow makes me want to black out my eyesockets, get my “the used” t-shirts out and paint my fingernails black and joint the EMo crowd once again.
I’m so misunderstood…
0a 45 6d 6f 20 6b 69 64 73 20 61 72 65 20 6c 6f 73 65 72 73
get thee some liquid flux and reflow those solder joints. there is bound to be a fairly cold solder joint there somewhere that will manifest itself sooner or later.
i have one it is way too cool !!!!
I’m glad ya’ll like it!
Midi would be tough since the main oscillator is controlled by a RC circuit, not an external variable. But you could switch out the photocell for a bank of pots and try to connect them to a MIDIFY.
#3 here
It’s a shame it doesn’t have a midi output. This is exactly what I needed, cause I wanted an analog synth, but I lack the smarts to build my own from scratch.
OK, I think you guys are missing something here.. the kit contains a speaker right? Just rewire the speaker to a stereo/mono port… no?
#10, you seem to be missing the point, what if we wanna control it via a midi input, rather than adding a midi output?
What happened to the images? They all 404 now.
I bought a thingamakit recently as a present for a friend and I am currently in the process of moddifying it by adding the sine wave switch and spikewave switch.
I’m afraid I think your pictures are misleading in that the picture for where you have soldered the sine wave switch differs from where it is in your picture for the spike wave.
In the first picture the wires are soldered to what appears to be pins 3 and 4 but then in the second picture they jump to pins 13 and 14.
I assume the second picture is correct and the circuit works with both mods working properly??
Hi,
I’m waiting for my Thingamakit and have some questions… Can I leave the standard waveshape selector and install the sine and spike wave switches through on-off buttons? If I do so, which waveforms are replaced when I activate them?
That is sick! Can you put an input jack in it so you can run it through delay or distortion or something?
So that is what two Ataris making love sounds like.
There’s a lot of people doing a lot of very interesting and bizarre things with music and tech out there. More, please!
I get it. But, Honestly just listening to it pisses me off.
I know this is old, but any chance of getting the images restored?
Does anyone have the missing picture under “adding an audio input”?