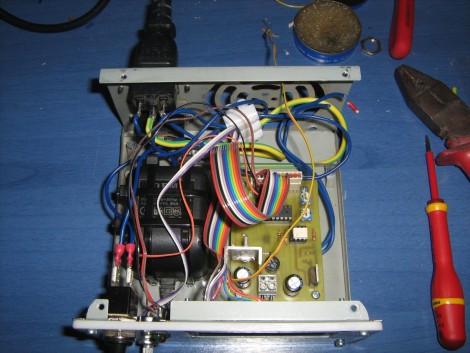
Take that cheap fire stick you call a soldering iron and turn it into a real tool. [Giorgos Lazaridis] turned his 30 watt soldering iron into a temperature controlled soldering station by adding a thermistor just above the tip to monitor how hot things are getting. A MAX6675 takes care of the thermocouple and shoots a digital temperature value off to the PIC 16F88 which controls the unit by taking user input from a potentiometer and displaying the settings on an HD44780 character display. His use of a dissected ‘wall wort’ inside of the ATX power supply carcass used as the case for the station is a clever hack. See it melt some metal in the clip after the break.
This makes a nice upgrade to our solder station guide, which had a temperature controlled iron but lacked the sensor and automation seen here.


That is really slick. I may have to build one myself!
Yes, you can get a temp-controlled station for not too expensive, but this is just plain sweet!
I have a temperature controlled weller. I rarely move it from 750f.
Correction, I think he’s using a thermocouple rather than a thermistor :D
Anyway, I’ll have to try this out when I replace my old wp-25 with something a bit nicer…
If I didn’t already have a BlackJack solder station then I would totally do this.
I miss my Metcal… :(
Nice to see a homebrew temperature-controlled station that is actually temperature-controlled. It’d be nicer still if the iron he used had better peak output—the faster you can heat things to soldering temperature the better!
Nice hack but it is not working as well as he thinks. This has the same problem as every other resistive based soldering station out there in that it has temperature overshoot at the tip. Weller, JBC, Hakko, Ersa, etc. all have the same problem, they manage it by placing the thermocouple as close to the tip as possible and managing the feedback from the sensor quickly.
This guy has an extremely thorough writeup of how thermocouples work. Very interesting. And, I think he uses a combination of thermocouple and an ic that compensates for the quirks that come with using thermocouples. The writeup is very informative and explains how a thermistor could be used to compensate.
The question is, how did he solder his soldering iron? THAT IS THE QUESTION.
@Anon
With a lighter of course! :)
there is a long discussion on thermocouples on the author’s page, together with a nice chip (max6675) that turns the thermocouple into a compensated digital temperature probe, very cool.
the price however ( i agree with the author) is rather steep. my suggestion: pre-calculated lookup tables. kammenos talks about this, but is concerned about the error.
but that might not be a problem for a soldering iron. below, let’s say, 160celsius you would apply full power anyhow, so who cares, whether it tells you 100celsius or 110c. and within soldering range other factors limit the precision enough, that an accuracy above 1degree wouldn’t improve anything. a pre-calculated table with 128 values would require only 7 jumps (8 actually: 7 decisions + 1 jump out).
Notice that PIC users most likely do proper layout, put thought in wise component selection, while arduous users stuck with breadboards and tape
I saw the old post on the Aoyue hot air rework station, so I just bought an Aoyue 937+ for $50 shipped on Amazon and I love it! Cool hack, I thought about doing something like this before I had a decent iron, but now I would highly recommend the 937+ (or maybe one of the more expensive models if you need it) to anyone looking for a high-quality, low-priced iron.
Pretty sure you mean “wall wart”. You don’t make beer with it, it’s something that looks like a wart on the wall :)
It would be easier to just switch out the heating element with one that has an embeded thermocouple instead. These are really cheap on ebay costing only a few bucks.
Size might be a problem. If the element is too small (diameter), just get some bare copper wire of a suitable gauge and coil it around the element tightly. It will work just fine.
An external thermocouple could instead be used to measure the tip temperature for calibrating the feedback loop.
Well, nice hack. But his soldering technique is a bit questionable…
I bought an AOYUE 936 this week from Germany, the unit + shipping to Finland totalled to 45 EUR. Not bad for a temperature controlled soldering station. Of course it’s not as high quality as Hakko or Weller but it will do better than fine for occasional prototyping.
I believe the nice part of this hack is that you are free to do your own PID (not pic) control loop in code to prevent temperature overshoot. I suspect you can configure different PID parameters by having 2 buttons on the front to tell the PIC if you plan to do heavy or light work. If you select a light-work PID, it can choose more agressive anti-overshoot parameters (with the downside of getting you jammed if you try solder a lug-nut :-) You could make it beep if you wanted to….
I too have a cheap station, the controller is crap, and beside overshoot sometimes gets confused. Once it’s outside the 1-year warranty I am going to rip its guts and come visit this article for inspiration again. It’s good to know that the pulse driving mechanism can get you there. Nice one Giorgos
Planning on building this temp controlled iron but using an 18F pic, coding in Swordfish. Use PWM to control the overshoot of temperature. Include a PID that combines the heating element resistance (seen several links using this for temp control)as well as the Max6675/thermocouple idea.
Am new to PIC programing but going to give it a go. Plan is to build in steps. Not to up on soldering iron efficiency but would a 24v DC iron be better than an 110 AC iron?
Understand a Metcal can be up to temp in a matter of seconds?
hi, the ideea is very good, but you have a bad heater. I also had a few years ago a Solomon station ( the station from where you get the tip) The problem of this station is that it has a slow temperature rise . Now i have the same station , modified with a heater element from ERSA ( 70W very thin). Your bad heater can be seen on the movie when you put that paper and temperature goes down. With my station i can engrave in ice cube with a only 30 degree celsius down of the limit that i set . This is because the heating time from 20 oC to 400 oC is rising in about 4 seconds :)
A lot of disappointed folks (including me) have built the one over here :- http://pcbheaven.com/projectpages/Homemade_Soldering_Station/
IT DOESN’T WORK AND THE AUTHOR IS NOT HELPFUL.
Anyone looking for an open source project can skip this.