This article will focus on developing a simple hello world program for android using Java. Google has recently released a “cute and fuzzy” programming environment for beginners to get into but I haven’t had the chance to try it, so we will be focusing on the Eclipse IDE here, which you should have set up in the last post. When creating a text based project there are two very important items. It will involve creating an android project, going through the necessary steps to complete both the (1) XML files and the (2) Java file and get this project ready for production and eventually deployment. The requirements of this project are simple, know the basis of XML (for new comers if you don’t that’s OK too, you will learn) and know Java (very basic knowledge but you will learn as we go and we will modify a few parts of the java file today).

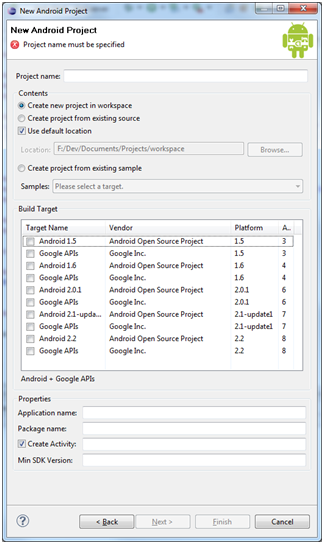
Start by firing up Eclipse and clicking File, New then Project. We are going to navigate to Android folder and select Android Project and click next. If you have updated your Android SDK correctly, your next screen will look like this. This screen requires we enter all data correctly including Project Name, Build Target, Application Name, Package Name, Create Activity, and Min SDK Version. These are important terms to know because they will control what keywords you can access and what your project looks like when you first create it. So to summarize:
-
Project Name: Will be the name you would like to use for your new project. In this instance we will use “HelloWorld” (I am a programmer and loath spaces you might choose to have them but it shouldn’t make a difference)
- Build Target: This will specify what API you will be utilizing in your projects. It is key to choose wisely or you may lose out on a wider audience than anticipated. It is always best to think of what your program will use and see if a lower build will support those functions before cornering yourself with a higher API. For this program we are going to choose Android 1.5
- Application Name: Will be the name you choose for your Application to be called. This can be changed later on and for right now we make that field equal Hello World.
- Package name: The package name will consist of your company’s standard package name that you would use or in my case I use my entrepreneurial one. For this I am entering in com.gregrjacobs.helloworld but you can enter in anything you wish. Also, make sure it is in all lower case for good coding practices.
- Create Activity: You will want to make sure that the box is checked before Create Activity because this option will do most of the work you just have to give it a name. NOTE: do not call this “Activity” as your project will cease to function and you have to go through the pain of making it all over again or manually correcting it. I am going to use HelloMain as my activity name, again use what you wish though.
- Min SDK Version: This will have to be a number you enter denoting the platform you would like to target and if this application will show up in the marketplace of certain devices. If you look to the build target devices after platform tab on Android 1.5 you will see the number 3 and that will be our minimum SDK Version. Once everything is filled out press Finish.
This will create the core of our project ranging from the Android 1.5 JAR file to our Java and XML files. The most important things right now are the files in the src/com.gregjacobs.helloworld/ folder and the files in the res/ folder. First we will look at the main.xml which is located in res/layout/. This file will hold the layout of your application including textboxes, labels, dateTimePickers and the like. In the main.xml we will see that we are using a LinearLayout which will organize items into a single row or column. This can be handy sometimes (other times not so much) and for this example it will work, so leave it like this because we will be displaying text so it makes no difference. Next is the strings.xml file which will conveniently house
all of strings in the application. This is especially useful to keep the clutter out of your Java and main.xml file. We are actually going to change the string called “hello” from Hello World, HelloMain! to Hello Android, Hello World! And our string named app_name can stay how it is.

After doing this we are going to navigate to the package name we created and open HelloMain.java and this will contain the code to run the XML files we were just looking at. The first line will contain our package name that the java file is associated with. Next, in the picture above, we have imported the OS bundle and the activity function that will run our app. Later on when we explore adding textboxes and labels we will be importing widgets into our files and we will put the imports just under these two shown above. Next is our class that basically says when the application starts up, set the view of the screen to the layout labeled main. This is interesting in the sense that you can design many different layouts depending on the state you application is in. Of course with a hello world program we only need this one layout but the option is there for you to experiment with.
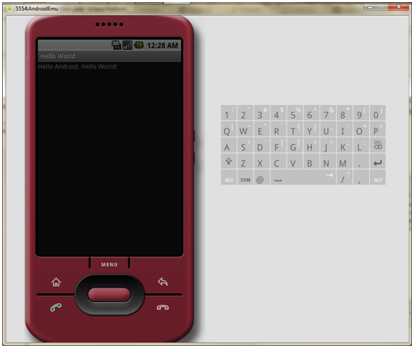
When we are done tweaking everything we wanted, we are going to build the application and run it on the emulator we created last post. To do this we go to the top of the eclipse screen and navigate to the button that looks like this and press it. This will prompt you to say what type of project you would like to run. We want to run an Android Application and press ok.
The emulator should pop up onto your screen and load up. The first load time of your emulator will be atrocious but after that you should have no problems with load. When the emulator is done loading it may ask you to press Menu to unlock, do so by pressing menu just under the screen. You don’t have to navigate to load your project it will do it by itself it just has to load the rest of the software and you should end up with a result like this:
When working with tools like the eclipse IDE and AndroidSDK, making simple text based programs is a breeze. The next post coming to this series will get somewhat more difficult by developing an improved Hello World program. If anyone had any problems with this today make sure to leave a comment and I will try to get back to you before the next post. If you can’t wait to look ahead to designing an interface for your android application or looking into databases, these are the places to go; Data Storage and User Interface. Until next post, happy hacking.
Continue on to Part2: Graphical Elements


thanks a bunch!
it works great!
when i created the new project though, it displayed APIs 7 and 8, therefore i can not use android 1.5 . it allowsme to use the android 2.1 and 2.2… any ideas?
This is excellent! Thank you very helpful and informative, I can’t wait till I do the next step. This was excatly what I needed to start developing for Android.
Hi, this is really cool. But I think you should mention how easy it is to set up a real phone to debug your programs. But over all a really cool tutorial, especially because I’m trying to get into Android. Thanks!
Love the tutorial, I really look forward to developing on this platform!
I’m a java noob, and scouring google left me with no results for my issue….
I encounter an error in my main.xml file on the LinearLayout line 2. My error description states “error: Invalid start tag LinearLayout” and I have not modified anything in this file. The code on the line is
<LinearLayout xmlns:android="http://schemas.android.com/apk/res/android"
followed by the orientation, layout_width & height.
Any Ideas? I'd appreciate any help!
@Greg
So the solution’s recorded, I had DavioP’s problem for a moment in Eclipse 3.5: By chance, I had strings.xml selected when I hit the run button, which led to the creation of strings.out.xml and an error. The solution was to click on the project root in the Package Explorer and then hit build. The clue was that I had no “Run As…” choice; it was trying a different kind of run.
Thanks for the solution to E_man’s problem, which I had in 3.6. Incidentally, 3.6 appears to be working fine so far…
Total novice…..im having a problem where it doesnt recognize a file, ERROR: Unable to open class file C:\Users\CHRIS\workspace\Helloworld1\gen\com\chriscutter\R.java: No such file or directory, but yet following that pathway i can find the file. Solutions?
Iam also facing same problem :
..\gen\com\chriscutter\R.java: No such file or directory.
Any pointers how to resolve….
Hi.. I really like the work youre doing :) As the two gentlemen above me, Chris and Kumar, I to am getting the same error. First time around I of course thought I was doing something wrong, so I deleted my project and started over again, but the error stays.. kinda stuck now and this is the only site I saw the problem addressed, so.. what are we doing wrong? (My eclipse and my andriod files are in different directories, can that cause the problem?)
About the error “\R.java: No such file or directory” i just closed down eclipse and opened it agian. problem solved. (new to this as well)
Thanks coby, that’s restarting Eclipse solved my problem with “\R.java: No such file or directory”.
regards
——-
subba
Re: “\R.java: No such file or directory”. If you’re using Eclipse, Project > Clean should also do the trick.
I really enjoyed this article and I would love to see more of this!
tsup guys, i learnt this a long time ago on the example scripts my app came with, where are the rest of the tuts? i know ruby, i want to know what i can execute on my android’s ruby shell and have it run right there and then
Awesome!
good stuff, but could you change the f*in color of this website, getting a migraine reading this
Great posts! I’ve gotten everything working so far except the last step. When I run the project, it opens up the android phone as you show, but my application hasn’t started. I’ve tried navigation to it, and it isn’t there either.
I know this post is around a year old, I was wondering if you had any advice?
how can i make a pdf reader for android mobile???
do you know any web site that could help me developing this software???
This article is great, but I cannot seem to get past the following error:
Error occurred during initialization of VM
java/lang/NoClassDefFoundError: java/lang/ref/FinalReference
Help Please!!
package com.srishti.helloworld;
import android.os.Bundle;
import android.app.Activity;
import android.view.Menu;
import android.view.MenuItem;
import android.support.v4.app.NavUtils;
public class HelloMain extends Activity {
@Override
public void onCreate(Bundle savedInstanceState) {
super.onCreate(savedInstanceState);
setContentView(R.layout.activity_hello_main);
}
@Override
public boolean onCreateOptionsMenu(Menu menu) {
getMenuInflater().inflate(R.menu.activity_hello_main, menu);
return true;
}
This is the code in the HelloMain.java
It says “- R cannot be resolved to a
variable” …I am a newbie so please help me solve this
hey… Greg… m a newbie.@ programming… but noe basics of java… however i havent understud d last line in code.wich is setcontentview…. what is d purpose of using it.. can u xplain me d stepwise execution of d last 2 lines of code.. pls..!
Very Nice Tutorial Greg R. Jacobs. Its very helpful for Beginners
When I originally left a comment I seem to have clicked on the -Notify
me whuen new comments are added- checkbox and rom now on every tike
a comment is addded I recieve 4 emails with the same comment.
Is there a means you are able to remove me from that service?
Thank you!
Reading this thing in 2020, anyone?