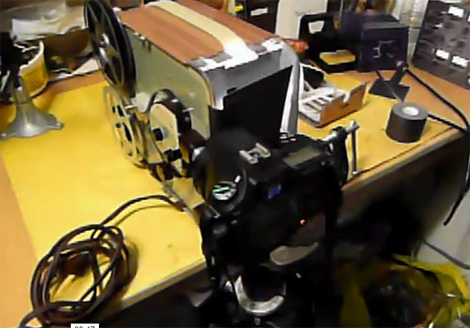
Many of us have these old 8mm family videos lying around and many of us have lamented at the perspective cost to get them converted to digital. [Paul] came up with a pretty slick way of digitizing them himself. He cracked open an 8mm projector and replaced the drive motor with one he could run at a much slower speed, allowing him to be able to capture each frame individually with his digital camera. He’s rigged his remote shutter control to the shutter of the projector so that it would be perfectly synchronized. There’s a video of it in action on the flickr page, and a video of the full 16,000 frame clip after digitization here.
[via Make]


Pretty good system; probably one of the best DIY transfers I have seen that isn’t a much slower manual process with a film scanner
But although it’s fast by comparison, it’s still slow enough that I’d highly recommend changing the bulb over to a broad-spectrum LED light source. If the machine jams while you are asleep you could be likely to wake up to melted/ruined film that you can never get back — or worse a fire.
It’s a nice setup. With three big drawbacks. But all are solvable.
Super 8 runs at 72 frames/foot. 50 foot rolls are all that’s available these days [3600 frames]. Some old rolls came in 200 foot lengths [14400 frames]. I have a few spliced together 400 foot reels (of regular 8, at 80 frames per foot). One or two reels won’t pose much of a problem. But when they start adding up, it’s going to put a lot of wear on the camera. A good pro DSLR will handle between 150k-200k shots before the shutter gives out. If you do this a lot, I recommend getting a good machine vision camera. About the same $$ as a used consumer SLR, and still mre than HD capable.
Heat. The projectors are not meant to run cool. They rely on the film moving past the gate fast to keep the heat from damaging the film. When you do freeze frame, they kick on extra fans. Luckily, many of the old bulbs can be replaced with plug in LED modules. McMaster-Carr had them for my old Bell&Howell projector. They might for others too. The other upside is that LED bulbs will last way longer than a straight replacement bulb will.
Lastly, diffusion. Not all projectors have adequate diffusion between the bulb and the film for evenly lighting the frame. This isn’t much of a problem when capturing reversal films (like Kodachrome or Ektachrome). But becomes critical when you want to capture reversal films (like Vision3). A bit of frosted glass or a couple of diffusion gels (with a LED bulb of course) would solve this cheaply and easily.
I LOVE seeing projects like these! Great job!
PS: Extra style points for shooting Pentax digital.
Hello Hubang, did your old Bell&Howell projector have a DLH bulb in it? If it did can you give me a part number for the LED module that you got from McMaster-Carr. I’m very interested in converting my 466ZB Belland Howell projector to a LED lightsource since the OEM bulbs now sell for $100+.
Thanks a bunch
No, it was a DLD bulb. It also looks like McMaster-Carr stopped stocking LED projector bulbs. At least, I can’t find it any more.
Excellent hack. This gives a much better result than those machines which transfer to NTSC encoded video. NTSC cannot encode the full dynamic range of Kodachrome film. I am surprised at how well each frame is registered. I did notice a lot of dirt on the tranferred images. This could be corrected by manually cleaning the film and/or by incorporating Particle Transfer Rollers into the film path. The Partical Transfer Rollers would work very well at the low speed used. See http://www.seapavaa.org/FilmPreservationHandbook/Treatments/PTR.htm
Great hack if I ever saw one. I have to wonder about the camera’s shutter life, though. Even if it is good for 100,000 exposures, doing this sort of thing will chew that up fast.
@Charles: I think part of the charm of this is that the particles transferred over to the film. It really maintains the look and feel that would come from watching that 8mm film.
I do think that John’s idea would definitely be worth a look. I had a projector jam on me and melt some priceless family film. Since then, I’ve switched anything I have over to LEDs. That might be worth a writeup and submission in and of it self….
Am I the only one who could only think about the shutter count on that poor camera? :P
what is the shutter life of a digital camera? if its 5million than not big deal, 1mil is another story.
dude you should start a transfer service. make your hack pay for itself and then some!
Shutter life can vary quite a bit but I found this that seems relevant for his camera:
http://www.olegkikin.com/shutterlife/pentax_k100d.htm
Just did the same thing without modifying a projector. Just project onto a matte white card, roughly 3 feet from the projector. Most low-end models can be or will naturally be focused at this range. Get a decent video camera and set it up parallel to the projector. Zoom and focus (I found it easier to focus on a sheet of paper with black and white print before runing the film). Correct cropping, etc later.
I have to agree the limited lifetime of a DSLR shutter mechanism (the top of the line D3 or 1D are rated for ~300,000 actuations) really make this more academic than practical.
The movie studios use some kind of purpose built scanner to digitize old films (saw on some television program).
oh someone beat me to it…i was going to do this with an aurdino and a powershot loaded with chdk using a sensor to trigger the shutter and also control the motor speed this could also facilitate fan control and thermal protection alas i haven’t gotten any farther than acquisition phase
Instead of LEDs, you could put an external xenon flash in the projector. Less power, less expensive, and much brighter.
8mm videos lying around? :)
I built a stepper motor attachment for a negative scanner, so I could do a dozen standard-8mm films.
Then I chanced upon someone who did it professionally, with frame-by-frame DSLR imaging for $20/reel. In the end I just got them to do it as my own effort would have dragged out for a long time. I had the option of getting them on a playable DVD or as the raw frames in an AVI, I elected for the latter so I could post-process them myself.
Better to just ‘get it done’ and preserve your family history NOW rather than put it off as a ‘gonna do’ because you never know if you won’t be able to do it – eg. house fire, film degradation or just plain misplacing or losing the films.
DIY telecine: http://www.cine2digits.co.uk/
and.. http://www.super-8.be/
an AVIsynth script to fix up the above:
http://forum.doom9.org/showthread.php?t=144271
and the video example:
http://www.vimeo.com/13173031
prospective
This is how I did it about 12 years ago: A crappy VHS-ish camcorder lol.
http://erikslaboratory.net/images/ProjectionXFerR.jpg
It’s nice having the actual projector running as the background noise in the film transfer, hearing the random sprocket pops, etc… I may re-do these with an HD camera soon, though.
What an idiot…That DSLR will be trashed after transferring one single movie. I would use a hi-res web camera, not something with a shutter.
Thank you for your thoughtfully worded advice, poot, but I dispute your poorly-thought-out assertion that I’m an idiot.
This was a retired dSLR with 50k shots on it already. The 17k more this project took isn’t significant. Want to put a number on it? 17k shots out of 250k expected, on a body worth maybe $200. That would be $14 well spent.
$14 is cheaper than my time it would require me to even find a ‘hi res web camera’, even if it would be suitable. Which, BTW, out of the box it would NOT be.
This is an excellent idea. One idea for the shutter is to perhaps defeat the internal shutter on the camera and just attache a rotating shutter within the projector mechanism (or use the shutter on the projector to begin with). Don’t let all these people get you down with their problematic observations. It’s people like you who just find a way to make things work.
I’ve worked with a WorkPrinter 8mm transfer machine which uses synch pulses between the machine and our crappy DV camera. Looking at the mechanisms it’s just a few bridge contacts on a rotating wheel, a 20Kohm resistor and a yellow rca cable lol. ANYHOW I’m rambing, thanks for the inspiration!
how about combining GregTheSquare’s advice with Rachel’s. defeat of the shutter on your camera, throw the whole setup under a black cloth or something to prevent outside light from getting in, and replace your projector lamp with a xenon flash connected to the camera. The shutter is always open, but no light hits the sensor until the flash fires. This solves concerns about backlight heat makes the setup a lot quieter (no fans, no shutter click), provides better lighting, uses less power, increases lifespan… ok i’ll stop. What do you think?
Genius! Did you project the image straight to the sensor of your pentax or did you have the projector lens on there?
Brilliant Sir. Thanks for giving us hope to preserve the 8MM Film that was part our family and something I have to tell my children about their Grandpa -ma. But using external xenon flash in the projector is great. Its less expensive as well.