3D Printing With A Delta Robot That Seems To Simplify The Concept

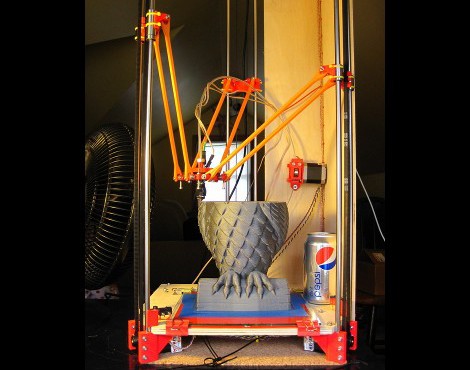
This 3d printing delta robot really seems to solve a lot of the hurdles faced by previous offerings. With other delta printers we’ve looked at the motor control of the three arms is usually a it complicated. On this build the motors can just be seen in this image at each corner under the build platform. Each motor has a belt that loops from the bottom to the top for the machine, driving an arm along two precision rods.

It’s also interesting to note that the printer head doesn’t have a motor mounted on it for feeding the filament. Instead, the motor is mounted remotely. You can see it above the soda can in this image. It feeds the filament through a hollow tube spanning the gap between the extruder and the motor. This acts as a Bowden cable. With less mass to move this may make it easier to control the location of the print head.

After the break you can catch a clip of the team showing off the speed and dexterity of the delta bot, followed by a printing demo.

Continue reading “3D Printing With A Delta Robot That Seems To Simplify The Concept”

Meizu MX Rooted Using The Bus Pirate

It is just amazing how small the boards are for some really powerful smart phones. For instance, the diminutive size of this Meizu MX Android phone’s board is only outshone by the intricate packaging the phone arrived in. [Adam Outler] did an unboxing of the device. But for him that mean tearing down all of the components and using a Bus Pirate to root the device.

In the video after the break he gives us a candid look at what it takes to exploit this piece of hardware. You might be a little spooked by the commands, which he reads aloud character by character, but watch closely and you’ll see they’re really quite common functions.

His rooting quest began by reading the datasheet for the main processor to find the USART parameters. With that information he hooked his Bus Pirate to ground, then probed around various test points on the board while it was rebooting until serial data started scrolling on the screen. He had found the USART lines and soldered a breakout connector onto them so that he had access after reassembling the phone.

From there he used the Bus Pirate to merge with the board’s terminal, then rebooted the phone using the Android Debug Bridge. Once it fires up, the Bus Pirate terminal window is sitting at a root prompt (many companies disable this but [Adam] was lucky). He remounts the internal file system to be rewritable, then uses the ADB to push the Linux substitute user (su) command onto the device as it will be needed by the Superuser.apk program. That is the next thing to be installed and once it is he officially has root.

Continue reading “Meizu MX Rooted Using The Bus Pirate”

Hackaday Links: July 13, 2012

Testing LEDs

Over at the Albuquerque, NM hackerspace Quelab, [Alfred] needed to test a bunch of surface mount LEDs. He ended up building a pair of 3D printed tweezers with a pair of needles attached to the end and a space for a coin cell battery. It works and Quelab got a new tool.

Woo Raspberry Pi

[tech2077] added an FTDI chip to his Raspberry Pi to do a little single cable development. We’ve seen a few similar builds, but surprisingly nothing related to the on board display serial interface. This wiki page suggests it’s possible to connect an iPhone 3G or iPhone 4 display directly to the Raspi. Does anyone want to try that out?  Nevermind, but it would be cool to get a picture from a display plugged into that display port on the Raspi.

I like to ride my bicycle, I like to ride my bike

Over at the 23b hackerspace a few people were having trouble finding a good bike cargo rack that wasn’t overpriced. They built their own with $30 in materials and a salvaged milk crate. It looks great and is most likely a lot more durable than the Walmart model.

If that cargo rack fell off, it would look like this

Apparently you can get ‘spark cartridges’ to attach to the underside of a skateboard. [Jim] saw these would look really cool attached to his bike so he did the next best thing. He attached them to his sandals. It does look cool…

Less heat, less noise

[YO2LDK] picked up a TV tuner dongle for software radio and found it overheated and stopped working after about 15 minutes (Romanian, Google Translate). He hacked up a heat sink from an old video card to solve this problem. Bonus: the noise was reduced by a few tenths of a dB.

Joystick Operated Security Cam Will Overlook The Moat

What good is a moat if nobody is guarding it? We suppose that depends on what beasties lurk beneath the surface of the water, but that’s neither here nor there. The members of LVL1 continue their quest to outdo each other in augmenting the building’s automated features. The latest offering is this security camera which is operated with an analog thumb stick.

These are the people who are building a moat (which the city things is a reflecting pool) in front of their main entrance. Now they will be able to see and sense if anyone is trying to get across the watery hazard. The hack marries an ultrasonic rangefinder and camera module with a pair of servo motors. The brackets for the motors allow a full range of motion, and the signal is translated by an Arduino and Video Experimenter shield to put out a composite video signal. That’s not going to make streaming all that easy, but we’re sure that is just one more hack away.

Laser Light Painting Includes Camera Control

This laser light painting setup can even control the camera. But it probably will not work with your average point-and-shoot. The exposure time used is somewhere around 2 seconds long, a feature which is hard to find on anything but DSLR cameras.

The setup relies on a red laser diode to do the painting. When viewed in real time you only see a dot tracing out a cryptic pattern and occasionally switching on and off. But with a long exposure the intense light persists to achieve an image like the one seen above. Note the ghosting around the rig as it has moved while the shutter was open.

The Arduino controlled device consists of a base which pivots the diode horizontally, with a servo for aiming on the vertical axis. Since the sketch is divided up by letter, we wonder how hard it would be to adapt this for use with a point-and-shoot? Perhaps you could capture one letter at a time and layer the frames in post production?

It seems this is a lot easier to build than some of the LED plotters we’ve looked at. If you do make your own don’t forget to send a link our way.

Continue reading “Laser Light Painting Includes Camera Control”

Garage Door Opener Now A Bedroom Door Closer

[Roy] had an extra garage door opener on hand and decided to put it to use as a remote control closing mechanism for his bedroom door. We gather he has some noisy housemates as the inspiration for the project came from not wanting to get out of bed to close the door when the ruckus interrupts his TV watching.

The image above shows the hinged system which translates the linear motion from the garage opener track to the rotational force necessary to swing the door closed. We’d say he really nailed it because the system matches the angle of the door jamb perfectly, and when the door is fully open the angle bracket is almost flat against the wall. We certainly don’t have the same need for closing doors, but the mechanism is something to keep in mind.

The motor for the opener is hidden beneath his desk. You won’t be able to see it in the video after the break because he built a matching enclosure around it. Now he just needs to add some WiFi connectivity and he can ditch the uni-tasking RF remote for a smart phone app.

Continue reading “Garage Door Opener Now A Bedroom Door Closer”