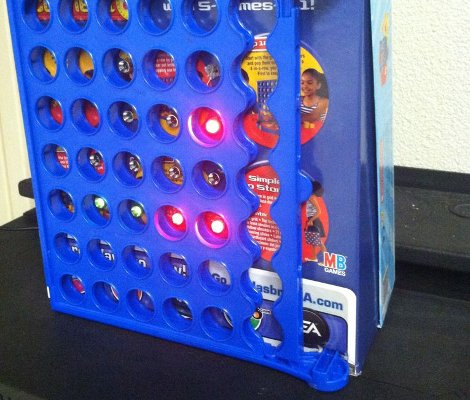
As part of a class at University, [Emacheen22] and his teammates turned an old Connect 4 game into a binary clock. This image shows the device nearing completion, but the final build includes the game tokens which diffuse the LED light. We enjoy the concept, but think there are a few ways to improve on it for the next iteration. If you’re interested in making your own we’d bet you can find Connect 4 at the thrift store.
Instead of using the free-standing game frame the team decided to use the box to host the LEDs and hide away the electronics. Since they’re using a breadboard and an Arduino this is a pretty good option. But it means that the game frame needs to be on its side as the tokens won’t stay in place without the plastic base attached. They used a panel mount bracket for each LED and chose super glue to hold all of the parts together.
We think this would be a lot of fun if the frame was upright. The LEDs could be free-floating by hot glueing the leads to either side of the opening. Using a small box under the base, all of the electronics can be hidden from view. After all, if you solder directly and use just a bare AVR chip there won’t be all that much to hide. Or you could get fancy and go with logic chips instead of a uC.


Aww, I was hoping they had one that would actually drop the game pieces (red for 0, yellow for 1) in as the time changed, and release them out the bottom to reset the row.
It’s doable if you don’t do seconds, and don’t mind the sound of clattering plastic every minute.
Me too, disappointment :(
this isn’t a connect 4. it’s a piece of a connect 4 game glued to a box with leds
Thats what I was thinking, I guess I don’t see the “hack” here…
You missed the word “Arduino”! (insert big smiley here)