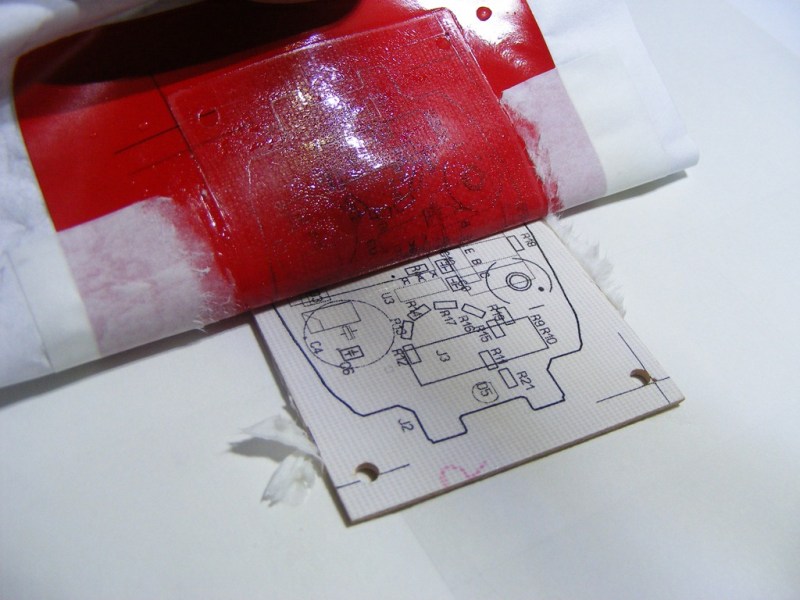
This toner transfer method uses a different material than we normally see. The red sheet being peeled back isn’t toner transfer paper. It’s printable vinyl used for both the resist and the silk screen.
The application process is almost the same as any other toner transfer PCB fabrication material. The printable vinyl stick is first adhered to a piece of paper before feeding it through a laser printer. It is acceptable to clean the vinyl with alcohol before printing if you think there may be a finger print or other oil on its surface. After printing it is carefully aligned with the board and ironed on.
[Mincior Vicentiu] thinks there are a few big benefits to this material. It seems that as you heat the toner it expands and hardens, but the vinyl actually softens to make room for this. We can imagine that this helps alleviate the smudging that sometimes occurs when ironing toner that is simply printed on paper. The other advantage is that the vinyl peels off quite easily after ironing, where as you need to soak paper in water and carefully massage it off of the toner.
[via Dangerous Prototypes]


That is the same dude who DP wrote about using the technique to do tonor transfer for etching in September
http://dangerousprototypes.com/2012/09/29/pcb-manufacture-using-oracal-vinyl-film-laser-printer/
he’s just doing the same for his silk screen.
I found that contact book covering (Duraseal etc, a self adhesive polypropelene) works along the same vein. Probably window covering film and shelf covering film from your hardware store too, indeed, I suspect that most any contact adhesive film will mostly work, stick it to sheet of paper, feed through printer, and then do the iron on, cold water dunk, and peel off ritual, you’ll just need to adjust the heat/time/pressure of the iron, and cooling time in water to suit by experimentation.
It’s your typical tonor transfer process, just without the scrubbing off of paper step since the vinyl just peels away (hopefully) cleanly.
Can you give it a try with dollar store vinyl (like contact brand) (Dollar tree carries it) and let us know?
Somebody put me onto this method a few weeks ago. I use it with a laminator ‘stead of an iron.
The cold water dunk is very important, and a bowl of cold water doesn’t do. I put it in the sink and run cold water straight onto the hot board for a bit. Usually till I can see the test print through the paper. Then don’t peel the vinyl BACK, but OFF.That is, lift it by a couple corners and don’t make a sharp bend where it leaves the board.
It leaves a the toner on the board neater than the blue paper does, and the copper underneath is smoother after the etch. I’m quite pleased with the results. Hadn’t thought of using the method for the silk sreeen, but then, I don’t do anything to align the vinyl to the board, just trim the board after transfering..
Vinyl gives off incredibly nasty fumes when heated.
Cutting PCBs with a saw gives off nasty fibres, developing can give off nasty fumes depending on the method, etching can give you a bad burn and also give off some toxic fumes depending on the method.
Really you shouldn’t be doing any part of the PCB manufacturing process unless you’re in a well ventilated area.
What’s up with Mike Szczys posting every article lately?
The zombies got everyone else.
They didn’t know how to open a curtain held shut by magnets.
the shower curtain groping may be the only groping they get!
So you can run this through any laser printer without it sticking inside it and gunking it up?
I think that because it’s adhered to the paper the very brief contact with the fuser heat is dissipated in the paper (ie, the paper is acting as a heatsink). Certainly I’ve had no problem feeding polypropylene contact film (for book covers) through for tonor transfer, stick to paper and feed to the printer.
That said, you can buy used laser printers for a couple of bucks fairly easily, complete with toner, at least I have bought a few for that sort of money here in NZ on our local equivalent of ebay/craigslist, use them until they die and strip for useful bits after. I have one out in the shed which I use for this.
I have used all sorts of gloss vinyl for this and haven’t found one that won’t work! Most I don’t even know what it is as I tend to just grab scraps that are lying around.
Vinyl should be fine in the printer as it is attached to the paper, on its own it would make a really horrible mess. It will also not melt at laser printer fuser temperatures unless it gets jammed in there. That is unless you have a 100 page per minute commercial printer or copier – they run REALLY hot! (trust me on this as someone who has spent a really worrying 2 hours trying to clean up a surprisingly expensive fuser unit)
I also use WD40 rather than acetone to remove the toner after etching – works far better than acetone (may just be for my printer but it works REALLY well. No idea why!)
I just scrub the toner off the etched board with a “green scrubbie” and no acetone. I’ve gotten some beautiful boards using this vinyl method and I’m very pleased with it.
No, you don’t heat the vinyl hot enough for it to give off its fume. At least, it works great in my Canon Imageclass D420.
My steps are:
1. Turn on the laminator. Important, you want it FULLY hot.
2. Print the reversed design onto a piece of paper.
3. Cut a piece of vinyl (mine is a fetching tint of purple) a little bigger than the design. Don’t worry about getting your fingers on it. It’s near impossible to do without getting your fingers on it.
4. Peel the backing and stick the vinyl neatly over the design. I sometimes goof this and have to start with step 2 again.
5. With a Q-tip or something, gently clean the vinyl of any grease or oil using alcohol.
6. Put the paper back in the printer and print the design again.
7. Scrub a board clean like normal. Here’s my technique:
A) Polish it both ways with a “green scrubbie.”
B) Wash it with soap and water.
C) Rinse it off with 91% (or better) isopropanol.
8. Clip the vinyl out of the paper and lay it face down on the clean, dry board. It’s handy if you leave the vinyl big enough to go over the edges of the board.
9. Run it through the laminator. Again and Again. Like 10 or 12 times. The board should be hot enough that it’s uncomfortable to hold on to. You don’t want it hot enough to brown the paper.
10. Quickly run cold water onto the HOT board. Get both sides. Keep the water running till you see the pattern through the paper.
11. Carefully peel the vinyl up by lifting the corners away from the board. Inspect carefully. Almost always you’ll see the neatest and cleanest artwork you’ve ever made. If you goof, you can always scrub it off and try it again.
I’ve had it fail when I didn’t get the board clean or when I’ve peeled the vinyl back against the board making a sharp bend. I think of “lifting” the vinyl, not peeling it.
I’m not getting something about this part:
4. Peel the backing and stick the vinyl neatly over the design. I sometimes goof this and have to start with step 2 again.
5. With a Q-tip or something, gently clean the vinyl of any grease or oil using alcohol.
6. Put the paper back in the printer and print the design again.
The original article also did a poor job of explaining this. So we print the design, stick it to a piece of vinyl, and then run it through the printer again? Why? Which side of this ‘compound media’ are we printing on – the paper side or the vinyl side? Why do the first print on paper to begin with if we aren’t transferring from the paper side of the media?
The rest of the steps appear to be the standard transfer toner from the paper side of the compound media, so I’m having further trouble understanding how this is any benefit at all.
Anyone care to clarify? If so, thanks…
Print on the paper first to make a “target” for where to stick the vinyl.
Stick the vinyl on to the paper over the design, then print on the vinyl side of the “compound media”.
The first print just serves as something to aim for and the paper is only used as the printers won’t (normally) take the vinyl alone without making a horrible mess.
Hope that clears it up for you.
Interesting. I work at a custom tees shop, where we have loads of printable vinyl and a heat press. I wonder how hard it would be to get ink cartridges filled with the proper material for printing….
What’s up to every , because I am in fact eager of reading this weblog’s post to
be updated regularly. It includes fastidious material.