
[D S] wanted his own head-mounted display. What you see here is just his mockup, but somewhere along the way he realized it’s closer to a finished build than just being a stating point. Not only does it work well for gaming, it came in at under $200 all in. You think your girlfriend makes fun of you now for wearing that big microphone headset while playing? Just wait until she gets a load of these!
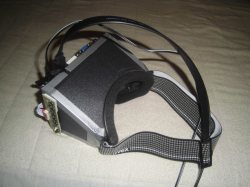
We’ve embedded an image gallery after the break as well as the description he sent us with his email. The display itself is a 7″ LCD module from eBay that boasts a hair better than 720P resolution: 1280×800. He’s using a pair of ski goggles to strap the display to his noggin. The enclosure is made out of foam board which should help keep the weight down. Inside there’s a Fresnel lens but after reading his description of how he measured the focal length we’re still not 100% clear on how he figured out where to mount it.
Though it may be missing the 3d of the rift,a quick mod could fix that and he’ll be well on his way through the journey to building his own Holodeck.

I just recently made a mockup for my head mounted display project that I will be refining over the next few months. However the mockup turned out so good that I thought I´d share it with you all.
Things needed for this project:
7″ 1280×800 resolution lcd panel with a controller board and buttons (can be sourced from ebay.com for between $100 – $150)
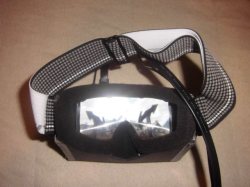
Skiing or snowboard goggles
Foam core plastic sheets
A postcard-size plastic fresnel lens (available at some book stores)
Plastic or crazy glue, double tape and duct tape.
Totaling at about $200 at max I think.
First I took the plastic visor out of the goggles and used it as a reference to cut out the fresnel and put that in the goggles instead.
Then I powered on the screen and plugged it into my computer to make sure it worked and have a picture on it to measure the focal distance which will be the depth of the casing (plus 2-3mm to accomodate for some double tape to mount the screen inside the casing).
I then got the foam core and cut out five big pieces for the front, top, bottom and sides and two small triangles for the nose piece. I used the screen and goggles and my ideal focal distance between the two as reference for the size and shape of the casing (Shape will vary with different goggles, size of screen and each individuals eyes so I will not go into that in detail).
I think the pictures should pretty much explain the rest.
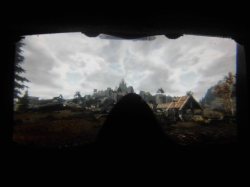
It only took me a few hours to get this together once I had all the material sorted and it´s greatly rewarding to put it on and play your favorite game on the equivalent of a movie screen.
I hope you guys like it and are motivated to make your own :)


It’s a tempting project, I’ve considered many variants of it myself in the past… but it always comes down to the fact that it might look like a movie screen… but it’s a movie screen with really, really, big pixels.
Once super high DPI monitors in those sizes are available at a reasonable prize – i.e. probably not anytime soon – I might just get on it.
Well, the projection screen doesn’t technically have any more pixels.
A good approximation of what is a “good” resolution is if you have pixels smaller than an arc-second. If you assume the screen is placed 5″ away, then 1280 pixels is good enough for a 2.1″ panel.
Except this is a 7″ screen, so basically you’re just repeating exactly what I said; not enough pixel density.
Which doesn’t make it any less cool, but not good enough that I’d spend money putting it together.
Well then you just have to place the panel further away, or use optics to shrink the apparent size down.
Which destroys the viewing angle.
But with such construction you have to ficus your sight on very short distance, it’s not good.
Cool article!
He’s using a fresnel “thin” lens, if mounted correctly the eye will focus at infinity (relaxed state)
The problem is getting a quality lens to minimize aberrations, if you see the image you can see some fringing (chromatic aberration). There might be some triplets sets suited for that, maybe sourcing parts from binoculars?
I’d be interested to see this project using an iPhone for the display. Maybe building a spot where your phone could just slide in? Should give you a nice high quality display to work with and reduce the build cost significantly.
It would significantly increase the cost because iPhones cost $5-800, but of course if you already have one could use it for something like this without having to buy an extra screen. This could be made to use any high-res screen phone, some of the Android ones are less than $200 now.
The good thing: on ebay one could buy an new iphone4 display for around $15.
The bad thing: as far as I know there is no way of driving them.
Though it would be a great start: 2 iphone screens, a open hardware controller, and a shapeways housing.
One could build such 3D headmounted display for under $100,-
Check out the FOV2GO, it is exactly what you describe: http://projects.ict.usc.edu/mxr/open-source/fov2go/
I was a lead on that project, you can get a lot of bang for your VR buck!
Very cool! Would this work for watching a standard video/app or does it require the VR apps?
I found a pair of old spectacles for someone with very bad hyperopia (convex lenses) at a charity shop, and did just this with my android phone. No extra software required – the YouTube app plays side-by-side 3d videos :)
There’s fringing at the edges, but overall, it’s Not bad for 2 euros…
I’m quite impressed.
This is just what i need.
Add 1 android mini pc.
With a single display like that, I would think convergence would be a problem. Most head mounted displays have a separate smaller display for each eye so that even if you don’t take advantage of it for 3D, the image appears straight ahead for each eye.
Could be done with software..
Pretty sure most modern video cards that support stereo 3D can output a side-by-side image. That should do it in this case.
Blenderplayer does this as well, without the special 3D output from a (high-end) card.. chk it out @ blender.org
For “relaxed” viewing you should have separated displays for each eye. Even with Fresnel lens you have to “cross” your eyes to look at the center of monitor
The better option would be to split the screen in half, and for non-3D applications send the same image to each side.
As long as he can get the screen in focus at infinity at the right distance, each eye effectively has their own screen. Two different images accounting for parallax will give Oculus Rift-like 3D.
You lose resolution like this, but you get a much higher field of view than something like the Vuzix HMDs.
I’m tempted to try to make one myself, using my phone as a placeholder screen until I can get something permanent. Wouldn’t work for gaming with the phone, but it would serve as fantastic proof of concept
“You think your girlfriend makes fun of you now for wearing that big microphone headset while playing?” Because all gamers are straight men, amiright? Ugh. This kind of casual sexism is probably less common on HAD than other places, but it’s still annoying when it crops up :/
That’s the most pathetic thing I’ve ever read on this site. We have skin to protect us from the external world, try growing some to protect yourself from “casual sexism”.
You’re right! My complaint is pathetic, while your complaint about my complaint is completely justified. Oh dear, now I’m complaining about your complaint about my complaint. Let’s see how deeply we can nest our complaints!
Won’t you both just shut the hell up? I can’t stand these stupid complaints about stupid complaints. /s
You guys are horrible. Comments should never be nested so deeply!
We must be straight men? Fascinating how you ignore the lesbians among us.
It’s mostly girls that would mock/complain since men are more into tech and games, so when gay the other party would get it.
Isn’t it way to heavy to just wear it with the goggle strap?
It kind of is but I´m going to extend the cables for the screen so that I can have the driver board in a box on my belt, which should lighten it sufficiently to sit comfortably on the face :)
The Driver board he is using appears to be one i just got in the mail from Shenzhen, China this afternoon.I bought mine for a gateway laptop lcd I had re-purposed for a side monitor…on my gamer.
But any ways yeah this looks like a fun project to try out in the future …albeit I would prolly use a different display for the Viewer.The lens seems to be a fairly decent idea though.
Is there any link to this project? I’d be really interested to know where the Fresnel lense was sourced from.
Maybe [D S] could provide a hint?
I got the fresnel lens at a local book store ;) They have them in credit card size, elongated credit card size and postcard size and probably more .
I´m thinking about SBS 3D in which case I´d probably try two credit card sized fresnels rather than a typical round lens.
Nice looking hack, i bet it adds a certain claustrophobic feel like if you were really wearing a armored helmet and goggles. To the one gay kid on HAD, don’t worry your not the only one who doesn’t have a gf
I believe it could, yes, but the screen is just big enough for you to feel like you´re looking out a really big window rather than into a box.
I am however going to keep working on this and try to extend the view to full fov.
But we´ll see how that goes.
the screen is the same size and resolution as a nexus seven…
just had an idea to attach a view-master to my nexus…
how the heck am I supposed to wear this and the eye tracker at the same time!?
Extend the top of the screen panel up a little for a camera, add an IR led below the screen. Add a IR reflective pad to the bridge of the nose for reference….. job done.
You don’t come here very often do you :-)
Maybe another idea besides the Fresnel lens is just using reading glasses 4+
Doesn’t look any worse then google glass.