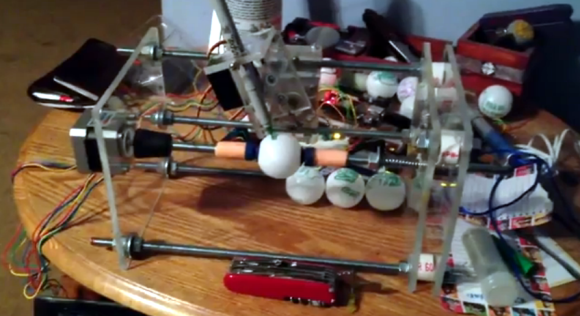
This is one of the simplest CNC builds we’ve seen but it still functions quite well. It’s a clone of the EggBot, but is aimed at printing on spherical Ping Pong balls rather than oblong eggs. [Chad] calls it the Spherebot, but you should be careful not to confuse it with the morphing sphere robot which can walk around like a hexapod.
The project is both mechanically and electronically simple. The body of the printer is made up of three acrylic plates, which we’re sure were clamped together when drilling holes to guarantee proper alignment. Threaded rod and nuts are used to mount the plates to one another, as well as to hold the sphere in place while printing. One stepper motor turns the ball while the other pivots the pen mount. A servo motor is responsible for lifting the pen. The entire thing is driven by an Arduino along with two stepper motor driver boards. Don’t miss [Chad’s] presentation embedded after the break.
[via Reddit]


Nice use of Nerf darts as well :-)
Not many comments on hackaday these days, ay? Someone must have ducked up the comment code… (on android, stock rom, this shit doesn’t work).
The SwAK (Swiss Army Knife), what function does it provide?
I was using it for the screw driver. The back plate of the pen holder slides up and down. the small angled screwdriver allowed me to make adjustments easily.
I was on Hack A Day and did not know it!?!
For those of you finding this even later than I am, I went with this design because everything is adjustable. The pen mount can be adjust left and right as well as up and down and even a little forward and backwards on the post to help center the pen over the object. The “sphere” holder is adjustable on the right side via two nuts.
Clamping the 3 acrylic sheets would have made drilling on my drill press difficult. I squared the edges off and used packing tape to hold everything together while drilling. Nothing moved and the tape came off with the protective plastic sheets. I like working with acrylic now.
I have printed on eggs with this (http://youtu.be/iaS9B83oDhk), but I bought a gross of ping pong ball like objects for testing real cheap.
I use Inkscape with the Unicorn plug-in to create the G-Code. After tracing outlines of images in Inkscape, I do a lot editing to remove unnecessary dots and lines to keep the images as simple as possible before exporting. The software I used to send the G-Code to the Arduino is a custom .net WinForm application that will probably never be what I wanted it to be because this experiment launched me into 3D printing. I have gathered all the parts and have started construction on my acrylic Mendel90.
SphereBot is the name I got from Zaggo’s site (http://pleasantsoftware.com/developer/3d/spherebot/). I did not use his templates or software and added a lot of my own stuff to the design as I was stumbling along, but his site was a huge inspiration for what I was trying to accomplish. Thanks, Zaggo!
It’s funny that I built that as proof that I possibly could build my own 3D printer. Now on Thingiverse there are a lot of eggbot clones that look like it, but better.