Bode Plots On An Oscilloscope

bode

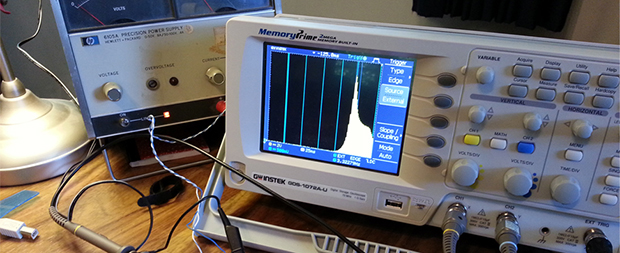
Bode plots – or frequency response graphs – are found in just about every piece of literature for high-end audio equipment. It’s a simple idea, graphing frequency over amplitude, but making one of these graphs at home usually means using a soundcard, an Excel spreadsheet and a multimeter, or some other inelegant solution. Following a neat tutorial from [Dave Jones], [Andrew] came up with a very simple way to make a Bode plot in real-time with an oscilloscope, a microcontroller, and a few off-the-shelf parts.

The basic idea behind [Dave Jones]’ impromptu Bode plotter is to configure a frequency generator to output a sine wave that ramps up over a period of time. Feed this sine wave through a filter, and you have amplitude on the vertical axis of your ‘scope and frequency on the horizontal axis. Boom, there’s your Bode plot.

[Andrew] did [Dave] one better by creating a small circuit with an Arduino and an AD9850 sine wave generator. Properly programmed, the AD9850 can ramp up the frequency of a sine wave with the Arduino outputting sync pulses every decade or octave of frequency, depending if you want a linear or log Bode plot.

It’s a nifty little tool, and when it comes to building test equipment from stuff that just happens to by lying around, we’ve got to give it up for [Andrew] for his really cool implementation.


Compact Fluorescent Grow Light

compact-fluorescent-grow-light

Spring is on the way for our friends down under. With that in mind [x2Jiggy] built this compact fluorescent grow lamp to help start the seeds for his garden. He used materials that are easy to find, and multiple bulbs means that you can mix and match their color warmth in order to get the wavelengths of light best for plant growth.

He started by building the box out of MDF. It is lined mostly with a reflector meant to go in your car’s windshield when you leave it in a hot parking lot. He sealed the seams of the reflector using what he calls flashing tape. This is the rubbery type of stuff used as soft flashing around windows.

The bulb sockets came from an old string of party lights. Wiring is run through plastic junction boxes which keeps the setup code-compliant. Each of the CFLs draw 20 Watts for a total consumption of 160 Watts. Combine this with a DIY hydroponic tent and you’ll be eating fresh greens year round.

Continue reading “Compact Fluorescent Grow Light”

Rescuing An SD Card With An Arduino

A few days ago, one of [Severin]’s SD cards died on him, Instead of trashing the card, he decided to investigate what was actually wrong with the card and ended up recovering most of the data using an Arduino and an immense amount of cleverness.

SD cards can be accessed with two modes. The first is the SDIO mode, which is what cameras, laptops, and other card readers use. The second mode is SPI mode. SPI is slower, but much, much simpler. It turned out the SDIO mode on [Severin]’s card was broken, but accessing it with an Arduino and SPI mode worked. There was finally hope to get files off this damaged card.

[Severin] used a few sketches to dump the data on the SD card to his computer. The first looked at the file system and grabbed a list of files contained on the card. The second iterated over the file system and output all the files in hex over the serial port. With a bit of Python, [Severin] was able to reconstruct a few files that were previously lost forever.

Even though the SD card was completely inaccessible with a normal card reader, [Severin] was able to get a few files off the card. All the sketches and Python scripts are available on the Githubs, ready to recover files from your broken SD cards.