The latest Hackaday Hackerspace Henchmen entry comes from [Bremster] and the Connecticut Hackerspace. He mentions that he’s been meaning to write about the PCB/engraving mill used at the hackerspace for some time, but it was the HHH program which motivated him to do so. Yay! That’s exactly what we envisioned with this and we hope there are more submissions which will encourage us to continue and expand the program.
We think this is a perfect CNC project for any hackerspace whose members are into electronics. It’s compact, and we find milling PCBs to be more desirable than chemically etching them; the tool should get quite a bit of use. This particular build uses x, y, and z axis hardware which was pulled separately from unknown machinery. Like any good hacking project, the fabrication process was so addictive that [Bremster] stayed at the space all night, breaking at 5am to shower and eat before heading to work.
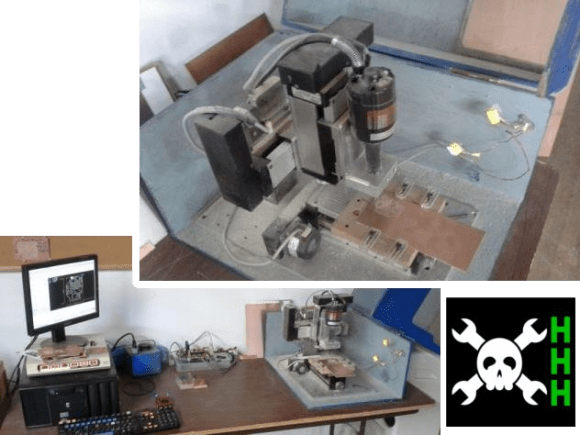
It originally used a Dremel rotary tool but had too much play in the mounting mechanism. When they replaced it with the motor shown above they also machined an aluminum bracket that dramatically stabilizes the cutting bit. This results in clean PCBs, and they’ve even used it to make stamps for their hackerspace passports. There is an enclosure attached, which has been hinged to the right for the two images above.
Check out the demo video below, and get your own CNC submission in for the HHH program before the October 31st deadline.


Man that’s dumb. Why don’t they just etch boards?
I wish their web page had links to higher resolution images. It’s hard to make anything out in the small photos.
People need to start using real cameras instead of cell phones to take pictures and videos (vertical video?)
Oh no doctor..
sob
.. it looks like another case of VVS!
http://www.youtube.com/watch?v=Bt9zSfinwFA
But nice job on the engraving mill.
Personally, I have nothing against vertical videos. In this case, it matches the subject matter quite well. A horizontal video would just add a lot of wasted space on the sides. Sure, it’s “non traditional” but that doesn’t mean there’s anything wrong with it. If I had to complain about the video, it’d be about the subject. I’m not really interested in scratching stars in plastic. I am interested in the machine.
I was hoping to be able to make out more of the details of their implementation that I can with the small photos. I’m trying to figure out why I’m the only person in the world who needs pull up resistors on the enable pin on the Pololu controllers to keep it from jittering on power up.
“we find milling PCBs to be more desirable than chemically etching them”
Please open this up a bit. Why? Milling seems to be quite hard to get right, especially for SMT stuff. It is noisy and very slow compared to etching. Okay, etching has chemicals involved but between muriatic acid and fiberglass dust, I’d take the acid any day :)
Yeah, a good addition to that mill, would be a dust-tight cover (Lexan?) and a robust dust collection system. Fiberglass dust is not nice (and the epoxy resin dust probably isn’t that good either)
It has a cover that’s hinged on the right. It’s just open in the pictures so you can see something other than a blue box.
No mention of dust collection though.
Well of course etching is the standard way for making PCB’s and for many good reasons. These hacker projects are rarely about the best way to do something. I would bet that the folks who made this contraption know more than when they started. It is often by experimentation that we do stumble upon a better way to do something, or come up with something entirely new. Stuff doesn’t have to be revolutionary to be cool.
JB, I agree that the video would have come out better if higher quality gear had been used but maybe the PCB mill’s parts ate up so much of their budget that there was no cash left over for a really nice video camera. That’s where I am with my CNC project; I really want one of those Go Pro cameras or a sub $1,000 DSLR. If I can’t borrow a real camera, I’ll have to settle with my iPhone or my buddy’s Droid.
Just a couple of thoughts I thought I might share.
We have a mill at Sector67 (Madison, WI), and I MUCH prefer it to etching. Here’s why:
* Consistent results every time. Etching can vary based on temperature, how irritable your printer is that day, all kinds of things. Milling doesn’t change.
* Holes + traces in one process. I use the same bit and do my through hole drilling at the same time, so I never have alignment issues, and I don’t have a separate process for making my holes.
* It’s a lot better in terms of chemicals and hazards. I don’t mill FR4 because the fiberglass particles are dangerous. I use Bakelite, which is pretty cheap off dealextreme, and cuts like butter on the mill. It’s so smooth.
* From Eagle to board is a single plugin. Just run the PCBGcode plugin and it generates the gcode used for the mill. Tape the board onto the mill, home the XYZ, and press go. Etching requires many more steps that require a lot more setup.
Etching is more appropriate if you must do FR4 (like if you’re doing 2 sided. I haven’t found 2 sided bakelite). Also the FR4 is stronger; I’ve had traces break off on milled bakelite boards more often than on FR4 especially when mechanical stress is involved like headers.
Temperature? You’re supposed to heat your etching solution. Heat it, bubble it, and in 2 minutes you have a done board. If milling was even remotely viable don’t you think it would be done commercially? Pros use spray. I’ve seen some amateurs spray too, but that to me is a bit much for what it is worth.
i’ve taken up using a dremel to do most of the boards i need(most of my designs are through-hole, though i have done some widely-spaced smd stuff this way as well).. yes it looks worse, but it still functions the same, and really, the worst part of pcb creation for me is 2-fold:
first, transferring the artwork rarely works correctly all the time, so i end up making 2-3 extra boards ‘just in case’.
second, most of my projects are less than 9″x 11″, and a single etching bath is all that’s needed, so to mix everything, get everything setup, warmed up, etc, for a single board.
the setup time alone takes as long as it takes me to just knock it out with the dremel, and there’s zero risk of liquids spilling with the dremel method..
Bob you might want to check for the safety of milling Bakelite stuff – it is not fiberglass but a quick search online suggest some carcinogenic particles get airborne.
For the other points you mention I agree with the drilling issue but other than that I disagree. If you have a non-Brother-brand laser printer and a laminator you can consistently get good results from etching with Muratic acid + H2O2 combo.
Here’s a board with 0.5mm pitch lcd connector
http://postimg.org/image/k8jxwlhgz/
I don’t think it would be so easy to get this milled.
A somewhat respectable CNC Mill is capable of at least 0,1mm precision, usually 0,05. This is better than the normal home printer. The only limit is the size of your mill bit, which can go to about 0,6mm as far as I know.
Wish they would have given details on the spindle. For some reason, they can tell us the first spindle was a dremel, but the second one is some sort of secret?!? :-| Who made it? Where did you buy it?
I’ve thought of building a mill and sources for parts are crucial information.