Wireless Keurig Hack!

coffeemaker

[Kolumkilli] loves his Keurig coffee maker, as it makes him an excellent cup of coffee, but he doesn’t like waiting for it to brew. So he set out to make it wirelessly controlled via his computer… with the press of a button, he can have his coffee ready and waiting for him when he gets up.

After carefully dismantling his Keurig, he set to locating the main buttons on the PCB, and proceeded to wire in relays in parallel to the ones he wanted to control. Throw in a Moteino and add the notification LEDs as inputs as well and now he can control and monitor almost all the coffee maker’s functions via a web browser at his desk. Now if only he could remember to put a new coffee cup in…

There’s a great writeup on the forum post, so if you want to see a more detailed build log, check it out! And if you’re looking to add even more functionality to your Keurig, why not run a waterline to it?

[Thanks Felix!]

Keep Your SD Cards Data Safe With The SD Locker

sdlocker_1

[Karl Lunt] has come up with a simple circuit for protecting data you have stored on SD cards. As is relatively well-known, the little lock switch on the side of most SD cards really doesn’t do anything more than the switch on floppies or the tabs on VHS or cassette decks. It’s up to the reader/writer to check the status of the tab and decide if it should write to the card or not. Not a very safe system. However, it’s not the only write protection system built into SD and SDHC cards. As part of the standard, cards have three protection methods: A TMP_WRITE_PROTECT bit, a PERM_WRITE_PROTECT bit, and a PWD register.

The PERM_WRITE_PROTECT bit permanently write protects the card. The bit can not be reset, so you should be really sure you want to keep the data on the card forever. The PWD register is a password register. The card will not allow any access (read or write) unless a password is provided. The TMP_WRITE_PROTECT bit is a temporary write protect. This is the bit that [Karl] is working with. When TMP_WRITE_PROTECT is set, the card can be read but not written. Note that there is no true protection here, as anyone can modify the bit. However, this should stop grandma from accidentally deleting your wedding pictures.

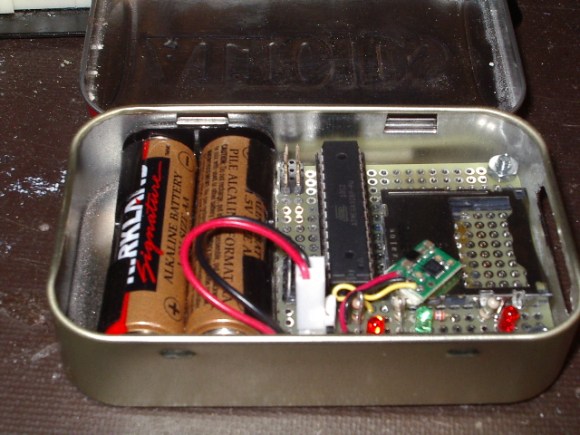
[Karl’s] device is very simple. A card is inserted into an Altoids tin enclosure. One button locks the card, another unlocks it. Three LEDs return status – power, card locked, and card unlocked. Under the hood, he’s using an Atmel ATmega328 to set and clear the TMP_WRITE_PROTECT bits. Power is provided by two AA batteries, and regulated with a Pololu 3.3v boost regulator. [Karl] has also included a serial port for control and debug information. We think this is a great hack, however one thing we’re not sure of is how or if these features are implemented in all cards. We’re relatively sure the name brand cards stick to the SD/SDHC spec sheet, but what about all the knockoff and no name brands from overseas?

Reverse Engineering The Sony Ericsson Vivaz High Resolution 640 X 360 Cellphone LCD

In our opinion, reverse engineering may be one of the best ways to tease your brain. [Andy] just did that by reverse engineering the Sony Ericsson Vivaz high resolution LCD (cached copy here). In his (very) nicely written article, [Andy] explains all the steps that led him to the result shown in the picture above. He started by finding the repair manual of the Vivaz, to discover that the display could be interfaced with 8080 type parallel signals. That meant that he could use a standard microcontroller without high speed buses to interface with it, in this case the STM32F4. Next in his adventure, [Andy] ordered the appropriate connector and took a more educated guess for the onboard microcontroller. A long Google search brought up the R61523 from Renesas. So he designed his breakout board, got it produced and a few hours later a nice picture was being shown on the LCD. He even took the time to compare the original display with the clone he found on the webs, and modified his graphics library to support this display.