[Abhimanyu Kumar] was watching YouTube videos one day when he came across something called a Polariscope — After learning how it worked, he discovered you can make your own using household items!
First off, what is a Polariscope? Well, put simply, it is a device that can show you the photoelasticity of a clear specimen, which can reveal the stress distribution in the material! And it is actually really easy to make one.
All you need to build your own is:
- A polarized light source (any modern LCD monitor)
- A transparent specimen (plastic cutlery, glass statues, plastic you can bend, etc)
- A circular polarizing filter (the cheap 3D glasses you didn’t return at the theater)
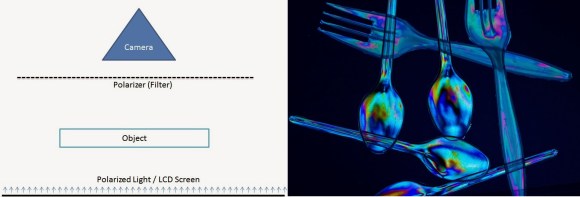
Then just place the objects in the order shown in the diagram and start snapping some photos. This would be really cool for checking stress concentrations in a project — provided you are using some Lexan or acrylic!


Surely a circular polarizer wouldn’t actually work here? Circular polarizers don’t do anything visible to planar polarized light; it’s why you can see your cell phone while wearing the more expensive 3D glasses regardless of the angle your phone is at.
You need more than just the polarizers. A circular polariscope also incorporates a set of quarter waveplates (to obtain circular polarization from linear polarization):
http://en.wikipedia.org/wiki/Photoelasticity
This is an interesting project, and will give quantitative information about the *magnitude* of stress in the material, which can be calculated by counting the observed fringes. One should use monochromatic light ( upper limit on linewidth of ~30 nm FWHM) to reduce errors caused by multiple fringes from broad wavelength light. These are known as isochromatic fringes.
Since stress is usually a vector, you’d obviously like to have some information about the direction of the stress as well. This is where the circularly polarized light comes into play. When using circularly polarized (monochromatic) light, you can now gain information about the direction of the stress as well as the magnitude. The resulting fringes are known as isoclinic fringes.
http://academic.mu.edu/phys/matthysd/L1980203.htm
The setup using circularly polarized light is, of course, much more complicated than the linear case. We use this technique quite a bit to measure laser-induced stress in silica glass.
Awesome stuff!
I did a similar project (on my now abandoned blog) a few years back. Regular polaroid is readily available for cheap on ebay.
http://amateurscientistblogs.blogspot.co.uk/2010/08/few-notes-on-polarization-and.html
Good write up! You should continue your blog.
Typically you don’t use a circular polarizer, you use a standard linear polarizer. There are places that sell polarizing sheet in rolls on-line. I helped a friend finish an art piece showing strain with glass. I made a giant polariscope from a large backlight section from a lcd panel and a frame to hold the glass. The viewer held another piece of polarizer to view it:
http://www.flickr.com/photos/67292116@N00/5135263104/in/set-72157624980669265
This is an excellent resource if anyone would like to read up on polarized light microscopy:
http://www.microscopyu.com/articles/polarized/index.html
Enjoy!