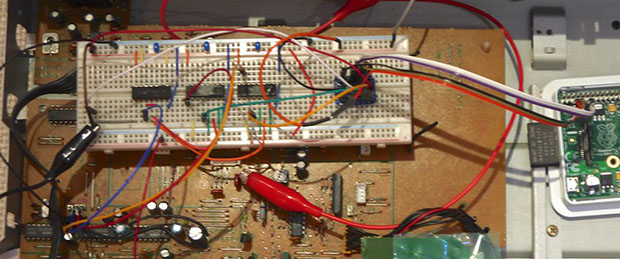
Before the days of iPod docks in every conceivable piece of audio equipment, most devices were actually built very well. Most shelf top equipment usually came with well designed circuits using quality components, and late 90s CD players were no exception. [Mariosis] heard of some very nice DACs found in some of these units and decided to take one out for a spin. He’s using a Raspberry Pi to play audio with the DAC found in a late 90s Kenwood CD player.
After fortune favored a CD player with a dead drive on [Mariosis]’ workbench, he dug up the service manual and found some interesting chips – a PCM56 DAC, a little bit of logic, and an SM5807 oversampling chip that does all the conversion for the DAC.
This oversampling chip uses an I2S – not I2C – bus to carry the data from the CD to the DAC. There is, of course, an I2S driver for the Raspi, but the first attempts at playing audio didn’t result in anything. It turned out there was a problem with what the oversampler expected – the ‘standard’ I2S signal delays the data one tick behind the LRCLK signal.
There are two ways to fix this problem: programming a kernel driver, or building some custom logic to fix the problem. Obviously breaking out some flip-flops and NOR gates was the cooler option, giving [Mariosis] a great sounding stereo with a vintage DAC.


if you want something done well, these days you have to do it yourself and thank God you can! Can’t trust others to always do it for you from the kindness of their heart….
Very nice DACs? Something which have to be experiences? After a brief googling it seems to be described as “the volkswagen beetle of the DAC world.”
Agreed, early oversampling DACs ended up giving oversampling such a bad name that to this day some people swear that NOS is the only way to get good sound, … despite what actual distortion tests tell us.
Had no idea what NOS was but I guessed it was valve. Is NOS nasty old stuff ?
NOS would be non-oversampling I presume? Not New-Old-Stock what you had in mind.
I first thought went to nitrous oxide system
Noob question: can anyone explain to me how oversampling a bitstream already sampled at 44.1kHz works in such a setup? I understand that DACs working at a higher frequency will require less steep lowpass filter. So is the basic idea here to add some dither while upsampling the PCM data before sending it to the DAC? Does this sound about right?
Not dither but interpolation. If record a waveform with frequency components from 0..22kHz, and you sample it with 44.1 kHz, you have all the information to do a perfect restoration of this waveform. So, you can perform this restoration (or a close approximation) in the digital domain, and then generate as many intermediate sample values as you’d like.
>Changing this to 0 should do it. But I dont like to compile a RPI Kernel now
On one hand Im loving this, because he researched stuff, debugged, understood the problem and build something that fixed it
on the other hand programmer in me died inside, its just one bit in the driver :/, you could probably reverse engineer the compiled driver (throw it under hexrays) and just hex edit that particular bit without recompilation
Heck, even recompiling the kernel should be simple; I mean, if I was able to do it under TurboLinux 2.0 on a 486 with 8 meg back in the day – to do it on an rpi today shouldn’t take anything…
At some point the linux kernel got so unreasonably enormous that compiling it on anything but the newest of machines became an utter chore. Even incremental builds take ludicrous amounts of time as it decided to go hem a pair of pants or something before you get your new module.
Nevermind self-hosting compilation on something like the RasPi, which is roughly comparable to a P3 or early Athlon in speed: I’d expect it to finish sometime 24h later.
I recompiled the kernel for an ARM device a few years ago, and it doesn’t take /that/ long.
On a Phenom II x6, it takes 2 minutes if on a tmpfs or SSD. It takes about 20 min on a mechanical hard drive. Admittedly, that’s only after you’ve got your cross-compiler setup.
Compiling it on a Tegra 2 takes about 10 hours, IIRC, so 24 hours is probably a good estimate for a RPi.
The point about not having custom code modifications is that once you tweak something in Linux, you essentially become the maintainer of your own private branch of the OS, and that takes more work than it’s worth.
The solution he made works even if he later decides to update the software on his RPi to something else.
or you do like the rest of th planet and send patches to the original maintainer, get them approved and then just use module options when loading driver
I remember something about the Playstation 1 having a really good DAC.
oh god, that reminded me of this old gem:
http://i.minus.com/iV6P8rljn874x.png
That’s pretty funny, actually. I’m guessing they are serious but it makes me want to do that with an old walkman cassette player – just because.
It’s called microphonics. All sorts of components from glass tube diodes to capacitors and inductors are actually sound sensitive and can feed back vibrations into weird reverb effects.
are you sure>? Can this be exploited somehow?
Technically that effect is a real thing but it only is a realistic concern in certain situations. For a turntable, it’s huge. For a tube amp, it can be an issue. For modern solid state electronics, it is far too negligible to cause any audible change.
Unless you have shoddy components that are specifically sensitive to vibrations, which isn’t too far-fetched in something like a cheap game console made 20 years ago.
High K plastic capacitors for example are prone to microphonics because the insulator material exhibits a piezoelectric effect when deformed. The thing is, you have to be listening to some really loud music before it starts to have any appreciable effect.
From a practical point of view, in something like a PS1, the only place where microphonics can happen is between the DAC and its output amplifier, and if those two are in the same chip then there’s probably no chance that it’s strong enough to affect the actual line output signal.
The other place at fault is old dried up electrolytic capacitors or badly would inductors with loose coils that can vibrate, that would inject noise into the power supply of the analog audio circuit.
Vintage DACs are the new tube amps.
Late 1990s is “vintage” now? I must be getting old…
https://www.hifiberry.com/products/dac/first-steps/
is currently 404…