 Silkscreening isn’t as hard as it might seem. For instance, it’s easier than block printing because you don’t have to reverse the image. [Jimmy DiResta] shows how easy it is to put a silkscreening setup together and print on wood, metal, and, of course, t-shirts.
Once you decide on a design, print it out on an acetate sheet which can be run through a regular household printer. You can buy ready-made meshed frames or even entire kits, but [Jimmy] shows you how to build a simple frame and staple screen mesh to it. After sealing up the edges, mix up some photo emulsion, cover the mesh, and let it dry in a dark room.
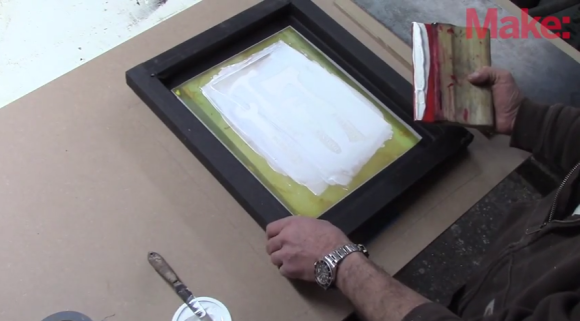
When it’s dry, place your acetate on the screen and expose the emulsion using whatever light is available. [Jimmy] built a milk crate tower up to his fluorescent work light and exposed it for about four minutes. Now you’re almost ready to make your mark. Peel off the acetate and remove excess emulsion with a squirt bottle and compressed air. Dry the whole thing with a hair dryer and you’re done. Load up a squeegee with silkscreen ink and draw it from top to bottom with nice, even pressure, and you’ve got yourself a silkscreened thing.


1. Can it do halftones?
2. Where do you get this “Photo Emulsion?”
1. I do not see why it shouldn’t do halftones, you would just need a pretty fine screen. I am not entirely sure on this though because my only experience has been through our schools shop.
2. We buy emulsion from our local art supply store because it is most convenient: http://www.dickblick.com/categories/screenprintingchemicals/ how ever you can get it on amazon: http://www.amazon.com/Speedball-Diazo-Emulsion-System-emulsion/dp/B0011YTZ9G/ref=sr_1_3?ie=UTF8&qid=1394964699&sr=8-3&keywords=emulsion
1) You can do half-tones as long as your image editing software of choice has a half-tone filter. You are also limited by the mesh size of the screen and dpi of your printer.
2) http://lmgtfy.com/?q=photoemulsion
This seems a lot more complex than just cutting a stencil on paper and silk screening it that way.
Yes, photo emulsion is more complex, but it lasts. I’ve got screen that are over 20 years old. Paper, or better yet, vinyl stencils are great for short/one-time runs.
Related: http://www.youtube.com/watch?v=ND1AUJhdUZc
Screen Print T Shirts Using Hand Cut Paper Stencils
Another way of putting it is that a silkscreen is a stencil that’s printed instead of cut.
Stencils can not have islands. Screen prints can.
Vinyl stencils can have islands… you just use transfer paper (tape) to pull it off and keep things in place before attaching to the screen.
You can do half-tones, dithering, anything that can be taken down to two colors (black and white) but the more detailed you make it, the harder it will be. It’ll be tougher to make a good screen (may need finer mesh) and it’ll be harder to get good prints. It’s a good video, but it’s very simplified, which, if you just want to shove some ink through a screen, it definitely shows the basics. Trying to hold a screen steady with one hand and squeegee with the other will often turn our terrible, because you really want things locked down in place. Also, screens can clog while printing, and fixing that often requires a lot of messy cleaning. Oh, you can get photo emulsion at art supply stores, but be aware it’s pricey and has a limited shelf life. If you’re only doing one screen it may not be worth it. For the exposure time, that’s gonna vary depending on your lights, distance from the light, etc. Once you’ve got it figured out (and you may ruin some screens) make note of the exact settings you used so you can get it right (hopefully!) next time.
But hey, when it all goes well, screen printing is awesome! :)
Disclaimer: I worked a screen printing shop for many years, and did it as a hobby/side job for many more years.
Here’s a product idea: A piece of a screen stuck to a paper backing. You ink-jet print your pattern, peel the screen, and the ink-jet ink is the medium or whatever you call what replaces that emulsion stuff.
You forgot to mention that silkscreen was a standard method for PCB production for many years.
… but the capabilities were quickly surpassed leaving us to resume the search for an adequate method for PCB’s.
http://en.wikipedia.org/wiki/Printed_circuit_board#Patterning_method_by_volume
So no details at all, just another “look at me do something” video. no source for the screen, no source or details for what to buy or even how to build it, like why does he use 80,000 staples? Anyone have any useful links to actually get someone some information?
yup, that’s the deal that jimmy has with Make. they get 2 exclusive videos a month from him of him just making something. nothing more, nothing less.
I think the staples are for even tension on the screen all around.
> it’s easier than block printing because you don’t have to reverse the image.
In almost all image-editing programs, reversing the image is a single keyboard shortcut or menu item. Compared to the differences in time, cost, knowledge and physical effort required by different printing processes, the difficulty of reversing the image is so negligible that it’s pretty much irrelevant to the decision.
It’s as easy as turning a page once you print out your design on acetate.
I don’t know how anyone else does it, but every block print I’ve done started with me drawing the image in reverse on a piece of mounted linoleum and then cutting it out.
I draw with software then reverse the image and laser cut it. :)
http://rasterweb.net/raster/2013/11/26/printing-plates-v2/
I was mostly making type, so drawing with software would have felt like cheating.
ampersands
lower case k
skyline
Those are nice! I suppose you could always draw on paper and scan it in to reverse it. (I tend to mix up my art between digital and analog processes.)
Thanks!
One time I drew one on paper and then rub-transferred the pencil marks. That was with the pink stuff; I’m not sure pencil marks would transfer so well to a regular linoleum block.
Leaving aside the silkscreening for a moment, have you seen the rest of this man’s work… https://www.youtube.com/watch?v=eLmKrXjTwIo for example… I’m not a big gun fan, but this is spectacular…
We do silkscreening at work in our assembly dept. The place we get the screens from charges about $50 to 75. Not bad if you dont want to make your own.
The part where he hammers the Frame together was the best. I could watch that all day Long.
I had a pretty rudimentary screen printing setup http://makecoolthings.com/?p=18 but I wasn’t entirely satisfied with my exposure/press solution. When I saw Ryonet’s starter press kit go on sale for the holidays, I jumped on it. http://www.silkscreeningsupplies.com/product/screen-printing-starter-kit
As soon as I stop being lazy I’m going to blog about the kit and post some finished stuff; Shirts, maybe a PCB. (Actually I have family staying with me and taking up space…throwing my whole thing into further disarray than I am used to. *Sigh*)
For those asking about photo emulsion: it’s pretty much what you want for most things, and you can get it pretty much anywhere. (Silkscreening suppliers, regular art supply stores, or even just Amazon.) Even the cheap stuff can give you great results and can be pretty robust. Example: I had a screen I coated with Speedball’s diazo photoemulsion (A very basic artist/hobby emulsion) and due to circumstances beyond my control, the screen sat unused for almost a year in the cabinet under my bathroom sink (Where I was drying the screens) and it still exposed perfectly fine. I was amazed. (Of course ironically, I exposed it with reject artwork ‘just to see’ because I was so sure it wasn’t going to work, but couldn’t bring myself not to at least try before reclaiming the screen.) I can’t recommend a scoop coater enough. You get beautifully uniform layers of emulsion.
Could you put the screen on your 3d printer and just print out a single layer to cover the non colored areas? That would be quick and easy.
Why am I hearing BENNY HILL tunes in my head?
Hey thnx for the video … I just don’t understand the mix, in the vídeo it has two jars but in the descripción you just said to use photo emulsion …so my doubt is what does contains the other one jar that isn’t photo emulsion …. Really thanks
Screen printing photoemulsions of this type need to be mixed with a sensitizing agent (Such as Diazo) before they become photo-sensitive. Once sensitized, the emulsion has a fixed shelf-life, un-mixed it is basically inert and good for years.
thnx John for your answer … sorry to bother again, but do you know if instead of using an acetate sheet… can I use a poliester sheet ?
You can use anything transparent that you can get opaque art onto, so long as it doesn’t block the light entirely. Of course, the less transparent it is, the longer the exposure required.
Some people use things like translucent vellum and tracing paper because they can print on it with an inkjet. Usually when high-resolution is of the utmost importance, like when doing halftones for CMYK color separations. That sort of thing is a little beyond my current range of experience, but I tend to exhaustively research the things that I’m working on/towards.