Heated beds for 3D printers help reduce the amount of curling and warping of parts. The warping happens when the part cools and contracts. The heated bed keeps the part warm for the entire print and reduces the warping.
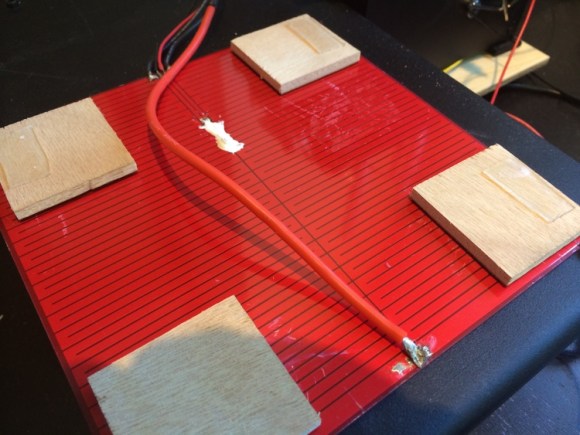
As an upgrade to her Printrbot, [Erin] added a heated bed. The first plan was to DIY one using Nichrome wire, but heated beds are available at low cost. They’re basically just a PCB with a long trace that acts as a resistor. She added a thermistor to monitor temperature and allow for accurate control.
The Printrbot heated bed worked, but didn’t heat up quite quick enough. [Erin] was quick to scratch off the solder mask and solder new leads onto the board. This converted the board into two parallel resistors, halving the resistance and doubling the power.
This version heated up very quickly, but didn’t have a steady heat. The simple control that was being used was insufficient, and a PID controller was needed. This type of control loop helps deal with problems such as oscillations.
The Printrbot’s firmware is based on Marlin, which has PID support disabled by default. After rebuilding the code and flashing, the PID gains could be adjusted using g-codes. With the values tuned, [Erin]’s printer was holding steady heat, and can now print ABS and PLA with minimal warping.


She could have just bought the 3DP Aftermarket’s PB Metal “Stick ‘n Print” Bed for the printrbot simple metal. I use it all the time! http://3dpaftermarket.bigcartel.com/product/printrbot-metal-bundle
“Well done, Nice DIY.” is also a valid comment. Nice link though.
with constant voltage you could just monitor current though the copper trace to measure temperature, copper resistance is +0.393% per celcius
Using the copper resistance is a nice idea! Wouldn’t I need a large shunt resistor, though? Also the printrbot’s control board has a connector for a thermistor, so that made it simple.
Halving the resistance this way quadruples the power. Start with a 10 ohm resistor and replaceit with 2 parallell 5ohm resistors….
I was as just going to say the same thing.
Nice hack!. It may not be elaborate, but half of hacking stuff all about making it better. This certainly counts.
Thanks!
Also relevant, locate a broken heated mirror (used on Suzuki and some other cars) and remove the heating element from the back then install it on a piece of PCB material or similar, even if it is salvaged from a dead laptop M/B etc then depopulated.
Usually due to a buffer layer the glass in front is just cracked and the back plate is intact it can be recycled in this way :-)
Heated beds are available from Printrbot themselves and from aftermarket sources specifically made for printrbots. The problem IMO is that the power supply is often too small and it’s having some trouble getting to usable max temp. I have an aluminium plate on mine (BEST BUY EVER – don’t do glass and clips). I haven’t calibrated my printer in half a year now and it spits out prints with no calibration issue at all.
I can see small pads on the heated plate and I can’t recommend that (I’m thinking air insulation right?). Instead add a few very thin cork slices under the bed. You can get them with glue on the backside and you can glue two very thin pieces together. This helps stabilize the temperature.
Disclosure: I have a printrbot plus with official upgrades (non-metal).
With some recent attention to RepRap printers being around quality and fire prevention this seems like a step backwards. I didn’t see if they have an SSR or external PCB powering this but the traces on reprap electronics are not designed to handle this kind of current.
There’s a couple of places on Aliexpress that will custom build you a silicon heatpad for reasonable prices. Pair that with a SSR and you have a fast and safe heated bed.
For these PCB heatbeds a bit of insulation on the bottom helps a lot.
Using ATX power supplies is probably fine but it’s often advised to also hook something up to 5v, like a power resistor strapped to a heatsink.
ATX psu’s are a very poor choice for powering these things. Most 400-500w PSU’s will only put out around 20-34A on the 12v rail. However that voltage will droop and cause problems. Even with large resistors on the 5v and 3.3V rail the psu is running closer to 80% of its capacity. Which its fine if you plan to do that in short spurts. However some prints can take 10-24hours, depending on the detail. I suspect that the reason the heated bed was not able to hold temp and had issues with voltage fluctuation is because the PSU is overloaded.
Honestly the only practical way you can get stable ample power for very little money (think 10-20$ to your door) is to use a quality used server PSU. Those are designed to be 12V psu’s and will happily give you 50-80A on full load, it may sound overkill but when you consider you are running one of those psu’s at 33% they will outlast almost any other type of psu for these printers. On top of it all server psu’s are built to much higher standards than standard atx psu’s. Here is what I did on my current build.
http://engineerd3d.noip.me/
If your buying a PSU for a new printer I’d just build for 24V and use a ‘proper’ 24V power supply. The motor drivers prefer it, you can get bigger silicon heatpads and faster cartridge heaters.
I thought most people using ATX are using a spare they had around!
I attained my psu for no cost, pulled from a recycler. However I have seen people purchase 400-500w psu’s as they seem to think its a good solution. It is not. Also from past experience, a good quality psu is worth its money, and most seem to prefer plunking 30-70$ on a chinese unknown psu that has 12v rails. I personally prefer these server spec psu’s. They have their pit falls as well, hacking and noise are two. A proper 24V psu I am sure will cost much more than my humble solution, while returning almost no gains. If I could get a 30A+ 24V quality psu for the cost of my server psu, I would get it. The whole point of building your own 3d printer is to be frugal about it, while achieving proper results. One could venture into buying or obtaining from recyclers as I did, two identical 12v server psu’s and hack and wire them for 24V at 50+ amps. I prefer to have an underutilized power domain, vs having a power domain that is stressed. In my case, the solution is simple.
I’m not quite sure why you’d want 30A at 24V… Over 1000W for a 3D printer sounds completely overkill…
The PSU that comes with the Mendlemax 2.0 is only 400w and I’d have no reason to doubt it’s powerful enough. They even state it has plenty of headroom.
500W (quality 24v power supply, not ATX) would cover 4 hot ends.
I’d rather have a well spec’d quality power supply than hacking together two noisy server psus capable of putting out overkill amps.
I take being able to stand being in the same room as my printer and being able to trust it while I’m not in the room fairly decent gains.
The heat bed is driven by the printrbot’s electronics. It comes with support for driving a heat bed and monitoring its temperature with a thermistor. I just plugged into that.
The power supply seems to be totally adequate. It wasn’t heating up slowly due to voltage drops (I measured) and the total max current draw was around 10A at 12V.
But are the printerbot electronics designed for this kind of current? Loads of people have burned out the traces on RAMPS boards by running too much current through the heated bed circuit.
I did something similar to my plywood Printrbot Simple. In case it’s useful to anyone, here’s the writeup. http://shortcircuitsandinfiniteloops.blogspot.com/2014/05/adding-heated-print-bed-to-printrbot.html
Liam. So you trust a 400W psu operating at close to 300W for 10-24hours? Also last I checked this was hack a day, not buy a day. I would not trust any consumer grade psu at over 50% duty cycle for anything more than a few minutes. As for being able to stand in the room. My particular example is silent enough, and even throttles the fan back to near silence. My heated bed alone was drawing over 10A @12.3v. Also the overkill solution gives me the possibility to add a firmware controlled heated build chamber, try that with a 400W psu. I am planing a few modifications to that printer before I call it done.
Well I do.
Also most power supplies are operating with highest efficiency close to their maximum continuous load specification.
PSU’s nowadays are designed upon one of many switchmode topologies, so PLEASE treat them as such, instead of babying them like how linear power supplies prefer.
They may yield a higher proportial efficiency at full load, but they’re still dissipating more power as heat than at partial load–and heat is the killer. I always prefer to derate cheap SMPSs by 50%.
^This. Not just the efficiency but the quality too.
The hack is the printer, build the printer from components, one of those being a good quality power supply and you’ll have a nice printer that can be left on its own.
“I really need my 3D printer but the PSU broke so to get me through the hack-a-thon weekend we hacked two server PSU’s we had sitting around together” is different to “I designed my own 3D printer and to save £30 I risk my house burning down in an electrical fire”.
I can say this. The quality of a server spec PSU far exceeds the quality of anything consumer grade on the market. Its designed to much higher standards than probably anything you can get in the consumer world. Its own thermal mass is much higher than anything else as well. These things are built for commercial applications, as for burning down the house? I guarantee that any atx psu you get once taxed is way more likely to catch fire, add to that the power bricks they sell which are nothing more than overgrown laptop power supplies and you have a way higher danger out there already than my server psu. What I tried to outline here is that you can get a good quality psu and have a stable printer with no major worries. However your free to go and purchase your 400w atx psu and put it under load for 24 hours or more, after a few stints it will die, possibly with disaster. I built overlcokced gaming rigs in the past, no matter who made the psu and how much power they put out, if I ran cancer reasearch on the cpu to test the system for 2-3 weeks straight which put the psu at ~60% of its load, if the psu was a quality unit it ran very hot and drooped on all 3 rails, if it was a mediocre unit as most are, it simply drooped to the point of causing instability and a system crash. I have built systems where people purchased “Quality” name brand units, for them to fail in less than 24 hours, sometimes taking the whole system with them. What I am saying is that the thermal requirements for ATX and brick style PSU’s are much lower with allowance into their max range for short period of time, vs server spec psu’s are designed to run >80% for most of their life cycle.
I was talking about quality 12 or 24v power supplies. Not atx power supplies.
I’m saying hacking two atx power supplies to run and joining the 12v rails to make 24v is more likely to cause an issue than buying a 24v power supply.
I am keeping my electronics at 12v for my own personal build. Therefore I have no need to hack together two of them. However if properly done, I don’t see any real danger with two of them running at tandem providing 24v. Maybe im wrong on that aspect.
I have a Felix 3.0 with aluminium sandwich bed and with the default “bang-bang” bed control, I can actually measure the bed expanding and contracting oscillations. A Felix forum member made a tweak to enable PID control on the bed and the expanding/contracting cycles are pretty much gone. Use PID if you can!
Why is this a hack? This is like the eqivalent of breathing in the reprap world…a purchased PCB heater and the standard power wires and thermistor to monitor the temp. Not to mention that all the major firmwares support PID and or bang bang temp control of the bed.
A simple tweak to make a stock part behave way better than it was designed to & and she wrote a nice write-up. Yes, having a hot plate is pretty standard, but I imagine it wouldn’t occur to a lot of people with repraps that you could do the above.
Do what? Add PID control? Everyone does that…
A hack is a hack whether YOU think it’s insignificant or not :)
Don’t know if it was on HackaDay before, but at Thingiverse there’s somone who built a HBP from Veroboard (stripboard).
I tried it myself on a smaller disc of Veroboard, trying to get it up to ~150C (I think) for another application. First problem I had was parts of the board getting too hot too fast and melting the solder joins between strips (resulting in a distinct anticlimax). When I get that working, I discovered that the boards I had start to melt (for want of a beter word, they actually shrivel up like a chip) and give off some fumes/vapour that stinks like hell and hangs around everything in the area for days. The vapour itself solidifies into a yellowish liquid. I expect this is the fire proofing chemical, and it’s probably pretty nasty to ones health (gulp).
On the bright side, the method worked great for heating to ~60C, without any hint of fumes.
I just did all of the above on my printer. splitting the heated bed in half did the trick.
Thanks
Paul