When you think about the difficulties of working with surface mount components, the first thing that often comes to mind is trying to solder those tiny little parts. Instead of soldering those parts by hand, you can actually apply solder paste to the pads and place all of the components on at once. You can then heat up the entire board so all of the parts are soldered simultaneously. It sounds so much easier! The only problem is you then need a solder stencil. You somehow have to get a thin sheet of material that has a perfectly sized hole where all of your solder pads are. It’s not exactly trivial to cut them out by hand.
[Juan] recently learned a new trick to make cutting solder stencils a less painful process. He uses a laser cutter to cut Mylar sheets into stencils. [Juan] appears to be using EagleCAD and Express PCB. Both tools are available for free to hobbyists. The first step in the process is to export the top and bottom cream layers from your CAD software.
The next step is to shrink the size of the solder pads just a little bit. This is to compensate for the inevitable melting that will be caused by the heat from the laser. Without this step, the pads will likely end up a little bit too big. If your CAD software exports the files as gerbers, [Juan] explains how to re-size the pads using ViewMate. If they are exported as DXF files, he explains how to scale them using AutoCAD. The re-sized file is then exported as a PDF.
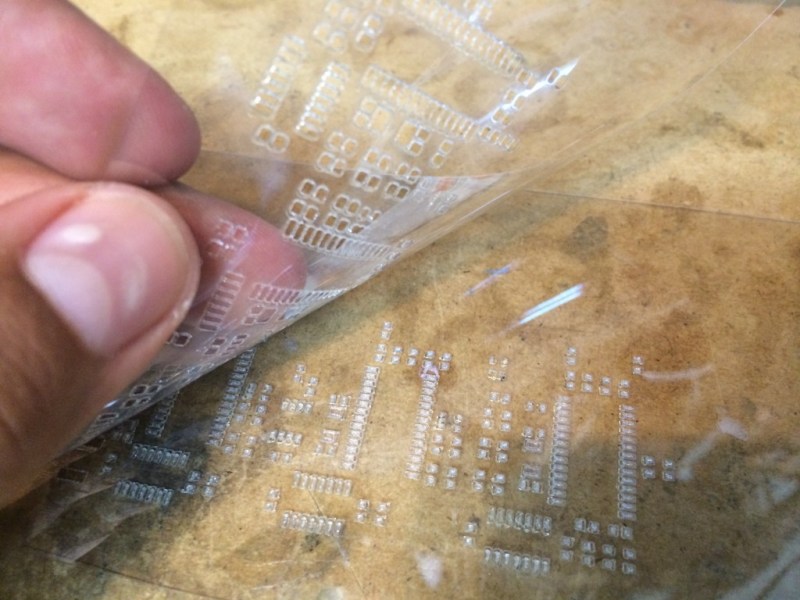
[Juan’s] trick is to actually cut two pieces of 7mil Mylar at the same time. The laser must be calibrated to cut all the way through the top sheet, but only part way into the bottom piece. The laser ends up slightly melting the edges of the little cut out squares. These then get stuck to the bottom Mylar sheet. When you are all done cutting, you can simply pull the sheets apart and end up with one perfect solder stencil and one scrap piece. [Juan] used a Full Spectrum 120W laser cutter at Dallas Makerspace. If you happen to have this same machine, he actually included all of the laser settings on his site.


I’ve done the same thing using a CNC mill, an engraving bit and laser printer (PET, I think) film! It works pretty well. I’ve also contributed the g-code generator to pcb-gcode for EAGLE, so you can (hopefully) do it too.
pics: http://i.imgur.com/QagZnYg.jpg http://i.imgur.com/PqBvpPH.jpg
I’ve got to see if the L-Cheapo can cut these.
I’ve experimented with this, too and it turns out you can do even stencils for 0.5mm pitch parts. I use 120um mylar films, rotate the stencil by 45deg and run the laser in raster mode. By fiddling with power and speed, you can engrave directly through the film and create much smaller and more accurate appertures than it would be possible in vector mode.
I’ve never seen the need for a second film, though and did not really get it out of the write down what this should be good for?
The chad sticks to the second sheet so you don’t need to poke them out.
The rasterizing vaporizes all mylar that needs to go away. No need to poke anything.
Right, that’s what ventosus is doing.It doesn’t sound like Juan is rasterizing his however. Hence the reason why he’s using two sheets.
Now as to why he doesn’t vaporize the chad and be done with it, I don’t have an answer.
Tried vector cutting and wasn’t working. Saw this and tried rastering and worked perfectly! 4mil at 50 power 50 speed and worked like a dream!
This comment was major key.
The problem is 120w even at it’s lowest setting is too high, he should be rastering on low even with a 40w.
I’ve been doing this for production runs. I do raster and engrave the mylar. It just blasts the holes away, and does a great job of it. Phil was absolutely right. The stencil is good for up to a few hundred uses, though we’ve found that especially with the smaller pitch stuff where there’s very little mylar between pads those tiny lines of mylar are the first to go, but it doesn’t matter much because the paste flows just fine and separates onto the individual pads.
Laser cutting mylar stencils isn’t new. Pololu has been doing it for a long time:
http://www.pololu.com/product/446
I’ve done this since 2009…unfortunately no access to a laser cutter anymore: https://www.flickr.com/photos/macetech/3311194156
You don’t need a second sheet of mylar, I just always taped my stencil mylar to a sheet of smooth birch plywood, which was necessary anyway to keep the air assist from blowing it around inside the machine. The chads stick very well to the wood when the edges melt, and are easily scraped off with a razor.
You can also directly export a cream layer with pre-offset pads from Eagle. Go to DRC and in the Masks tab there is a Cream section. Set both the Min and Max to the offset distance you want. Bam, your cream areas are 6 mil (or whatever) smaller than your pads. Just remember to change it back before sending to a real PCB manufacturer.
Oh my! We have a seriously useful contribution to the hobby here. Thanks for posting! The myriads of iterations and improvements made by your readers will refine your work and serve us all well. You though, get the Cudos!
Thank you.
Silhouette Cameo cutting machines also work well
https://github.com/pmonta/gerber2graphtec
Another “me too” comment. My laser is a 40W eBay special under Mach3 / g-code control, hence vector cutting rather than raster is easier for me.
I use CamBam to import and adjust the pads for kerf. I put masking tape on both sides to help with the melted edges and then some fine sandpaper for a final clean up. To be honest if the stencil isn’t perfect, the way reflow works the odd joined TSSOP pads solder just fine for me.
Check out the TOMTOM engraving addon on Youtube, it makes engraving much easier with Mach3, I use it on the small machine.
Thanks. I’ve used a different plug in with some success, but will certainly give that a try.
The dev is a good guy too, will help when he can.
I’ve switched to a DSP now(AWC608 is £195 delivered on aliexpress to UK) on my main machine and will be running it on the new machine when I’ve finished building it(http://hackaday.io/project/316-Simple-DIY-laser-cutter)
Inkscape has a cool way to shrink the outlines. If you can get the design into SVG.
Add a border twice the width you want to remove, then do a “Path/Stroke to Path” operation. Then you can remove the outer line and leave the smaller inner one.
There must be a dozen or more articles on had about vinyl/laser cutting stencils with eagle etc, the shrink/grow is built into eagle, sparkfun have a great article on it too.
Also 7mil mylar seems way too thick to me, i usually never go above 5 and even that puts a lot of paste down.