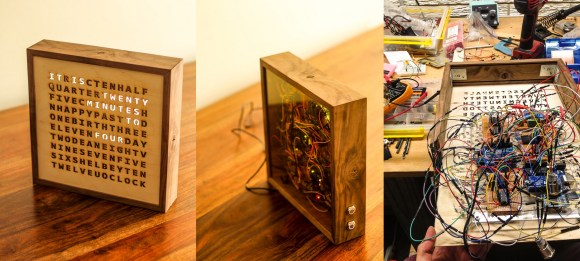
What is a word clock? A word clock is a clock that displays the time typographically that is also an interactive piece of art. Rather than buy one for $1500, [Buckeyeguy89] decided to build one as a present for his older brother. A very nice present indeed!
There are many different things that come into play when designing a word clock. The front panel is made from a laser cut piece of birch using the service from Ponoko. Additionally, white translucent pieces of acrylic were needed to keep each word’s light from bleeding into the neighboring letters. The hardware uses two Arduinos to control the LEDs and a DS3231 RTC for keeping accurate time. The results are very impressive, but it would sure make assembly easier if a custom PCB was used in the final version. For a one-off project, this makes a great birthday present.
The craftsmanship of this word clock is great, making it well suited for any home. What projects have you built that involve more than just electronics? Sometimes, quality aesthetics make all the difference.


Max7219 is your friend.
It’s best to avoid using ASICs in your designs because they can go out of production and you’re in a bad situation. Microcontrollers programmed as logic gates or buffers or anything else can be easily replaced if for example Microchip or Atmel would go bust.
Oh, I was thinking to use the max to avoid so many wires! Those wires seem to be a weak spot. Stock extra ASICs if necessary.
You should take a look at the circuit diagram…
Yea, fat chance that the MAX7219 will go out of production any time soon. And even if they did they would still be available in hobbyist and medium sized batch quantities for many years to come.
I can still buy the AY-3-8910 sound chip from the 1970’ies for a few dollars each.
And if it does go out of stock there will be another along shortly.
He could have saved a couple of chips by multiplexing using the two latches (which makes programming a bit harder) or just using a bigger latch, you can get 32-bit ones.
OP is new to uCs, they used a whoel arduino for every task. One to read the RTC, the other to turn the lights on and off. They acknowedged in the reddit thread they were not familiar with performing more than one task in a program (sketch)
If you know there’s a gap in your knowledge, fill it.
Or use fifty dollars’ worth of parts to do a 50-cent job.
Whichever.
A completed project in the hand is worth learning new skills in the bush.
It’s rare to see someone actually finishing something. Two useful (if perhaps conflicting) ‘rules’:
An engineer is someone who can do for 10 cents what any fool can do for a dollar,
Poorly designed and working is better than well designed and not working.
Good call, but in this case, I’d say WS2812 LED strips are your friend. Especially since he’s already using them for the “happy birthday” regions — just use them for the whole thing, control it off one pin, and win! Not only does the build become much easier, simpler, and tidier, but it also adds the possibility of implementing many other features. e.g. power-up “splash screen” of any static or animated, full-color, 13×10 graphic, transitions between words (e.g. darken the old word one letter at a time while lighting the new one similarly), display arbitrary text (e.g. date) either by scrolling it in graphic form, or by lighting non-adjacent letters one at a time in sequence)
When do these kids learn to break out their ATMegas? :(
You didn’t mention what it does on their birthdays!
Per the reddit thread, the HAPPY, BIRTHDAY, NAME, NAME sections have a WS2812 strip that does raibow effects at a much brighter intensity over the rest of the clock…
Awesome Project ! Pretty neat writeup.. Added to the “TO-MAKE” list :)
An idea came to mind about your dividers. if you places tape over the tops of the diffuser then spray painted the gaps black or silver “i think might work” then places in the divider there would be a good gap free seal.
apart from that is is a a great project and well documented / designed.
I actually made my own version of this a few months ago that looks fairly similar. That is exactly what I did. Glad to see someone else had a great idea. Unfortunately you still need dividers for the LED’s themselves to avoid light leakage but other than that, it worked great.
Good build, very aesthetically pleasing. Wiresplosion, while amateurish, is still cool in some places and is a necessary substitute when you don’t have the facility or experience to make your own (Giant!) pcb.
I love liberal use of BlueTack in permanent builds. That stuff is seriously underrated.