Fashioning a custom, one-off rubber part for your project isn’t usually an option, but [Ben Krasnow] has an alternative to injection molding and casting: machining frozen rubber.
As [Ben] points out, you can’t exactly pop a sheet of rubber on your mill and CNC the needed shape; the bit will push the material around rather than cut it. Freezing the rubber first, however, allows you to carve into the now-hardened material.
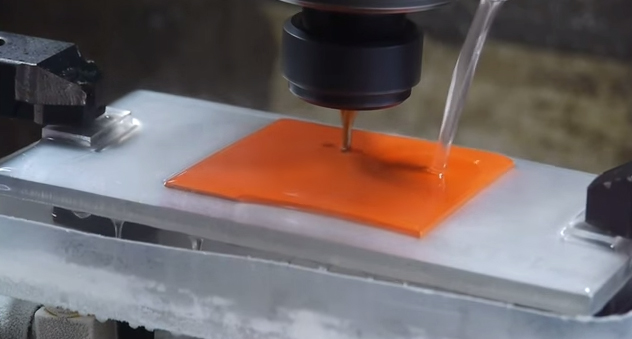
His initial setup consisted of a sheet of aluminum with water drizzled on top, a square of neoprene placed on the water, and a steady stream of -60 to -80C alcohol flowing directly onto the rubber. The water underneath freezes, holding the neoprene in place. This proved problematic as the ice-clamp gives way before the milling is complete. [Ben] later adds some bolts to clamp the pieces down, allowing the milling process finish as planned.
A small plastic tray sits underneath this assembly to capture the alcohol as it runs off, feeding it back with some tubing. [Ben] recommends against a submersible aquarium pump—his initial choice—because the pump stopped working after a few minutes immersed in the chilly alcohol. An external, magnetically-driven pump solved the problem although it does require manual priming.
Stick around after the jump for the video and check out some of [Ben’s] other projects, like his quest for the perfect cookie, or CT scanning a turkey.


Interesting, but I’d think that the extreme cold might not play nice with the end mill.
The cutting load is so minimal when doing this you don’t have enough stress to break things. Considering they cryogenically machine metals at much lower temps then looking at rubber is nothing.
I wasn’t thinking so much of the cutting stresses as much as the thermal expansion/shrinkage of the metal.
Dropping the temp to -80c would reduce the diameter somewhere around .001″.
Ridiculous. Sharp blades work way better on rubber or silicone.
True, now cut a uniform step on the inner face of a square rubber washer freehand and I will admit to being impressed.
If I had access to a low temp cooler and endmill like this I know which method I’d find more fun at the very least ;)
Honestly, if you want to do it you could probably do it with dry ice and a copper pipe. Stick a pipe-coil in a bucket, fill bucket with dry ice, put alcohol through the pipe.. Pretty easy really, and how often do you need CNC’d rubber?
You don’t even need the pipe. That’d hurt thermal transfer a lot, actually. Just fill the bucket with alcohol – with as low a water content as possible – and dry ice.
Way better than what?
Dull ones? That doesn’t merit thought.
This project? How do you know? Have you made a cryogenic machining setup to compare the two?
Did they pass a law enforcing stupid remarks on the internet? Because I don’t know why you threw in that comment otherwise.
I agree that for flat cutouts a blade would be better, but even for 3D objects I just can’t imagine this is the best method either, casting or molding isn’t THAT hard surely.
And how about using some sort of hot needle? Although you need a way to remove material then. But I’m sure something can be thought up.
This is actually done, conceptually, just like this in industry. Though why not cast his part out of silicone? Not sure if his end use application precluded the use of silicone elastomer or not?
Most silicone seals are vulcanized and not catalyst cured. The catalyst cure rubbers don’t have as much strength in my experience.
Would a parasitic pump not be a better choice then priming would not be an issue
Or even a peristaltic pump, might be even more better.
I like the idea of creating a mold, but in practice it’s a real pain getting all the little tiny bubbles out. If you just need a quick rubber or silicon gasket, this idea takes the cake.
I like this idea, I am keeping it.
Hmmm, the same low temps that help make the rubber easier to machine are going to make most tubing like latex surgical tubing stiff as a board and cracking when going through the peristaltic pump rollers. Darn.
“Peristaltic”, that’s the kind that bursts out of you chest while you’re eating the soup at a diner, right?
“Up peristalt.”
“Check please.”
Quite Sublime my good sir!
Good thing you keep a safe flow system with cooling ability in your workshop that can deal with running alcohol through it – I assume.
And setting all this up plus waiting for it to chill down is any faster? Use machine wax to make the mold (allows insane machining speeds), if you need just one you can even go for lost mold…
De-bubbling can be done via a venturi pump running on tap water, the vacuum will be sufficient to remove most bubbles…
Cheap and easy to set up, as a bonus the machine wax can be recycled.
That’s a fun experiment. Just using a sharp bit at high RPM can also work well because plastics stiffen up when strained quickly. Might be more useful for carbon fiber cutting. A friend of mine with an unheated shop found out that carbide bits last a lot longer when the part is really cold.
Really smart.
Had the idea of freezing the rubber to mill it when a friend of mine asked if I could machine rubber, but I never thought of cooling the piece with alcohol. Very clever !
I think its interesting. Casting silicone is simple. Either vacuum the rubber before pouring it into the mold, or pressurise it while already in the mold. All of the extra steps taken to mill it outweigh any production benefits.
True, but as he pointed out in his video, this was a one off part. There’s a lot of time invested in machining a mold and casting the part. Granted, his setup isn’t something anyone could cobble together from things in their garage, but is a smart way to tackle his problem.
I do wonder if similar results could be obtained by using a larger block of aluminum (or steel) and cooling it using dry ice. I would think an appropriate sized block would have enough thermal mass for acceptable machining time.
If you watch the video, he actually says you can use dry ice sitting in a bath of alcohol to achieve the same temps, and he was just using the chiller because he had one.
Yeah, I did catch that, but he was alluding to still flowing alcohol over the work. I was pondering a way around that.
A guy I went to school with used to do something similar to this when machining rubber gaskets. He said they had a cold table that would freeze the rubber in place so they could mill it. I don’t know what it used to cool though.
Could have been one of those cold tables used for icecream and the like.
Ok, Now this has me thinking a tiny bit. I’m wishing for a way to make reproduction, “obsolete” foam, filter elements for older Briggs & Stratton engines..
goofy thought, but what if I soaked an appropriate type and size block of foam and then either milled (doubtful idea for a handful of reasons) or a well shaped, wire bristle wheel to do the stock removal.
Or has anyone got a link to some pourable **open cell** foam
that is gasoline and oil tolerant And wouldn’t cost over around $10 USD for the materials. I realize some kits of stuff might not come in a size that matches the job and you’d have waste or figure more usage per kit or just get over it! I would build my own form, So not concerned over that cost. The factory elements usually break down/crumble after about 5~8 years.
Briggs has superseded to a chintzy universal sort of replacement filter now , but it’s an entire housing change and closure VS the old style and it’s NOT nearly the dirt tight product that a Properly Maintained, old style one was.
The geometry of the filter is what makes the challenge to cutting one. It’s not a square block. Hopefully these pics link and show.
The foam block has a flange or lip around the outer perimeter on side These lips are absolutely CRITICAL to sealing to housing from dirt entering & bypassing the element. Then the center hole also has a flange of similar thickness and with same importance.
http://contentinfo.autozone.com/znetcs/product-info/en/US/max/334314/image/3/
http://ecx.images-amazon.com/images/I/41z68HvTTnL._SS380_.jpg
Hopefully the pics show and those lips/flanges are evident and maybe my long winded prattling was worth it.
Lacking that cure, The next thing may be trying to “cad” up a file to 3d print an entire new type of intake the accept the disposable paper ones. But those just get expensive very quick in dusty/dirty conditions. You can only do a few (partiality effective) dirt cleanings before the pores are totaly clogged.
That is a very common filter that is available at most outdoor power equipment shops.
Itlookslike one for a B&S 2hp L head engine. There are a lot of theses styles with different clipped corners and positions of the hole. The key to getting the right one is to bring the filter housing and cover with you.
At the expense of straying further off topic: if you track down the filter element, your only given the entire air cleaner assy. No option of the element only. instead of an $8~10USD element, your at $68+
and notice that given element will NOT work/function properly in that housing.
If you pull and pack it in there it will leak around and if you did manage to catch the sealing lip in the cover, it will tear loose in a few hours running time.
I used to be a repair “tech” many moons ago and have seen it more than once.
If you try to follow some of the other numbers, they seem to have been reassigned. ….sigh I’m just gettin old and so is my “treasure” :^( If the 5hp horizontal shaft ever does go back in service, it’ll probably be converted to a paper element from an I.C. series.
The vertical shaft ones are the bigger problem. Direct drive/mount blade rotary mowers like to rattle those dry type canisters loose. Even with well balanced blades.
http://www.ereplacementparts.com/cleaner-assemblyair-p-290576.html?osCsid=1gqaomm584eh7nimgikf7kd2e7
I’ll eventually spot something or other to do with the mower filters.
Hmm, might have to look around for a Hacker s
It’s just those headset cushions that I would like to match the feel and acoustic characteristics of .
Hmmm, might have to look around for any area Hacker Space and hope for a laser table, then see if I can strike a deal!
for foam, as its porus, you could just submerge it in water, freeze it, and mill the big ice cube.
Yeah, I dropped the frozen part in my long winded thoughts.
If the right foam choices were readily available and I could afford them, this could be useful for a couple of things or maybe more.
My other known project is an older set of headphones** that Koss no longer has the cushions for. They were made of a foam that resembled slightly undercooked cake batter (for lack of a better descriptor that’s easily understood) They were oh so comfy!
Shape wise, They were a ring that looked a lot like a large, multi-angle valve seat insert.
About 3″ across and 5/8″ thick.
And just a personal curmudgeonly, opinionated sort of gripe/rant moment:
HEAD phones COVER the ear but do not enter it.
If it goes INTO the ear it’s an EARphone.
aaahhhh, I feel better now.
What I’ve seen for cutting foam, like this: http://www.carrycasesplus.com/images/detailed/1/convoluted_foam.jpg is that the foam is squeezed so that the cut you have to make is straight.
I’ve used the frozen foam technique for some manual cutting, works well. Haven’t tried it with CNC, but it seems feasible, as long as you can get the cut done before the water starts to thaw. Perhaps a fluid with a higher freezing temp might be useful too. For example, DMSO freezes at only 65°F, you could keep the entire work area – or event the room – below that temperature easily. Note that it’s a solvent, so check for material compatibility. And it penetrates skin quickly, tending to carry along anything dissolved in it as well. It’s not toxic in reasonable amounts, supposedly has some medicinal properties of its own, and is sometimes used to carry drugs through the skin (like aspirin). But it’s better to avoid casual contact, as it could pick up something toxic from the foam, or something already on your skin that wouldn’t otherwise penetrate.
If you were making a few, you could probably make up a few jigs and hotknife the whole thing.
I recently had to cut custom gaskets and other structures from rubber, and so I reached out to my Silhouette cutter. The bundled software made the process difficult, so I developed my own driver in python, and I have posted the results. You can find out more about it here:
https://www.youtube.com/watch?v=OxYCJ1hTM2I
https://github.com/vishnubob/silhouette
manual priming? nothin like a buzz before machining :)
I’d just use the CNC to cut the part out of wood. Then put it in a small container and pour plaster of paris over it to get the mould. Then pour silicon into the mould :p I think it would still be quicker and simpler than what he’s created.
Fun to try at least :)
Some kinds of foam such as LD 50 low density polyurethane foam can definitely be routed cleanly, with an ordinary, sharp endmill, 1 or 2 flute better than 3 or 4. The direction of cut makes a huge difference. Upcut is clean and downcut is rubbish. Or it might be the other way around!. I can’t remember from when I did it. But you’d find out in a 3 second trial.
Safety? Wear gloves, glasses and respiratory mask.
Strange: People get mad about laser safety, but here, no one.