Breadboarding A 68000 Computer In Under A Week

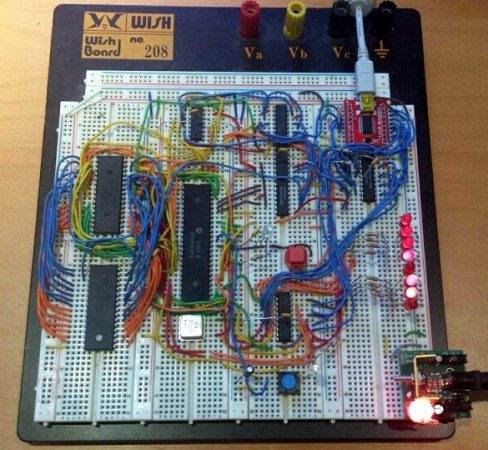
We’ve been lurking over at Big Mess ‘o Wires as [Steve] geared up for his 68000 computer build. One of his previous posts mentioned a working breadboard version but we figured it would be a ways off. Surprise, he’s got it working and what you see above took just 6 days of “occasional work” to get running.

The chip in use is actually a 68008 but we remember reading that he does plan to migrate to a 68000 because this one lacks the memory pins to address more than 1 MB of RAM. The trick here was just to get the thing running and he made some common choices to get there. For instance, he grounded the /DTACK in much the same way [Brian Benchoff] explained in his own 68k build.

We’re not sure if his address decoding was a time saver or not. If you study [Steve’s] original planning post you’ll learn that he’s going to use programmable logic to handle the address decoding. But above he wired up 74-series logic chips to perform these functions. On the one hand you know your Hardware Description Language isn’t the problem, but did you terminate one of those wires where you ought not?

Additional tripping points include a bouncing reset pin. Looking at that we’d tell [Steve] there’s a problem with his chip, except that this was his first thought as well. He went the extra mile by building and testing a replica of the reset system. This makes our brain spin… shouldn’t the reset be among the most reliable parts of a processor?

At any rate, great work so far. We can’t wait to see where this goes and we hope that it unfolds in a way that is as exciting as watching [Quinn Dunki’s] Veronica project take shape.

Tesla Truck

Tesla Truck Wants To Bring The Makerspace To The Children

With so many budget cuts, many public schools find themselves having to cut “unnecessary” programs such as shop, art, and music classes. They simply can’t afford to keep those things running and also teach other important concepts like math, language, and history. The obvious side effect is that kids don’t have a safe place to be creative and learn to make things with their hands.

Luckily, the maker movement has been rapidly growing over the last few years with makerspaces popping up all over the globe. These places are picking up the slack left behind by the budget cuts that hurt our public schools. But while makerspaces are getting more and more common, they still don’t exist everywhere. Even in those places lucky enough to have a makerspace, not everyone is aware that they exist and not everyone can afford to be a full-time member. This is where Tesla Truck comes in.

The Tesla Truck’s mission statement is “to provide a cutting-edge, mobile, hands-on STEM lab, where students, teachers, and makers can teach, learn, collaborate, create, and innovate.” It’s a noble cause for sure, but how do they plan to do this? This group intends to outfit a truck with the kinds of tools every maker dreams of. These would include a 3D printer, laser cutter, CNC plasma cutter, mill and lathe, electronics bench, and more.

Obviously just having a bunch of high-end tools is not going to cut it. Someone is going to have to teach people how to properly use these tools. The group behind the Tesla Truck is made up of educators, engineers, and published researches who have been doing this kind of thing for a while now. This group has been packing up their own personal tools into their hatchbacks and setting up shop in school classrooms around New York City, only to have to break down at the end of the day and bring them all home again. Together with the students, this group has built things like robots, quadcopters, and water purifiers. The Tesla Truck will give them the ability to reach more people much more easily.

The Tesla Truck is looking to raise a total of $62,804.01 to make their dream a reality. They have raised more than half of that outside of crowd funding. They’ve now turned to Indiegogo to raise the last $24,300. They have ten days left and they are almost halfway to their goal. You can watch their campaign video below to get a better feel for what they are all about. Continue reading “Tesla Truck Wants To Bring The Makerspace To The Children”

Using Tetris Like MS Paint

Check out Samus looking boss in this pixelated image. Who would have thought of using Tetris as a canvas for these types of graphics? Coming up with the original idea of strategically clearing and leaving Tetris pieces to end up with what is shown above is hard enough. But how in the heck do you implement the algorithm that generated this programmatically?

First off, two thing should not be surprising about this. It wasn’t manually generated during normal gameplay. That would be beyond savant level. The other thing to note is that the order in which pieces occurred was not random, but strategically calculated by the algorithm. The challenge is not only to occupy and clear the correct pixels, but to make sure the correctly colored pieces remain.

You need to see the fast-motion video embedded after the break to fully appreciate the coding masterpiece at work. We’re not going to try to paraphrase how the algorithms functions, but get comfy with the link above which walks through all of the theory (in addition to supplying the code so you can try it yourself).

Continue reading “Using Tetris Like MS Paint”

Dog Tracker Knows Where The Dirt Is

[Eric] is well on his way to making one of the less pleasant chores of pet ownership a bit easier with his dog tracking system. The dog tracker is actually a small part of [Eric’s] much larger OpenHAB system, which we featured back in July.

As a dog owner, [Eric] hates searching the yard for his pet’s droppings. He had been planning a system to make this easier, and a local hackerspace event provided just the opportunity to flesh his ideas out. The Dog Tracker’s primary sensor is a GPS. Most dogs remain motionless for a few seconds while they go about their business. [Eric’s] Arduino-frgbased system uses this fact, coupled with a tilt sensor to determine if the family pet has left any presents.

The tracker relays this information to the home base station using a HopeRF RFM69 transceiver. The RFM69 only has about a 900 foot range, so folks with larger properties will probably want to spring for a cellular network based tracking system. Once the droppings have been tracked, OpenHAB has an interface

[Eric] has also covered runaway dogs in his design. If Fido passes a geo-fence, OpenHAB will raise the alarm. A handheld dog tracker with its own RFM69 can be used to chase down dogs on the run. Future plans are to miniaturize the dog tracker such that it will be more comfortable for a dog to wear.

Continue reading “Dog Tracker Knows Where The Dirt Is”

Micro-Scallop Robot

Nanobots Swim Like Scallops In Non-Newtonian Fluids

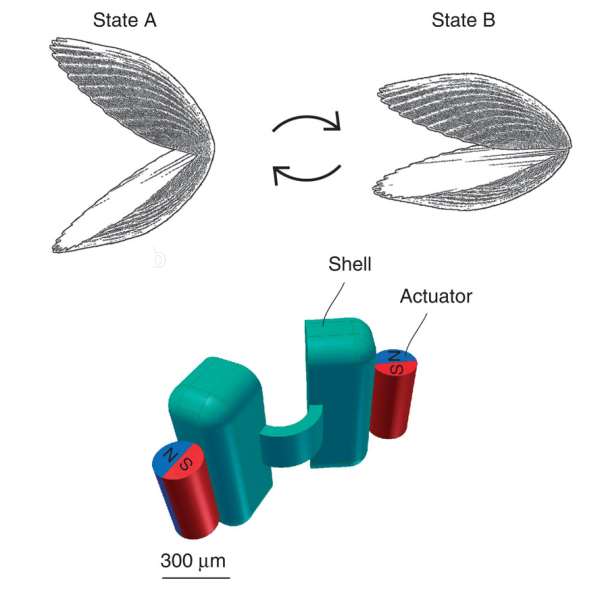
The idea of using nanobots to treat diseases has been around for years, though it has yet to be realized in any significant manner. Inspired by Purcell’s Scallop theorem, scientists from the Max Planck Institute for Intelligent Systems have created their own version . They designed a “micro-scallop” that could propel itself through non-Newtonian fluids, which is what most biological fluids happen to be.

The scientists decided on constructing a relatively simple robot, one with two rigid “shells” and a flexible connecting hinge. They 3D-printed a negative mold of the structure and filled it with a polydimethylsiloxane (PDMS) solution mixed with fluorescent powder to enable detection. Once cured, the nanobot measured 800 microns wide by 300 microns thick. It’s worth noting that it did not have a motor. Once the mold was complete, two neodymium magnets were glued onto the outside of each shell. When a gradient-free external magnetic field was applied, the magnets make the nanobot’s shells open and close. These reciprocal movements resulted in its net propulsion through non-Newtonian media. The scientists also tested it in glycerol, an example of a Newtonian fluid. Confirming Purcell’s Scallop theorem, the nanobot did not move through the glycerol. They took videos of the nanobot in motion using a stereoscope, a digital camera with a colored-glass filter, and an ultraviolet LED to make the fluorescent nanobot detectable.

The scientists did not indicate any further studies regarding this design. Instead, they hope it will aid future researchers in designing nanobots that can swim through blood vessels and body fluids.  We don’t know how many years it will be before this becomes mainstream medical science, but we know this much: we will never look at scallops the same way again!

Continue reading “Nanobots Swim Like Scallops In Non-Newtonian Fluids”

Adding A Battery Gauge To A Project With Zero Parts

The typical way of doing a low battery detector is throwing a comparator in the circuit, setting it to measure a certain threshold voltage, and sending that signal off to a microcontroller or other circuit to notify someone the battery is going dead. [Josh] has a simpler way using an 8-bit AVR and zero other parts.

The chip [Josh] is using is the ATtiny84. The ADC in this chip is usually used to measure an unknown voltage against a reference voltage. The trick [Josh] is using is to do this in reverse: The internal 1.1 Volt reference voltage is measured against an unknown scale, namely the input voltage.

The value provided by the ADC on the chip will always be Vin times 1024 over the reference voltage. Since Vin will be 1.1 V in this case, the ADC value is known, it’s only a matter of doing some 6th grade algebra to determine the value of the input voltage.

[Josh] put together a small demonstration where the chip blinks out the number of volts its receiving from a bench power supply. By blinking a LED, it can blink out the current value of VCC as integers, but by using this technique you should be able to get a fairly fine-grained reading of what VCC actually is. Video below.

Continue reading “Adding A Battery Gauge To A Project With Zero Parts”

Ask Hackaday: Why Don’t We Have Flexible Displays Yet?

A few times a month we receive extremely well crafted crowdfunding campaigns in our tip line that make us doubt our sense of reality. While this article therefore isn’t a hack, we felt it would be a good place to start a discussion around OLED flexible displays.

As the dedicated Wikipedia article states flexible displays have been around for a few years already. In 2013, the Samsung Galaxy Round was unveiled as the world’s first mobile phone with a 5.7″ flexible display. The phone (and the screen) were curved in shape but the phone itself was solid. The same goes for the recent Samsung Gear S smart watch.

Yet for only $350 in a $50k goal crowdfunding campaign the Portal flexible wearable smartphone seems to have all the answers. It is scratch & shatter proof, water-resistant, flexible, includes a ‘Portal proprietary flexible battery’, the ‘Fastest multi-core CPU’, gyro, compass, barometer, Bluetooth 4.0, NFC, GPS…. Specifications are even subject to change to ensure the best available components… and it is 89% funded. As they mention,

building a smartphone or a tech company isn’t rocket science.

We also found a 70% funded €100k crowdfunding campaign for a watch bracelet (right click to translate) that will include GPS, Bluetooth, NFS (not a typo), a uSD card, a 4 lines LED screen and a battery for a few days autonomy… how surprising that no major manufacturer thought of that.

This leads us to the title of this post: why don’t we have truly flexible displays yet? We’ll let our readers discussion this point in the comments section below…