Using The Second Microcontroller On An Arduino

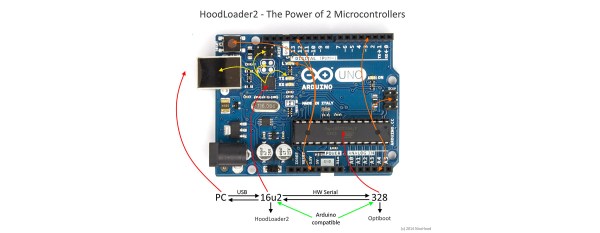
While newer Arduinos and Arduino compatibles (including the Hackaday.io Trinket Pro. Superliminal Advertising!) either have a chip capable of USB or rely on a V-USB implementation, the old fogies of the Arduino world, the Uno and Mega, actually have two chips. An ATMega16u2 takes care of the USB connection, while the standard ‘328 or ‘2560 takes care of all ~duino tasks. Wouldn’t it be great is you could also use the ’16u2 on the Uno or Mega for some additional functionality to your Arduino sketch? That’s now a reality. [Nico] has been working on the HoodLoader2 for a while now, and the current version give you the option of reprogramming the ’16u2 with custom sketches, and use seven I/O pins on this previously overlooked chip.

Unlike the previous HoodLoader, this version is a real bootloader for the ’16u2 that replaces the DFU bootloader with a CDC bootloader and USB serial function. This allows for new USB functions like HID keyboard, mouse, media keys, and a gamepad, the addition of extra sensors or LEDs, and anything else you can do with a normal ‘duino.

Setup is simple enough, only requiring a connection between the ‘328 ISP header and the pins on the ’16u2 header. There are already a few samples of what this new firmware for the ’16u2 can do over on [Nico]’s blog, but we’ll expect the number of example projects using this new bootloader to explode over the coming months. If you’re ever in an Arduino Demoscene contest with an Arduino and you’re looking for more pins and code space, now you know where to look.

3D Printing Without Support

3D printing is getting better every year, a tale told by dozens of Makerbot Cupcakes nailed to the wall in hackerspaces the world over. What was once thought impossible – insane bridging, high levels of repeatability, and extremely well-tuned machines – are now the norm. We’re still printing with supports, and until powder printers make it to garages, we’ll be stuck with that. There’s more than one way to skin a cat, though. It is possible to print complex 3D objects without supports. How? With pre-printed supports, of course.

[Markus] wanted to print the latest comet we’ve landed on, 67P/Churyumov–Gerasimenko. This is a difficult model for any 3D printer: there are two oversized lobes connected by a thin strand of comet. There isn’t a flat space, either, and cutting the model in half and gluing the two printed sides together is certainly not cool enough.

To print this plastic comet without supports, [Markus] first created a mold – a cube with the model of the comet subtracted with a boolean operation. If there’s one problem [Markus] ran into its that no host software will allow you to print an object over the previous print. That would be a nice addition to Slic3r or Repetier Host, and shouldn’t be that hard to implement.

Hackaday Links Column Banner

Hackaday Links: November 30, 2014

Tired of wiring up the power rails and serial adapter every time you build something on a breadboard? [Jason] has you covered. He put his Breadboard Buddy Pro up on Indiegogo, and it does everything you’d expect it to: power rails, USB to UART bridge, and a 3.3 V regulator. Oh, he’s not using an FTDI chip. Neat.

With Christmas around the corner, a lot of those cheap 3-channel RC helicopters are going to find their way into stockings. They’re cool toys, but if you want to really have fun with them, you’ll need to add a penny.

Here’s a crowdfunding campaign for a very interesting IoT module. It’s a UART to WiFi adapter that has enough free Flash and RAM to run your own code, GPIOs, SPI, and PWM functions. Wait a second. This is just an ESP8266 module. Stay classy, Indiegogo.

Mankind has sent space probes to the surface – and received pictures from – Venus, Mars, the Moon, Titan, asteroids Itokawa and Eros, and comet Comet 67P/Churyumov–Gerasimenko. In a beautiful bit of geological irony, every single one of these celestial bodies looks like a rock quarry in Wales. That quarry is now for sale.

Here’s something exceptionally interesting. It’s a browser plugin that takes a BOM, and puts all the components into a cart. Here’s the cool bit: it does it with multiple retailers. The current retailers supported are Mouser, Digikey, Farnell/Element14, Newark, and RS Components.

Want a death ray? Too bad, because it’s already been sold.

[Glasslinger] Builds Tiny Tubes

In the early days of transistors, RCA and GE were battling against silicon with ever smaller vacuum tubes. These tubes – Nuvistors, Compactrons, and some extremely small JAN triodes were some of the tiniest tubes to ever be created. [glasslinger], YouTube’s expert on DIY valves, is pretty close to beating the tiniest tubes that were ever manufactured. He’s created a miniature diode and triode that are about 1/4″ in diameter and 1″ long.

The most difficult part of making a vacuum tube is getting a perfect glass seal around the pins. For this, [glasslinger] is using very fine tungsten wire and glass beads. A bead is placed around each wire, mounted in a stand, and melted together with a torch.

A diode is simple as far as tubes go, requiring only a filament between two pins. [glasslinger] is just stringing a fine piece of wire between two pins and welding them on with a miniature spot welder. After that, it’s just an issue of melting a 1/4″ glass tube to the base of the tube, putting it under vacuum overnight, and sealing it shut.

Build Your Own Raytracing Minion

A canceled project left [Craig] with six Raspberry Pi based devices he calls “Minions”. A minion is a Raspberry Pi model A in a small enclosure with an Adafruit 2.2″ 320×240 SPI LCD. The LCD lives in a lollipop style circular housing above the base. [Craig] has found a use for one of his minions as a desktop raytracer.

The Raspberry Pi is quite capable of running Persistance Of Vision Raytracer, or POV-Ray. POV-Ray started life as an early PC based raytracer. Created as a port of an Amiga program called DKBTrace, which was itself a port of a Unix raytracer, POV-Ray first was released in 1987. For the uninitiated, raytracers like POV-Ray  literally trace rays from a light source to an image plane. As one would imagine, the Raspberry Pi’s little ARM processor would take quite a bit of time to raytrace a high resolution image. However, when targeting a 320×240 LCD, it’s not half bad.

[Craig’s] minion is running his own software which he calls ArtRays. Based upon a setup file, ArtRays can render images from several sources, including the internet via a WiFi dongle, or a local SD card. Rather than walk through the setup and software install, [Craig] has provided a link to download a full SD card image to build your own Minion. It might be worth experimenting on your own first though, rather than killing his server with a 1GB download.

We’re glad [Craig] has found use for one of his minions, now we have to see what he’s done with the other five!

Locking A Beer With A 3D Printer

Have a nice, refreshing IPA sitting in the fridge along with a ton of other beers that have ‘Light’ or ‘Ice’ in their name? Obviously one variety is for guests and the other is for hosts, but how do you make sure the drunkards at your house tell the difference? A beer bottle lock, of course.

Because all beer bottles are pretty much a standard size, [Jon-A-Tron] was able to create a small 3D printed device that fit over the bottle cap. The two pieces are held together with a 4-40 hex screw, and the actual lock comes from a six-pack of luggage padlocks found at the hardware store.

It’s a great device to keep the slackers away from the good stuff, and also adds a neat challenge to anyone that’s cool enough to know basic lock picking. Of course, anyone with a TSA master key can also open the beer lock, but if you’re hosting a party with guest who frequently carry master keys around with them, you’re probably having too good of a time to care.

Transferring Audio To An AVR At 12kbps

Back in the bad ‘ol days of computing, hard drives cost as much as a car, and floppy drives were incredibly expensive. The solution to this data storage problem offered by all the manufacturers was simple – an audio cassette. It’s an elegant solution to a storage problem, and something that has applications today.

[Jari] was working on a wearable message badge with an 8-pin ATTiny. To get data onto this device, he looked at his options and couldn’t find anything good; USB needs two pins and the firmware takes up 1/4 of the Flash, UART isn’t available on every computer, and Bluetooth and WiFi are expensive and complicated. This left using audio to send digital data as the simplest solution.

[Jari] went through a ton of Wikipedia articles to figure out the best modulation scheme for transferring data with audio. What he came up with is very simple: just a square wave that’s changed by turning a pin off and on. When the audio is three samples long without crossing zero, the data is 0. When it’s five samples long without crossing zero, the data is 1. There’s a 17-sample long sync pulse, and with a small circuit that acts as a zero crossing detector, [Jari] had a simple circuit that would transfer data easily and cheaply.

All the code for this extremely cheap modem is available on GitHub.