Developing film at home is most certainly a nearly forgotten art nowadays, but there are still a few very dedicated people who care enough to put in the time and study to this craft. [Jan] is one of the exceptional ones. He’s developing 35mm film with Lego (Dutch, Google translate).
For the build, [Jan] is using the Lego RCX 1.0, the first gen of the Lego Mindstorms, released in the late 90s. According to eBay, this is a significantly cheaper option for programmable Lego. The mechanics of the Lego film developer consisted of multiple tanks of chemicals. The film was loaded on a reel, suspended from a Lego gantry, and dunked into each tank for a specific amount of time.
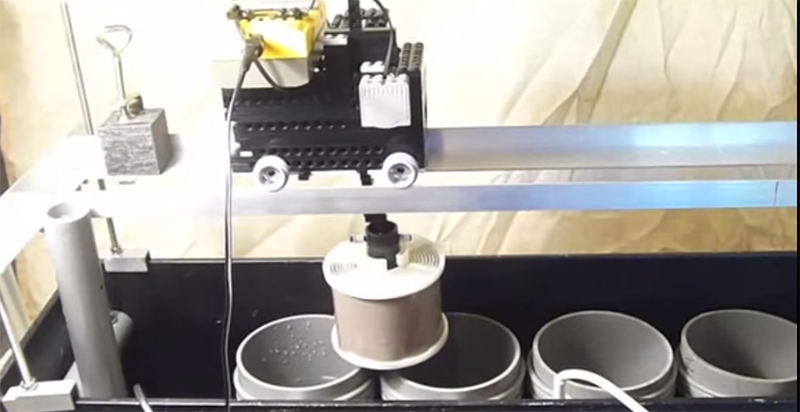
A second revision of the hardware (translate) was designed, with the film loaded into a rotating cylinder. A series of chemicals would then be pumped into this unit with the hope of reducing the amount of chemicals required. This system was eventually built using the wiper fluid pump from a car. Apparently, the system worked well, judging from the pictures developed with this system. Whether it was easy or efficient is another matter entirely.
You can check out a video of the first revision of the Lego film developing system below.
Thanks [Andrew] for sending this in.


Do the pictures come out blocky?
https://www.youtube.com/watch?v=9CdVTCDdEwI
For a second I thought someone said film.
“most certainly forgotten” eh? There would be order of magnitude more people active and developing film on APUG than there are people on hackaday.
And that ain’t 35mm film. It’s mostly 120 or 220.
Nice dip ‘n dunk, but a pity it has no agitation. If you look carefully at the photos on one of the other links, you can see that he’s built a Jobo-like rotary processor as well.
Exactly. Hackaday used to be a place where curious people mix old and new to create really awesome stuff … but then came along Arduino & Co. and things got boring… in a way the RCX/NXT are a part of that “borification” process but when we developed those “toys” we saw them as tools for kids to replicate the world around them and to be able to do meaningful scientific research at home … BTW thanks for pointing out that this is 120/220 film.
I was just about to mention APUG!
Just recently picked up a nice set of Nikor tanks and reels, and some chemicals to do my own B&W at home, for about a tenth what it costs me to send it to the lab. The first negs came out great, and I got an Epson V600 for *free* from work!
The agitation part would be the interesting setup… getting consistent, random movements… using moving liquid or moving the film. Moving the film up and down will cause the streaks in the emulsion. possibly moving the film up and down with a small pump to move the liquid, or a magnetic stirrer in the bottom… Film agitation was always a debate at RIT among the photo Techies.
Is developing a lego movie hard
The thing about this is that unless you can trust it, it’s useless. Because you can’t just go and reshoot a spoiled film and it’s oh so easy to ruin. And this particular implementation with all its shaky and flimsy bits does not inspire confidence. It’s a really nice prototype, but I would not trust it my film.
Re: agitation – what about raising the spool and lowering it back like 4 times a minute? Or is it undesirable because the developer would oxidate faster than usual or something?
Jan basically had the right idea, but the implementation was inefficient. I have worked with a similar commercial machine but the chem tanks were arranged in a circular pattern around a central armature. Additionally his design only holds a small amount of each chemical and as such would require a feed to replenish the chemistry as subsequent rolls of film are processed to achieve consistent results.
For a home based, low volume lab this would probably be the ideal setup, and by going with the circular configuration it could be enclosed in a vertical cabinet with a much smaller footprint. Additionally the cabinet equipped with a single front door would provide for fewer potential sources of light leaks during the development process.
As far as agitation too much is bad and too little is bad too. Perhaps a magnetic stirrer glued to the bottom of a plastic impeller set to bump every 30 secnds or so for about 5 seconds should do the trick, or maybe put a set of power supply fan blades on the end of a center spindle eunning down the center of the carrier rod?
Caps to cover the tanks when not in use would be a nice idea, especially floating lids to minimize oxidation, and I cant tell from the page or video how he is getting the final wash done, but with a little creativity, incorporating a water wash would be a simple matter.
This is the right site for anyone who really wants to understand this topic.
You understand so much its almost hard to argue with you (not that
I actually would want to…HaHa). You certainly put a brand new spin on a
subject that’s been written about for ages. Great stuff, just wonderful!