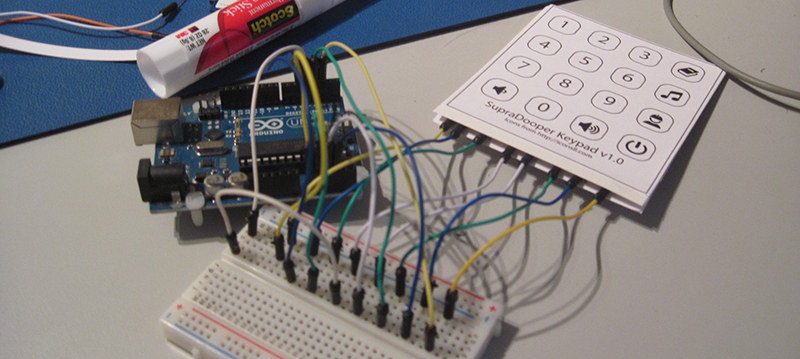
A few years ago, [Paul]’s son got a simple electronic toy that plays funny noises and sings to him. The son loves the toy, but after months and months of use, the toy was inevitably broken beyond repair. Figuring an ‘electronic box that plays sounds’ wouldn’t be a hard project to replicate, [Paul] set out on making his own. The electronics weren’t hard, but custom membrane keypads are hard to come by. No matter, because it’s actually pretty easy to build your own.
Membrane switches are usually made with silkscreen conductive inks on fancy plastic, but that’s not a requirement to build your own. All you really need are four layers – a ‘front decal’, a ‘top foil’ layer for the rows, a ‘bottom foil’ layer for the columns, and a ‘cutout’ layer that provides enough separation between the rows and columns.
[Peter] laid out the four layers in Illustrator, printed the layers, and covered the rows and columns with copper tape. The cutout layer is the crucial part that keeps the layers separated until the button is pressed, and that was just a piece of card stock with strategically placed holes.
Once the rows, columns, and other layers were glued up, [Peter] could connect this keypad up to a microcontroller. The code is very easy with the Arduino keypad library, and should stand up to the rigors of being handled by a child.


I always thought that the describing feature of a membrane switch would been his dome-effect that gives a tactile feedback.
Microswitches are only a few pennies each and it is very easy to solder up a keyboard matrix on protoboard. That will give you the tactile feel, and will likely be more reliable and last much longer to boot.
But that’s not really the point, is it?
Well, it sort of is… I mean, if the previous one didn’t break, he wouldn’t have gone to the trouble to make his own, would he? So the fact that the original wasn’t robust is the reason that we’re reading this article.
I would suggest using just a simple metal dome. You can ask for a free sample box from snaptron, works well with home made membrane switches. That way you get a tactile feedback, don’t have to worry if the ‘Top layer’ will actually short the pads below, and depending on the spacer (cardboard, pet, whatever floats your boat) thickness get a dome shape on the top layer if flexible enough material has been used (I’d suggest car wrap vinyl, i.e. 3M 180cv3).
To be able to create a single layer board you can use the four or three legged domes, and if you are in to masochism you can use the full “bowl” shaped domes by masking the side traces with some tape. The three and four legged domes have a better tactile feedback imho, but you compromise on the looks of the dome sticking through the top layer. To get better aesthetics I would suggest going the masochistic road.
I’m wondering if the metal domes can be bought for cheap somewhere. Just add a PCB with the traces arranged in a matrix layout below the domes, and a printed paper top with keys above
There are actually quite a few places. http://www.snaptron.com/ for example
I’m surprised no-one has made a zx81 related joke here…
A Z80 walks into the Spectrum Z(ed)X81 bar, see…… …….Some pun which involved the register…
HA! I’ve been to that bar.. There was a nun and a rabbi, and I think your momma was there.
No need for the antisemitic stuff here.
@als taxi – There was nothing antisemitic about his post. Stop freaking out every time somebody mentions a “Rabbi” or other thing whose very mention causes you to think someone is being antisemitic.
Great! From zx81 keyboards to antisemitism in 4 posts…
It’s also anti-Christianity, and anti-Momma. The trifecta of comments.
Indeed, there are other posts that are far more suitable for antisemitism.
I think you are mistaking it for the bar for people with either no technical skills and knowledge or a weak sense of humour or both. That is where I expect people like Rabbis, moms, nuns and you.
You might be right. In this case, I was mainly going for a very thin keypad where there are no physical switches and the circuitry is on the structure itself. This post is really about the prototype I made to figure out how well the method worked.
I’ll write up the actual replacement I made for the toy shortly so hopefully it makes a bit more sense why I didn’t go for using off the shelf buttons or such. Looking around, I couldn’t find anything that would be thin enough and have the shape I want and still have any sort of physical switch (domes, etc…). The original toy has a very nice “touch panel” sort of feel to it even though it really is just a matrix keypad.
Thanks for the comments everyone. I realized the blog post may not have made my original intention as clear as I wanted. This was a prototype of the method of building a thin matrix keypad using foil tape. The ultimate goal was to replace the decal on the toy itself. I added a brief update showing the decal layer of final keypad I made. I’ll do another post later to detail how that works and differences from the prototype (it is messier and not fully matrixed).
Blog post seems clear enough to me, motivations valid, nice clean build. The only detail I see missing is that normally the decal layer will be laminated or clear-coated to protect from dirty fingertips.
In the prototype I left the decal layer unprotected. The final new pad has vinyl decals over laminated cardstock so I hope it will stand up a bit better.
Good work… maybe laminate it like I had planned with mine
I love the legend… Aesthetically, very nice. Is there a chance that the copper foil & legend will deform and become a problem through usage?
The copper will oxidise over time and stop working, which is why people gold-plate the contacts or use other materials.
(That’s what the flux in your solder is for – it gets rid of the oxide layer)
Hopefully not before [Paul]’s son outgrows the toy, which would work out nicely. Limiting myself to materials already on hand, a coat of electroless tin (“Tinnit”) might provide a longer-lived keypad. Or a thin coating of silicone dielectric grease, which would necessitate plastic or laminate on all exposed surfaces.
This looks nice. I’ve spent a lot of time trying to figure out nice ways to make small quantities of keypads since I built a CNC pendant a few years ago. What I did was do a matrix of tactile switches and an overlay printed on inkjet vinyl. The trick that made it feel nicer was to line the spaces between the rows of keys with weather stripping foam.
Before:
https://ckcnc.files.wordpress.com/2011/01/img_0228.jpg
After:
https://ckcnc.files.wordpress.com/2011/01/img_0235.jpg
When I was a kid, some friends showed me how to make something like this out of index cards and aluminum foil. We used it to make an indicator light for the garage, to tell my mom how far to pull in. After maybe a few weeks she went back to the more reliable tennis ball on a string.
Here is how to install it easily in just 6 steps. I hope its useful: https://bit.ly/3veTkAY