DIY Camera Light Ring

Inexpensive Ring Light Makes Macro Photos Easy

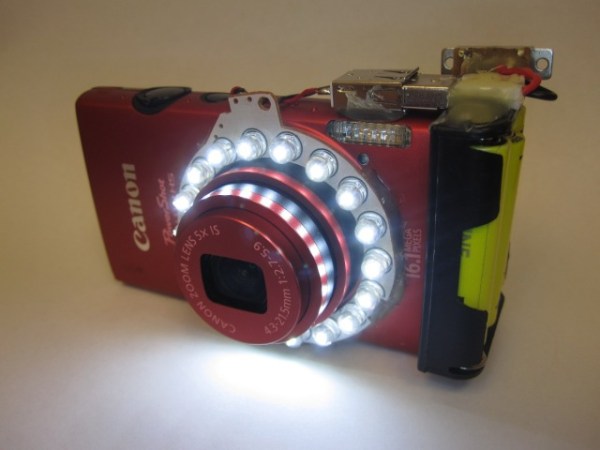
[edyb] uses his relatively inexpensive Cannon camera quite a bit. However, in dark areas or extreme closeups, the camera’s image quality leaves something to be desired. [edyb] hopped on the ‘net and found out that a ring light may cure his photo faux pas. Ring lights are nothing new but nothing existed for his lower-end point and shoot camera. With a USB-powered lamp and a spare AA battery pack kicking around, [edyb] decided to make his own.

First, the USB lamp was disassembled, luckily the LEDs were already laid out in a ring shape. The clear protective housing and gooseneck were discarded and the remaining PCB ring was glued directly to the camera. A female USB jack was then glued to the top of the camera and soldered to the two leads connected to the lamp’s PCB. The AA battery holder received a small switch and a male USB plug, also courtesy of a few dabs of glue. The now-assembled battery pack plugs directly into the camera via the USB connector and is its only method of attachment.

DIY Camera Light RingThe utilitarian modification may look crude but the results are anything but. Check out this close-up macro shot of a Canadian penny. Not too bad.

[edyb] has done some similar mods to other cameras, attaching components with magnets and even using an old Blackberry battery to power the LEDs showing that there is no one way to solve a problem. Check out the video after the break…

Continue reading “Inexpensive Ring Light Makes Macro Photos Easy”

DJ Light Box Grooves To The Beat

During a Product Design class, [Oscar de la Hera] designed and built an LED light box that responds to music — and looks good doing it!

He carefully constructed the box out of Oak with a one-way mirror top, enclosing a 6 x 6 matrix array of NeoPixels. Behind the panel is an Arduino Uno which uses an MSGEQ7 chip and two audio jacks to take in an audio signal and create a light show. When the lights are off, it looks like a fancy little mirror — but when you turn on the music it becomes alive.

If you’re curious on how it was made, or if you want to make your own, there’s a full tutorial on how to make your own over at Instructables — and don’t forget to take a look at it in action after the break!

Continue reading “DJ Light Box Grooves To The Beat”

SuperBowlLamp

Super Bowl Football Lamp Keeps You Informed

[David] loves to watch football. After his preferred team lost the playoffs, he wanted another reason to watch the big game last Sunday. He ended up building himself a football-shaped lamp that changes color based on who scored last.

[David] started with a Spark Core and a Spark Button. The Spark is the primary microcontroller and includes WiFi. The Spark Button is essentially a shield for the Spark that includes an accelerometer, some LEDs, and a few push buttons. The other part of this build was the housing. [David] used a toy football he got for free as swag from a parade.

As for the code, [David] started by first learning how to control the LEDs on the Spark Button. Then he wrote his own touchdown function to illuminate the football a specific color. Since the Spark uses the REST API, [David] is able to trigger this function by simply visiting the URL of his Spark. This makes it very simple to trigger the event.

The final part of this build was made easy thanks to IfThisThenThat (IFTTT). This is a web service that allows you to monitor and interact with various online web services. It can monitor one service, and then interact with another based on events that happen in the first service. In this case, [David] is using a “channel” added to IFTTT by ESPN. This channel can trigger when certain events happen for whatever team you specify. For this project [David] is monitoring touchdowns.

After combining all of these various services, [David] had a working light that would change colors based on which team scored. He did notice that IFTTT has anywhere between a 1 and 15 minute delay, and he hopes to improve upon this design by hooking directly to an API and skipping the extra service altogether.

A Simple But Elegant Time-Lapse Camera Slider

Time-lapse photography is always a fun way to show off the build process of a project – but sometimes it can get a bit boring and repetitive. To add a new dynamic, why not try a moving time-lapse? It’s not actually that hard to build a time-lapse slider rig. And you can do it with, or without a microcontroller.

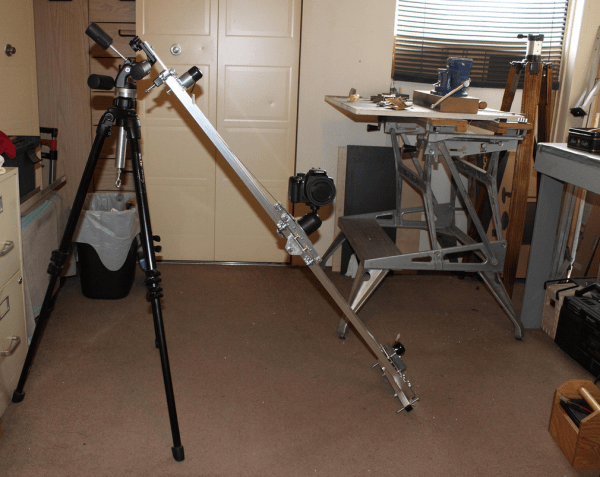
[Charlie] built this slider rig out of square aluminum tube stock which is cheap and easy to work with. It’s also a great candidate for using pop-rivets which can speed up the assembly considerably. The camera bogey uses aluminum angle stock with skateboard bearings to ride along the track. Altogether the rig is four feet long and about 6″ wide.

To pull the camera back and forth, [Charlie] has a 0.5RPM geared motor from Servo-City which results in a travel time of about 5400 seconds (90 minutes). While there aren’t any demo videos of the rig in action, we imagine it’d produce some pretty clean motion. And thanks to its rigid construction, the camera can be pulled upside down, on angles, and even vertically.

San Francisco Hackaday Hang This Thursday

This Thursday a bunch of us are going to be in San Francisco. Come join in for some after-work drinks!

Part of the crew that builds the Hackaday.io platform is located in San Francisco and we’re in town working with them. This happens to be just about the time that the 2014 Hackaday Omnibus will start shipping. Come celebrate with us! We’ve been inviting people on social media and are ecstatic about the guest list. We don’t want to call everyone out since this is a casual thing. But for instance, [Brian] somehow got connected with [Dave Grossman] who co-wrote The Secret of Monkey Island and he’s giving one of the lightning talks. You don’t want to miss this!

Leave a comment below using a valid email and we’ll send you an invite with the details.

Logic Noise: Sweet, Sweet Oscillator Sounds

Welcome to part one of a series taking you down the rabbit hole of DIY electronic synthesizers based on (largely) CMOS logic chips. Instead of synths being commodity gear made by large corporate enterprises, we’ll be building with the cheapest available parts, using and misusing digital logic. In short, don’t expect pre-packaged smooth tones, because we’ll be making creative noise machines.

If you’re the chiptunes type, you’ll probably find something you like here. If you’re the circuit bender or electro-noise-punk type, this is gonna be right up your alley. If you just like to see CMOS chips wriggle and squirm in unintended ways, feel free to look over my shoulder. If you’re the type who insists that a screwdriver can’t be used to pry open a paint can, then maybe you’d better move along. There’s a thin line between the glitch as bug and the glitch as interesting discovery, and we’ll be dancing all over it.

Continue reading “Logic Noise: Sweet, Sweet Oscillator Sounds”

Towards A Tiny Pick And Place Head

One of the projects that has been on [Peter Jansen]’s build list for a long time – besides a fully functioning tricorder, of course – is a pick and place machine. It’s a project born out of necessity; each tricorder takes four days to assemble, and assembling the motherboard takes eight hours with a soldering iron and hot air gun. The pick and place machine isn’t complete yet, but one vital component – the vacuum head for picking up components – is getting there with the help of some odd components.

A few months ago, [Peter] saw a post on Hackaday about repurposing a tiny piezo micro blower for use as an extremely small vacuum pen. The original build was extremely simple – just a few pieces of foam board and a power supply, but the potential was there. A tiny electric air pump that’s able to pick up large chips and modules along with tiny resistors without having to run a hose through the mechanics of a CNC gantry is a godsend.

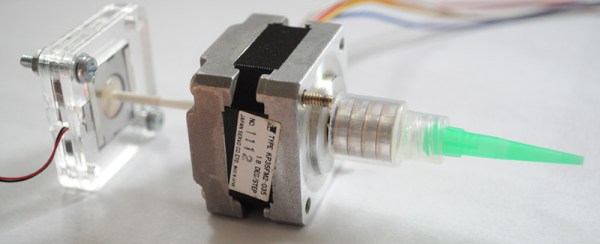
[Peter] got his hands on one of these micro blowers and started work on a proper tool head for a pick and place machine. A port on the micro blower was covered so it would suck instead of blow, the vacuum port was threaded through a stepper motor with a hollow shaft, and a fine tip was attached to the end.

What can this vacuum head pick up? 0604 size resistors aren’t a problem, but larger modules are simply too heavy. It looks like this micro blower would only be able to pick up small components. There are other options, though: [Grant Trebbin] has had some luck with a larger pump from Sparkfun, but this requires a vacuum line to run through a CNC gantry. There’s still some work to do before a small vacuum head shows up on the tool head of a pick and place machine, but given how long it takes [Peter] to put together a single tricorder, it’s well worth investing the time to do this right.