DSP 01: Real, Legit Audiophile Goodness

About six months ago, we saw [tshen2]’s work on the DSP 01, a 2-input, 6-output DSP and crossover for extreme audiophiles, and we’re not talking about oxygen free rooms here. The DSP 01 turns a USB audio output into six outputs that will give you perfectly flat eq across bass, mids, and highs, integrates with a 6x100W amplifier, and compensates for room noise. There was a huge update to the project recently and [tshen] is more than happy to share the details

Getting to this phase of the project hasn’t been without its problems. To get the DSP communicating to a computer through a USB port, [tshen2] found a potential solution in the CP2114 USB to I2S Bridge. This device should function as a USB audio sink, translating digital audio into something the DSP understands. This chip did not work in [tshen]’s design. The CP2114 simply does I2S wrong; the I2S spec says the clock must be continuous. This chip implements I2S with a SPI, firmware, and a few other things, making it incompatible with to-spec I2S.

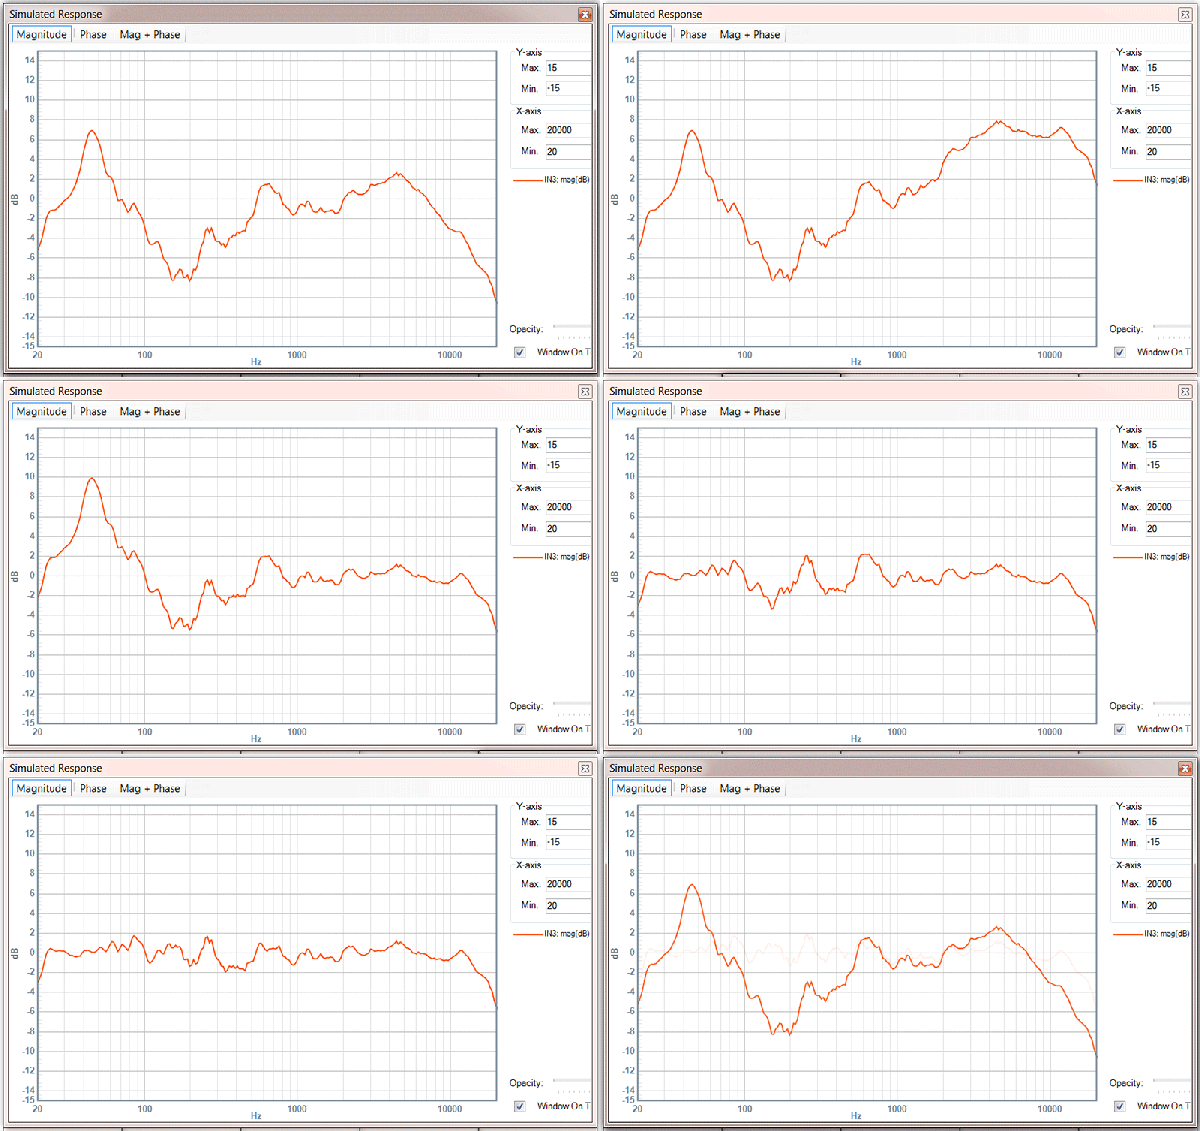
While there was some problems with getting audio in to the device, the core of the device has remained unchanged. [tshen2] is still using the Analog Devices DSP, with the interesting SigmaStudio being used to compensate for the frequency response of the room. This real, legit, science-based audiophile territory here, and an impressive development for a field that – sometimes understandably – doesn’t get the respect it deserves.

Uber Hack

Stumbling Upon An Uber Vulnerability

[Nathan] is a mobile application developer. He was recently debugging one of his new applications when he stumbled into an interesting security vulnerability while running a program called Charles. Charles is a web proxy that allows you to monitor and analyze the web traffic between your computer and the Internet. The program essentially acts as a man in the middle, allowing you to view all of the request and response data and usually giving you the ability to manipulate it.

While debugging his app, [Nathan] realized he was going to need a ride soon. After opening up the Uber app, he it occurred to him that he was still inspecting this traffic. He decided to poke around and see if he could find anything interesting. Communication from the Uber app to the Uber data center is done via HTTPS. This means that it’s encrypted to protect your information. However, if you are trying to inspect your own traffic you can use Charles to sign your own SSL certificate and decrypt all the information. That’s exactly what [Nathan] did. He doesn’t mention it in his blog post, but we have to wonder if the Uber app warned him of the invalid SSL certificate. If not, this could pose a privacy issue for other users if someone were to perform a man in the middle attack on an unsuspecting victim.

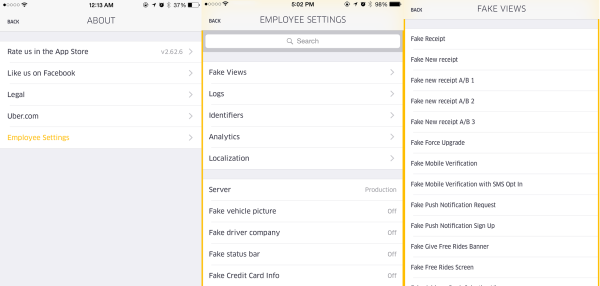
[Nathan] poked around the various requests until he saw something intriguing. There was one repeated request that is used by Uber to “receive and communicate rider location, driver availability, application configurations settings and more”. He noticed that within this request, there is a variable called “isAdmin” and it was set to false. [Nathan] used Charles to intercept this request and change the value to true. He wasn’t sure that it would do anything, but sure enough this unlocked some new features normally only accessible to Uber employees. We’re not exactly sure what these features are good for, but obviously they aren’t meant to be used by just anybody.

ChipWhisperer Hits Kickstarter

Even the most well designed crypto algorithms can be broken if someone is smart enough to connect an oscilloscope to a processor. Over the last 15 years or so, an entire domain of embedded security has cropped up around the techniques of power and side channel analysis. The tools are expensive and rare, but [Colin O’Flynn] and the ChipWhisperer are here to bring a new era of hardware security to the masses.

The ChipWhisperer was the second place winner of last year’s Hackaday Prize. It’s an interesting domain of security research, and something that was previously extremely expensive to study. If you’re looking for a general overview of what the ChipWhisperer does, you might want to check out when we bumped into [Colin] at DEFCON last year.

While the original goal of the ChipWhisperer was to bring the cost of the tools required for power and side channel analysis down to something a hackerspace or researcher could afford, this was still too expensive for a Kickstarter campaign. To that end, [Colin] designed the ChipWhisperer Lite, a cut-down version, but still something that does most of what the original could do.

There are two parts to the ChipWhisperer Lite – the main section contains a big microcontroller, a big FPGA, and a high gain, low noise amplifier. This is the core of the ChipWhisperer, and it’s where all the power analysis happens. The other part is a target board containing an XMega microcontroller. This is where you’ll run all your encryption algorithms, and where you’ll find out if they can be broken by power analysis. The main board and target board are held together by a break-away connection, so if you want to run a power analysis on another board, just snap the ChipWhisperer in half.

[Colin] is offering up a ChipWhisperer Lite for around $200 USD – far, far less than what these tools cost just a year ago. We’re looking forward to a successful campaign and all the neat findings people with this board will find.

Fish Feeder

3D Printed Fish Feeder

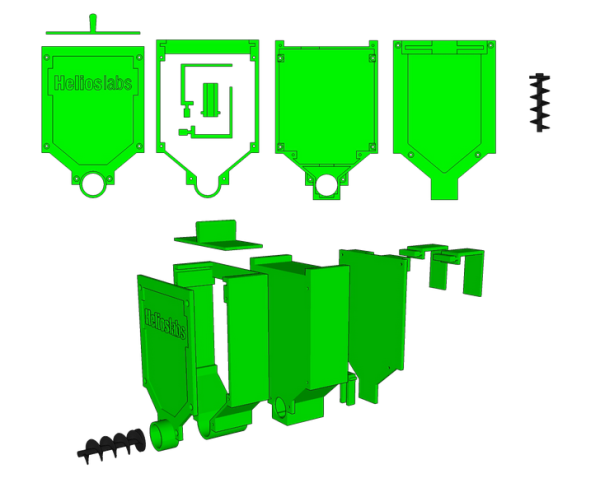
[Helios Labs] recently published version two of their 3D printed fish feeder. The system is designed to feed their fish twice a day. The design consists of nine separate STL files and can be mounted to a planter hanging above a fish tank in an aquaponics system. It probably wouldn’t take much to modify the design to work with a regular fish tank, though.

The system is very simple. The unit is primarily a box, or hopper, that holds the fish food. Towards the bottom is a 3D printed auger. The auger is super glued to the gear of a servo. The 9g servo is small and comes with internal limiters that only allow it to rotate about 180 degrees. The servo must be opened up and the limiters must be removed in order to enable a full 360 degree rotation. The servo is controlled by an Arduino, which can be mounted directly to the 3D printed case. The auger is designed in such a way as to prevent the fish food from accidentally entering the electronics compartment.

You might think that this project would use a real-time clock chip, or possibly interface with a computer to keep the time. Instead, the code simply feeds the fish one time as soon as it’s plugged in. Then it uses the “delay” function in order to wait a set period of time before feeding the fish a second time. In the example code this is set to 28,800,000 milliseconds, or eight hours. After feeding the fish a second time, the delay function is called again in order to wait until the original starting time.

Hacklet 36 – Oscilloscope Projects

Oscilloscopes are one of the most often used tools of the engineer, hacker, or maker. Voltmeters can do a lot, but when you really need to get a good look at a signal, a good scope is invaluable. This week’s hacklet is triggered by the rising slope of some of the best Oscilloscope projects on Hackaday.io!
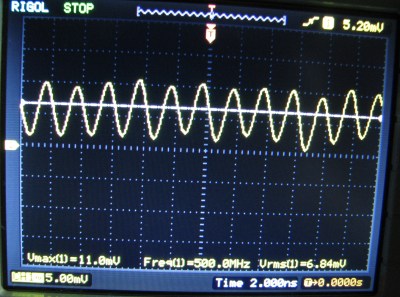
rigol500We start with [DainBramage’s] recent project Stretching the Limits of a Rigol DS-1102E Scope. The new Rigol ds1054z may be getting all the press lately, but the older DS-1102E (100 MHz) model is still a very capable scope. [DainBramage] broke out his vintage Singer CSM-1 service monitor to generate frequencies all the way up to 500 MHz. The Rigol did admirably well, detecting a sine wave all the way up to 500 MHz. This is in part due to the scope’s 1 gigasample-per-second sampling rate. Once things got beyond the specified limit of 100 MHz though, the signal began to attenuate.  Not bad for pushing a low-end scope way beyond its limits!


cornel-scopeNext up is [Bruce Land] with his PIC32 oscilloscope. Microcontroller scope projects are nothing new, but one that runs at nearly 1 MHz sampling rate while generating NTSC composite video is nothing to sneeze at. [Bruce] pulled this off by using Direct Memory Access (DMA) to move the data from the ADC to memory, and to get the video data from memory to the I/O pins used to generate video. The video itself is created by a resistor tree DAC. All you need to make black and white video is three resistors and two I/O pins. [Bruce] says the entire scope cost about $4.00 us in parts!

scope-hand[Jacob Christ] mixed art and science with his chipKIT Oscilloscope Plotter. [Jacob] used a Microchip PIC32 based Fubarino to draw patterns on his scope. To do this the scope must be set to X-Y mode. [Jacob] paired his Fubarino with a MCP4902 Digital to Analog Converter (DAC). Using a dedicated DAC is a great way to do this. [Jacob’s] images are a testament to that, as they’re some of the cleanest “scope art” drawings we’ve seen. Much like [Bruce Land], [Jacob] used his project as the basis for a college class. In fact, the image to the left was created by one of his students!

Want more scope goodness? Check out our new Oscilloscope Projects List!

Hackaday.io Update!

Hackaday.io is getting new features every day. Our dev team has just rolled out a new gallery view. Just click on a project’s featured image, or the “View Gallery” button, and you will be taken to a gallery view of every image used in the project – including log images. YouTube videos will render in the gallery as well. It’s a great way to view a timeline of progress for some of the projects on hackaday.io. For a great example of this, check out OpenMV’s gallery.

In other Hackaday.io news, check out the Caption CERN Contest! Every week we put up a new image from CERN’s archives. The Hackaday.io user who comes up with the funniest caption wins a T-Shirt from The Hackaday Store!

Looks like we’ve hit the end of the trace for this Hacklet. Same hack time, same hack channel, bringing you the best of Hackaday.io!

Custom Case Made Entirely Out Of PCBs

So you’ve finished your project. You’ve got a wonderful circuit, a beautiful PCB, and everything works perfectly. You’re done right? Well, maybe not. Sure, a bare PCB might be fine for a dev board, but what if you have a LCD to mount, a knob that needs turning, and buttons that need pressing. Yeah, that potentiometer hanging off the board by a few wires isn’t so pretty, is it? So it’s time for a case. Yuck. We all hate modifying cases.

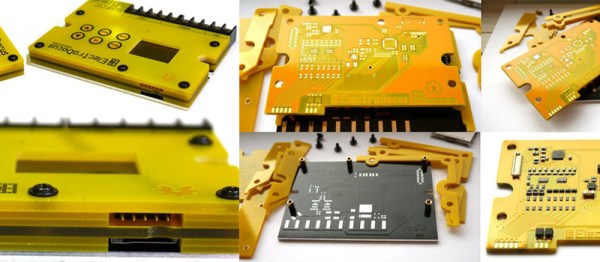
[Electrodacus] came up with a clever solution in the form of stacking PCBs to form a case. In his project, he actually has the circuitry spread across 3 PCBs, and uses surface mount connectors to connect them in a stack. Along the edges are specifically shaped PCBs to complete the enclosure. This technique could be used with only one PCB containing all the circuitry, and the others acting as the case sides and top.

In this solar battery management project, the base layer has most of the power circuitry. This layer uses an aluminum metal core PCB for heat dissipation. The center layer is home for the micro controller and supporting components. And the top layer is the “front panel” with capacitive touch buttons and a cut out for a LCD. The top layer silk screen contains the logo, button markings, and the pin out of all the connectors.

If you hate drilling and filling cases (as much as we do), this technique might be right for your next project.

[via EEVBlog Forums]

Control board for a Wi-Fi enabled thermostat

Controlling Central Heating Via Wi-Fi

If you’ve ever lived in a building with manually controlled central heating, you’ll probably understand [Martin]’s motivation for this hack. These heating systems often have old fashioned valves to control the radiator. No Nest support, no thermostat, just a knob you turn.

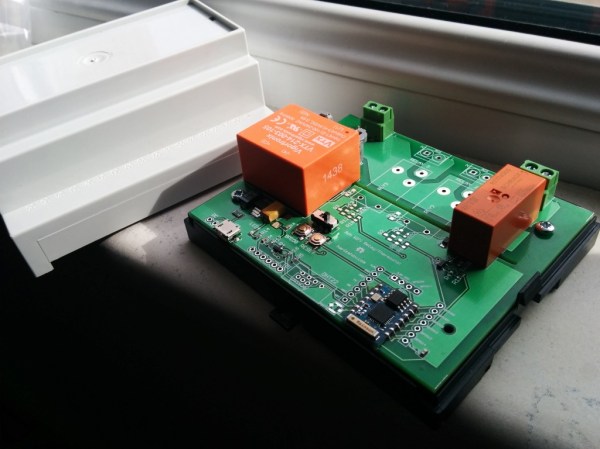
To solve this problem, [Martin] built a Wi-Fi enabled thermostat. This impressive build brings together a custom PCB based on the ESP8266 Wi-Fi microcontroller and a mobile-friendly web UI based on the Open Thermostat Scheduler. The project’s web server is fully self-contained on the ESP8266.

To replace that manual value, [Martin] used a thermoelectric actuator from a Swiss company called HERZ. This is driven by a relay, which is controlled by the ESP8266 microcontroller. Based on the schedule and the measured temperature, the actuator lets fluid flow through the radiator and heat the room.

As a bonus, the device supports NTP for getting the time, MQTT for publishing real-time data, and ThingSpeak for logging and graphing historic data. The source code and design files are available under a Creative Commons license.