If you’ve ever seen 3D printed parts form an extrusion type printer, one of the first things you’ll notice is the texture. It’s caused by the printer laying down its plastic layer after layer. This surface texture isn’t always desirable, so people have found a few ways to smooth the 3D printed part out. For example if you are using ABS, you can rinse or “paint” the part with acetone. Another method of smoothing is heat up some acetone in a container, and let the acetone vapors do work to smooth the finished part.
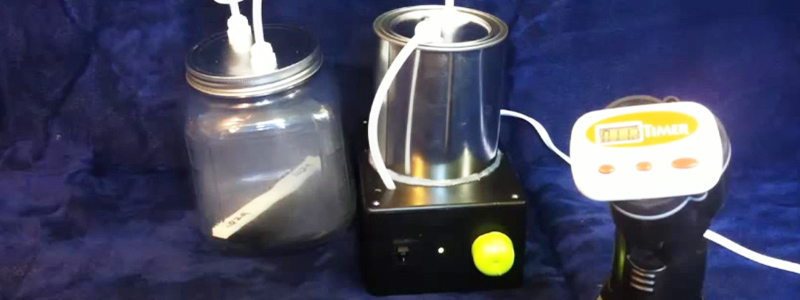
[Mike] from engineerdog.com thinks he may have found a more elegant solution using an inexpensive ultrasonic humidifier you can buy online for about $40 USD. This room humidifier uses a piezoelectric transducer that can vibrate liquids at a high frequency to produce a mist. [Mike] removed the transducer and electronics from the humidifier and mounted it into a paint can. This is where the acetone is stored, and turned into a vapor by the transducer. An aquarium pump is used to transfer the highly concentrated vapors into the polishing chamber (an extra large pickle jar.) He added a spring loaded, electrical timer (the kind you might find in the bathroom at an office building) to make his vapor polisher as easy to use as a microwave oven.
[Mike] concludes his post with some strength testing of parts before and after acetone treatment, and was surprised to find that the parts were weaker after the treatment. You can read more about that on his blog and see a video of the vapor polisher after the break.


Highly flammable liquid turned into a fine mist – what cold possibly go wrong….?
The phrase “fuel-air explosive” comes to mind….
Add broken glass jar pieces flying off in every direction in the explosion… What can possibly go wrong?
If you are using a dangerous fuel-air mixture, you should at least have some sense to use a safer container that can contain the explosion.
This could be safe with precautions. The acetone would probably saturate the air within the closed system and would be harder to ignite than you might think. Any danger could be mitigated by placing it in a fume hood, or just blowing on it with a fan, which would have an opposite effect, rarefying any leakage to non-flammable concentrations.
“what cold possibly go wrong….?”
NOTHING, if we apply common sense and our Earth Sciences studies.
Starting from Professional level to the most simple.
+Fill with an inert heavy gas from the noble gas family (such as Argon used in arc welding)
+Perhaps pure Nitrogen (not Nitrogen Oxide obviously))
+CO2 from a paintball tank. (Conversely we can wait for a small piece of DRY ICE (Carbon Dioxide) to melt and displace the oxygen.)
+A use teaspoon or tablespoon of 91% isopropyl, ignite it and lightly cover the container (mind the vacuum doesn’t seal the jar)
+++Easiest way is before starting the process, hold your breath as long as possible, exhale into the jar. (Unless you’ve been drinking Bacardi 151 or Moonshine.)
The only caveat SHOULD be ensure that we aren’t doing this in a extremely hot environment or the equipment in use doesn’t allow the liquid to reach flashpoint.
-=-=-=-
There are a few DIY copper heat sink tubing articles about using ACETONE. The key is standard copper tubing, copper braid, solder wick, PRE-sealing the tube at the bottom. Immersing copper tubing in a garbage can or bucket full of ice water. You CAN crimp, THEN SOLDER the open end of the copper tubing. The copper tube and braid setup MUST be measured for full displacement and only 1/3 to a maximum 1/2 filled.
engineeringtoolbox has common liquid boiling points. It is surprising to note spite of the extremely quick evaporation rate of Acetone (function of exposed surface area?). It’s boiling point is 50.5 C or 133 F.
-=-=-=-=-
[mikes electric stuff] You are absolutely correct however this is definitely a yellow or orange warning label project.
You can see the tube on the lid of the jar. It appears to have a liquid in it. If that was a non-volatile liquid that would mix with acetone, the exhaust gas would be trapped in solution. Thus preventing an explosion hazard outside the system. A pretty effiecent way to solve the immediate danger of a fire.
https://www.youtube.com/watch?v=ZJWhfpWlGFg
That video is very misleading. If you are actively producing an acetone fog that can flow out of the container then you’re going to have a bad time. If that flame in the video was left burning, the glass container would have shattered/cracked and then you’d have quite a serious problem. It’s simpler and safer to use a containment vessel that won’t spontaneously change state nor can act as a dangerous pressure vessel.
It’s easy to just go “oh, the person who actually tested this is wrong because X Y Z that I didn’t actually do myself but I’m convinced I’m right anyway”.
Tested it before. It doesn’t get hot enough to do that with a regular glass (Ball) jar.
Seriously, fears of that are WAY overblown. Otherwise anytime some nail polish remover spilled, we’d have to take it as seriously as a gas leak.
You don’t have enough in there to create that much heat.
How much heat will you get when you knock it over trying to put out the harmless little fire?
These days, they are moving away from Acetone for that.
Typically, you don’t heat up nail polish removers to generate lots of vapor. In a regular spill, the percentage of vapor is very low in *open air*. Once the concentration reach a certain threshold, then that changes.
Ethyl acetate is still flammable and explosive over a similar range as acetone (2-11% vs 2.6-13%). The switch is due to health concerns over exposure to ketones and the drying of skin and defatting that occurs with acetone exposure.
[George Graves ] Please see my comment above. You aren’t igniting liquid acetone.
youtube fMrj9VFl2cY
This is true George, except in this case where you have a closed non-open air setup. With a closed volume, you have pressurization and an explosive reaction when the container cannot withstand the pressure. (If ignition occurs – see gas engines) That being said, this setup in the article, would never reach the stoichiometric ratios for ignition to happen.
I suspect the softening was due to insufficient drying time after treatment. The video shows the bars are actually “hollow” in the middle with lower density printing under the surface. Solvent vapor would diffuse into that area through micro holes and also through the plastic itself pretty easily.
The problem is getting it back out again. I’d be curious if the strength came back after baking at say 75°C for 5 hours or so or just air drying for a week.
Alternatively the test could be repeated on a more solid printing subject that was not “spongy” on the inside.
I don’t understand why anyone would think acetone vapor smoothing would enhance the strength part. The liquid only prenetrates about 10 um into the surface as a mist. So in reality you get good bonding of very outer skin of the plastic. That’s about it.
Abs smoothing almost never looks good to me. I’ve seen excellent results with rounded objects, but it usually warps holes, messes up sharp corners and if using a high layer height, gives those lines a bumpy appearance instead of scanline look. Part strength is about temperature, infill percentage, and skin thickness. The part he printed was a terrible example. It looks like one or two perimeters, two top and bottom layers, 25% infill. No wonder they broke like that.
“I don’t understand why anyone would think acetone vapor smoothing would enhance the strength part”
I guess they assume they are forcing out the surface bubbles inherent to the open air process?
ABS does have very good modulus but yeah the tensile strength leaves much to be desired (or is it the other way around). Perhaps a nozzle that follows directly behind the direction of the printing head that disperses cornstarch or fine flour? (Sorry, my thoughts drifted for a second at that old Heston movie where the Pharaoh says “Let them make bricks without hay”)
Vacuum formed ABS is fairly durable.
I guess a good Hackaday experiment/entry would be to place a 3D printer inside a high PSI steel container? (Do all 3D printers only spool out the ABS thread and melt at the nozzle point? Maybe someone can give some more info if air pressure is involved. If there isn’t any air flow involved maybe try a Vacuum sealed/Low PSI environment could give a better results.)
The high end option (AND EXTREMELY DANGEROUS) might involve superglue / cyanoacrylate fuming after the initial smoothing? But again we go back to your initial correct assessment that it’s only several micrometers thick.
What you say is true. However you can’t get the strength unless it’s made a solid piece of abs. The point of smoothing stations, and setups like this, is for cosmetics, and more importantly, adding strength ALONG the print layers. If his flex test was done again against the layers not with them, you’d see a difference.
The non smoothed part would delaminate and fail. The adhesion between fdm layers isn’t the greatest. Smoothing the outside effectively prevents the edges from splitting apart and having the split continue to run along the path.
“preventing an explosion hazard outside the system”
So what exhaust gas? The displaced inert gas we filled the workspace with before we started or the acetone that is evaporating (fumes) because of the amount of surface liquid exposed or that we have a high ambient or enclosed temperature? So, a static spark is or is not capable or igniting a trail of acetone fume? Do you recommend a ESD preventive measures for additional protection?
“stoichiometric ratios for ignition”
*rubs eyes* Do you have a link for that information? I’d be interested in the control process of how Funny Cars run off of Methanol. Perhaps a optimization algorithm on how to accelerate or prevent ignition by timed diffusion of inert gases. Dude, Focus.
“more importantly, adding strength ALONG the print layers.”
Horizontally or vertical wise? I mean are we supporting weight and compression? or using it to maintain structural integrity similar to a skeleton? Assuming we are not printing a SOLID block of the object should we be exposing the internal framework as well as the external (for decoration as you say). Would placing the printed object on another axis and performing a second exposure (OR third axis) assist in adding strength? What have you tried?
-=-=-=-
Sedzy Plz. You know that guy that is pseudo-intelectual that sits in IRC and spouts random crap that attempts to use big words, posts useless links and doesn’t help? That’s the role we see you doing right now. 3 bane posts and ZERO clue.
We are all reading paywall theoretical BS from your posts, cut it out. Present applicable solutions, simple workarounds, positive ideas in layman grammar or STFU & GTFO.
Big_Up’s:
I’m not going to get into a troll argument with you. In fact I wasn’t arguing anything you posted, if you re-read, you’ll find we made the same points.
My initial point was the setup in the article would NOT reach the proper Air-Fuel Ratios (Stoichiometric ratio of 4:1 for typical Acetone) to ignite. There is an exhaust vent in this setup, and the liquid would trap any volatile fume escaping. You could exercise ESD, but it wouldn’t be required.
http://en.wikipedia.org/wiki/Stoichiometry#Stoichiometric_air-to-fuel_ratios_of_common_fuels
As for your funny car… try Google for how funny cars work, you’ll find Methanol or other Alcohols have their own Air-Fuel ratios that allow it to have 4000+ horsepower when it’s mixed correctly. But that’s not relevant to this article. – see Carburetors.
FDM 3D printing, lays down sheets/lines of material. One on top of the other. (like plywood) Those layers aren’t as strong parallel to the print laydown, as they are 90 degrees to the print laydown. So if you smooth/melt/glue (whatever) the edges together, the layers will be less likely to delaminate and form a split run. Again, goto Google, and educate yourself. Another user posted after, and referenced a potato chip bag being opened. Excellent metaphor.
I have years of experience in commercial FDM and SLA 3D printing, I know what I am talking about, but I’m not going to prove it to you. You can either read things, and take the information from them, or you can talk smack IRC style. I choose the first.
Happy Printing. :)
“I have years of experience in commercial FDM and SLA 3D printing, I know what I am talking about”
Thank you. Superiority complexes like this make it difficult for others better apply general knowledge. It would explain the lack of explaining what you meant, be it basic assumptions that everyone understands what you know and your unwillingness to extrapolate in greater context.
Perhaps the years of experience can also attribute to the structuring of your posts in acronym filled difficult “trade sekret” based language.
I’m glad you provided us with great insights to helping us research. What was that site called again? Google? Hmmm….
In short, you didn’t present new ideas, you didn’t extrapolate the terminology and you didn’t define the context and address how to solve various concerns.
Glad you “know what your talking about”. Yeah, we are done with you.
Same reason you can easily continue tearing open a bag of chips, if you can just start a tear. Or acrylic snaps easily across a small score. Edge defects travel.
Somewhat related – I remember seeing a UV resin printed dog tag here a few weeks back. Originally flexible, it was made rigid by addition of just a few um of nickel plating. Had to think about that one for a minute. Made sense when I realized that for the plastic to bend, the coating wouldn’t just have to bend, but stretch as well. And it’s far stronger in that aspect.
I wonder if slowly rotating the part while in the vapor bath, so that gravity takes second fiddle to surface tension, might ameliorate some of the issues you note with smoothing.
couldn’t they just add a heated spatula or something to 3D printers that as a last step moves over the surface? I mean the software has the outline, and you should be able to use that to somehow go over it and smooth it out without ending up rounding the parts that should not be smoothed like acetone vapor tends to do.
How’s the energy efficiency of that ultrasonic humidifier like? I was trying to think up a design for a solar powered personal water desalination machine.
You understand ultrasonic humidifiers don’t boil the liquid, yes? They simply agitate the fluid until micro droplets are ejected from the liquid surface.
That got me thinking Mark. How micro are the droplets? I’m thinking something like an inflatable Gortex balloon. would be pretty cool to have the balloon sweat freshwater.
Just read newsoffice mit edu 2012 graphene-water-desalination-0702
@Kratz – Forget energy efficiency for solar power, it is solar right? I’m thinking back to a show called Voyage of the Mimi where the cast was stuck on an island. Anyway, the Number 1 awesome tech I learned was the open air desalinator.
The Top of the tripod was CLEAR plastic. The bottom was BLACK plastic. This elongated triangle would collect the freshwater humidity at the TOP of the clear plastic due to the evaporation from the BLACK plastic bottom pool.
Anyway a cup or two a day from droplets.
If you REALLY want to get SCIENCE HARD. Peltier cooler and heat pipes (See above for DIY heatpipe). If you want to get ULTRA SCIENCE HARD look-up the specs on a regular microwave (gets hot because tuned to only agitate H2O molecules ) and calibrate the ultrasonic humidifier to only emanate that specific freq. Maybe Piezo Speaker/Microphone Hexagon array (yes, I gave that one away as well search for bass drum microphone pickup). No, I haven’t tried any of this stuff.
Logically, the Protip would be store the solar energy during the day and run the Peltier coolers at night when there is more humidity in the air to condense.
They are on the order of 1 to 10 um depending on the viscosity of the liquid.
Big_Up’s – I don’t know who you are – but thank you for reminding me of a childhood classic. Voyage of the Mimi was brodcast only a few times(on my PBS) – and it was a amazing show. Thank you, thank you, thank you. I wonder if I should post it on hackaday. I’ll re-watch it and see if it won’t confuse too many people about it’s 80’s awesomeness.
Yep. [Kratz], if you’ve ever used a ultrasonic humidifier with tap water, you’ll be familiar with the white powder it deposits on nearby items; a result of the ejected droplets retaining the mineral content in water.
Otherwise efficiency is quite good. Perhaps if your desalinator works primarily on the principle of a solar still, and the ultrasonic mist doesn’t reach the top condenser sheet but produces droplets which evaporate more easily due to their huge surface area, you *might* be able to produce higher throughput from a device of a given size and insolation – at least when deployed. When stowed, a traditional solar still is cheaper and more compact though, since all you really need is polyethylene sheet, and all the other components can be “found” or multipurpose items.
Indeed. I once tried to make a whole-house humidifier using an array of ultrasonic transducers (similar to what you might find in a commercial greenhouse). The array worked pretty well. A couple days later the flue temperature sensors on both of my furnaces began tripping which indicated not enough air was passing over the heat exchangers. Turns out the filters were completely clogged with white dust.
So that ended my ultrasonic house humidifier experiment. Couldn’t come up with an affordable way to obtain 10-12 gallons of mineral-free water per day.
Jimmie, Jimmie, Jimmie!
That doesn’t mean it didn’t work!
Just a heads up, if you want to try this route, Ozone isn’t a joke (it does burn both flora and fauna) so maybe a smaller trial would be required. Try the smallest NEON sign, bust the glass and grab the transformer place 2 grids between the Transducers and the Filter. Pass the fog from the chicken-wire mesh (x2 or x3) to a Ground Negative (x2 or x3) chicken-wire mesh.
Everyone knows pure distilled water does not conduct current. You might get the mineral deposits to form on the chicken wire instead of the filters.
Maybe 2 computers fans at low RPM in push pull along a tube of metallic window screen to collect the freshwater.
Just keep in mind two things.
As long as it isn’t salt or toxic minerals it doesn’t matter. Iron, Calcium, Magnesium, Selenium, Potassium even Sulfur is tolerable in drinking water. If you can get out Sodium Chloride, Mercury, Arsenic and Cadmium you would be awesome.
And famous quote, “I have not failed. I’ve just found 10,000 ways that won’t work.” Please don’t get shunted into a dead end job. Keep working at this.
[George Graves] I sent you the link on the solar still.
You can get a piezoelectric fogger on amazon for $12, they are made for doing diy fountain decorations and as a added bonus it comes with colored LED’s.