If you’re testing the amount of ammonia, nitrates, or just the pH of a pond, pool, or aquaculture setup, there’s two ways to do it. The first is with test tubes and chemicals: put some water in the test tube, add some chemicals, and match it to a color card. The second option is with expensive sensors.
[James] has a better idea. Since pumps, RGB LEDs, and light sensors exist, he’s building a reagent robot that will be able to measure ammonia, chlorine, nitrates, and pH without purely electronic sensors. The idea is to fill a clear container with water, add those fancy chemicals that come from aquarium supply stores, and measure the color of the water.
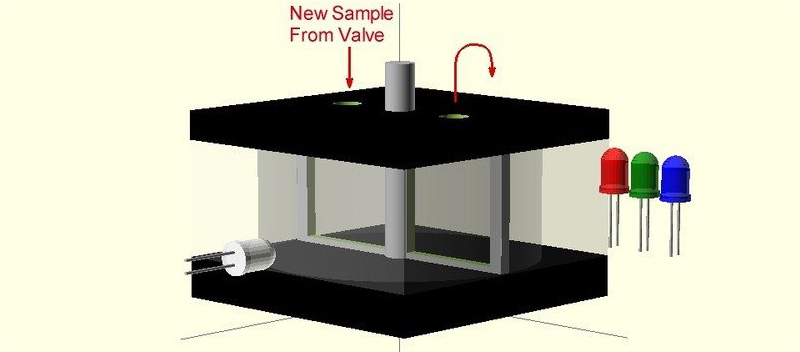
Right now, [James] has a bunch of stepper motors, valves, and solenoids all working together to pump water into his clear container. The next step will be to mount some RGB LEDs, a light sensor, and calibrate everything so colors can be measured.
It’s a great idea for electronic monitoring of aquaponics, ponds, and aquariums; those indicator chemicals are pretty inexpensive compared to electronic sensors, and once [James] has one measurement/reagent working, adding another is just a matter of putting in a few more tubes and pumps. You can check out a video of the progress so far below.


i watched this video its really good. You got very valuable content here
VERY awesome. I know many aquarists who would love something like this. Some years back I experimented with reading the colors with a flatbed scanner, with some success; however, both the lengthy initial calibration and variability of the CCFL in the scanner made it unpractical for general usage.
I have one concern. It sounds like the test reagents are going to be pumped in? This will be a problem with the nitrate test in particular. The instructions for those tests tell you to shake one of the reagent bottles before dispensing. That’s because the active ingredient is actually solid crystals in liquid suspension, which settle out over time, and given enough time will also clump together. Both of which prevent them from being evenly and correctly distributed. They also have a nasty property of packing the dispenser tip in a way that they strain out any additional particles from being dispensed, leading to a falsely low reading; a user sometimes gets a clue this is happening when it suddenly becomes harder to squeeze out additional drops. Nitrate tests have earned a reputation for being notoriously unreliable, but few are aware that this is the reason why. Shaking them VIOLENTLY, much more so than the instructions hint at, helps greatly. So does beating the bottle on a flat surface, as impact is better than shaking for breaking up clumps. As a last resort for old test kits, the dispenser opening can be slightly enlarged with a needle. I have only been able to get consistent results from nitrate tests since adopting these techniques, for which I credit a Red Sea test kit chemist, with whom I had a long and productive phone conversation.
I’m not sure how one might address these issues in an automatic dispenser, if that’s what [James] is planning.
Store the problem reagent in a container that can be vibrated quite violently? Before you start the test, a big motor gives it a shakeup. You could even have a solenoid hammer to whack the bottom. Ugly, yes, but what else can you do?
That seems reasonable, but I suspect it won’t be that easy. From [James]’ page:
“Figuring out the reagent injection system is next… anyone have experience with syringes, luer locks, and one way valves?”
Let’s assume he goes with syringes. He could mount all the syringes, and plunger actuators, on a rack driven by an oscillating motor that shakes things up. However, unlike a reagent bottle, there is no airspace in a syringe. So I assume it’s going to be harder induce sufficient motion in the fluids inside. Especially if there is flexible tubing leading from the syringes to the test chamber, which being non-rigidly attached, would receive less mechanical energy. Would you agree this is a correct analysis?
Or use a magnetically coupled mixer like the ones that laboratories have.
Nice idea with possibilities, but I see a few possible issues.
First is that calibration is going to be tough. The components drift,among other things, and since many of the readings are going to be small changes, the drift may overwhelm the change in property if the calibration isn;t done before every reading. Experience tells me that this is likely to be a major problem if no provision is there to autocalibrate.
Second concern is due to the wavelengths and bandwidths of the LEDs, as well as the specific absorption profile of the reaction products. Not sure if this is going to be a major issue here… I don’t know what LEDs are being used or what the absorption spectrums are. May be ok, since the reagent is known. If unlucky, the product may not have a strong absorption at any of the LED wavelengths. This is why spectrophotometers still use incandescent illumination and prisms to select wavelength during scan.
Nothing in the linked writeup addresses these, so I am wondering if they have been addressed.
Hanna Instruments has a very wide range of electronic colorimeters:
http://shop.hannainst.com/products/photometers-colorimeters.html
Each of these is about $50, which is fairly cheap for a colorimeter including reagents (especially considering the cost of Hanna reagents). However, each is single purpose, so if you want to perform a range of tests the costs add up quickly. As far as I know, they’re all LED based. Example text from the HI700 Ammonia Low Range Checker:
“Professional instrumentation incorporates a light source such as an LED or tungsten lamp with a filter and a light sensing detector to precisely determine absorbance and ion concentration. Professional instrumentation offers greater resolution and accuracy but can cost hundreds of dollars. The Hanna Ammonia Low Range Checker® uses a fixed wavelength LED and silicon photo detector to provide the accuracy of professional instrumentation at the affordable price of a chemical test kit.”
This, along with my previous experiments using a scanner as a colorimeter, are enough that I think the issues you listed, while valid, aren’t insurmountable. It only has to perform with better accuracy than manually reading a vial pressed against a color chart to be useful. Which is rather easy to accomplish, you can have three people try to read the same vial, and they will often give three different answers!
While [James]’ project page is rather sparse, he at least mentioned he’ll be performing a turbidity test to establish the base color of the water without reagents first. That’s a promising sign he’s familiar with the issues he’ll be facing.
Thanks for the interest, positive comments and /especially/ for the concerns posted here. Helps to know what to look out for.
But folks, I need help. Does anyone have access to, or know how to access, basic medical supplies in small quantities? Everything I can find is a box of 20 when I need ONE! If I buy a huge box of each part, the price gets crazy fast, and without being able to play with the parts, I don’t know if what I order will actually work.
Specifically, I’m building the injector pump for the reagent, and I’ve found designs that look pretty good using a servo to open and close a syringe, which would be hooked to a reservoir with two one way valves. The medical community calls them “back flow preventers” and they connect together with something call “luer loks”. Also, there are curved hypodermic needles that would be perfect to deliver the reagent to the reaction chamber.
I need:
– 1 small syringe that moves easily (this is a real problem because no one lists the force to activate)
– 2 back flow valves, one between the reservoir and the syringe, one between the syringe and the needle.
– 1 curved needle of a very large bore, and
– some means of connecting all that together and to the reservoir. I assume if they are all luer lok parts, they will all hook to each other already.
Here is a link to a very basic version (no reservoir or valves or needle) of the injector design I’ve selected:
http://www.thingiverse.com/thing:219281
Help?