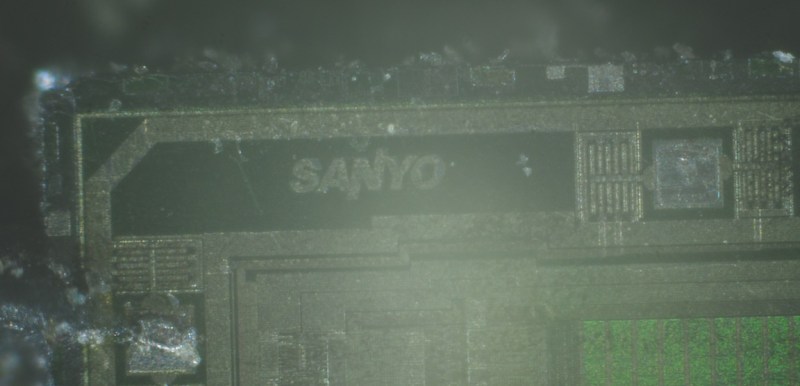
The black blob IC is of a particular annoyance to the modern hacker. There is no harm in peeking under the hood to see how the IC works. But when it’s covered in a mountain of seemingly indestructible epoxy, this can be a bit difficult. And such was the case for [Jamie], who had found an old electronic pocket dictionary whose main PC board boasted not one, but two of the black blob ICs.
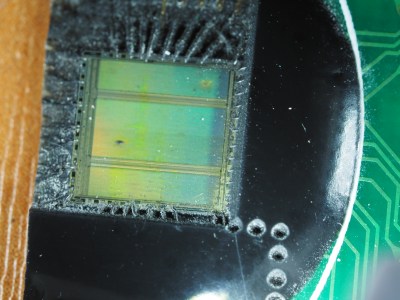 The lack of traces between the two pushed [Jamie’s] curiosity past the tipping point. He didn’t have access to any nitric acid which is used in the customary chemical decapping process. He did, however, have access to a laser cutter. It turns out that decapping ICs with a laser cutter is not only possible, it’s not that difficult.
100% power at 300mm per seconds on a cheap 40 Watt “eBay” laser cutter is all it takes. Three passes did the trick for [Jamie], but this will be dependent on the thickness of the black blob epoxy. Each case will likely be unique.
Got a laser cutter? Then take a peek at a few black blob ICs and let us know what you find.
Thanks to [ex-parrot] for the tip!


IIRC this talk mentions the type of laser (wavelength) that passes through the silicon:
https://media.ccc.de/browse/congress/2014/31c3_-_6084_-_en_-_saal_6_-_201412281130_-_uncaging_microchips_-_peter_laackmann_-_marcus_janke.html
It also gives hints on how to make fuming nitric acid at home.
Sorry for the accent of my fellow countrymen.
Just doubt about that 300mm per second, thats 30cm per second – china cutters are not capable of that speed. Instead there is a bug in application that comes with cutter. I do have this cutter too.
It’s actually pretty much accurate; I’m using a slightly nicer controller than the standard, and 30cm/second isn’t extreme at all. From what I remember, the stock controller could manage about that speed too, though.
The steppers used in these cutters are not geared down at all, and are just driving a belt pulling the head/mirror assembly. It’s about a 12.5mm diameter pulley on mine, which means a 40mm belt movement per revolution, or about 7.5 revs/second (450rpm) – very reasonable for these steppers.
Stock controller can do 300mm/s. If you’re enthusiastic you can do over twice that on the X axis.
Depends on what you are cutting and how fresh that laser is, my EBAY one started off cutting 3mm Acrylic at 20cm and was down to 5 at the end of the tube life.
Any way I did something very similar with the power turned down to remove the chip markings
[youtube http://www.youtube.com/watch?v=4yGWuUFiFEI&w=560&h=315%5D
True. But I was not pointing out speed vs power, but just speed itself, without cutting anything. There are two ways of cutting/engraving with china lasers – using Moshi draw or how its called, which shows numbers like 100-300mm/s or use Corel draw plugin (called corel laser or so) from same author which shows numbers like 3-7mm/s for the same speed. I think here it means cm/s, not mm/s. Did you notice? This is most confusing. So definitely there is something wrong about the numbers. While cutting, it cant hold high speeds, because on sharp edges it will not slow down, it tries to change direction at full speed which leads to go bit off at every sharp turn. According to my experience it can do safely 6mm/s in application value (which I think means 6cm/s in real life, lol)
From the video you posted I counted the lasers traveled across 22 times in 10 seconds, in case of 2cm distance (guess by jumper size) equals to 22 x 4 = 88cm in 10 seconds = 90mm/s. What says the application?
Also laser head does not seems like the one used in 40W ebay table cutter refered in article. Maybe not same cutter?
I may be completely wrong and missed some important point. Just it seems to me the numbers are not real.
Yeah the gantry can only change speed at so fast and at a given power it actually leaves a hot spot where more power is put in to the material. With regards to the Head I thought he had one of those cheaper ones with a manual power control so yeah maybe different heads ..Same general idea.
The exact cutting speeds are meaningless except for that individual cutter and really only any use as a guide.
There are two versions of the eBay 40W laser, the article version has the clamp for holding rubber stamps (best discarded), this one looks like the nicer variety with the honeycomb table and Z-axis lift. IIRC the nicer one has air assist as stock, the article one added it to his. Same controller and mechanicals (they do vary over time as the makers try to strip every cent they can in costs).
Moshidraw uses cm/s for etching, and mm/s for cutting.
FWIW my version on MoshiDraw claims a maximum 200 cm/s (2,000 mm/s!) for etching (raster) which seems a bit far-fetched. I don’t do much etching as it takes forever, but I seem to recall using numbers in the 30-40 cm/s range as per stated here. Don’t forget every line has an accelerate/de-accelerate bit where it overruns the area being etched that adds to the total time.
For cutting (vector) I’ve used up to 40 mm/s for thin paper (low power) without it losing steps. I use a lower speed for fine details like small text, it doesn’t seen to cope there.
A decent power supply is needed, I replaced the 24v one an older unit as it used to lose steps even on simple shapes at around 20mm/s. I was getting a lot of controller errors as well which is why I replaced the power supply. I usually only cut at under 10mm/s so losing steps at a higher speed was annoying, but not that much.
MoshiDraw doesn’t do constant velocity or have any corner power correction, it’s rather crap all round. It does do a good job etching though (which is what it was designed for).
I already have done this:
https://ca.rstenpresser.de/blag/2015/02/fix-broken-pins-on-qfp-package/
Insane! Good job.
what is the wattage of your cutter? that is insanely good work! I now have a reason to move my cutter into my basement lab and out of the garage.
Maybe a stupid question, but is the chip after this treatment bricked, or is it still working?
It’s way to much heat, but only for a small amount of time, and the silicon is absorbing less energy than black carbon-sth…
Probably bricked, The silicon is impervious afterall they use Silicon in the optics of the laser but the structures will easily cook up good and exposed to the air it’s only a matter of time before they get oxidized anyway
If nothing else, the photoelectric effect ensures that all sorts of interesting electrical activity was taking place across the chip, probably not exactly within the tolerances its designers intended. This IC obviously isn’t intended as a solar panel; but any semiconductor will do if you don’t care much about efficiency.
Some chips might be fine, if build on a reasonably robust process and not dependent on any exquisitely delicate stored charges; but I’d imagine that any flash memory or EEPROM won’t be quite as informative as it was before intense light exposure.
The chip is not functioning after 100% laser decapsulation. This method is only used in the failure analysis as pre-decapsulation; you have to leave some modling compound protecting the die. The remaning molding compond can be removed with jet-etch and acid.
The reason that you cannot go all the way with the laser is that you melt the top metal layer of AlCu. If your top metal layer is Cu, the damage of the laser is minimized, but still present.
There is a nice 10year old paper from Intel describing the minimum remaning molding compond which has to be left from laser decapsulation: it depends on the size of the SiN-SiO filler particles in the molding compond.
it was a little dusty (the various unpleasant byproducts of burning epoxy tend to recondense on nearby surfaces), but the laser was clearly cutting the epoxy fine.
Be careful, folks!
There is a reason that laser cutters are not recommended for certain plastics that give off dangerous fumes. If you noticed the fumes were unpleasant, you have inhaled something. Let’s hope it was not carcinogenic.
ADVICE AND INFORMATION RELATING TO THE PROBLEMS ASSOCIATED WITH LGAC’S (Laser Generated Air Contaminants) [PDF] states 2 component epoxy polymers yield amines.
Agree. The fan included with china “ebay” laser is very week. I do suggest first to seal all holes between cutting area and the electronics area on the right and then enlarge extract port to 60×200 reduced to 125mm diameter and purchase some blower capable of 300m3/h at least to extract all fumes out. Also I recommend to drill two 5cm holes in front and put two more PC-like fans 12V+12V = 24V hookable directly to cutter power supply. With this modification you can use cutter in your living room.
I’d probably not use it in your room even with that fan, at least if you are doing a decent volume of cutting something always leaks out. I have mine in the conservatory and make sure the door is well and truly closed.
I would be interested to know if it’s really OK in low volumes!
Some papers recommends to use fan which is capable of at least 800m3/h (470ft3/min), which seems too me quite big for 40W china box. So I did go with 300m3/h. Its just fine.
I’ll try sealing it up a bit better see if that makes it any better at least for the short runs
The extractor fan that these cheap lasers have is little better than useless. I added a large 300M^3 hr(i think?) extractor fan to the end and it’s much better at shifting the evil stink.
Ive been working on a idea of using a industrial quality bathroom vent fan pulling the air though a activated charcoal or carbon filter (to prevent the fan and duct work from getting sooty). I already have the vent and ducting setup as a solder fume hood.
On another note I have most of the pinouts and layout figured out for the K40 Moshi V4.7 Board. (google K40 Moshi V4.7 Board moogle to find my site as hackaday has my website blacklisted in comments for some reason)
I am using laser to burn rubber (to make stamps) time by time. This makes a lot of mess, but does not seems as problem to big fan.
Correct name of my app is Winseal (not moshi as I stated before). Some downloadable pinout is here http://www.3wcad.com/download/M2Nano%E4%B8%BB%E6%9D%BF%E7%A1%AC%E4%BB%B6%E6%89%8B%E5%86%8C.rar
They do sell mechanical and carbon filter mats you can cut to shape for kitchen hoods. Actually, an enclosure with a kitchen hood fitted on it would be a pretty good fume extraction system, especially if you can vent it outside the house.
https://www.youtube.com/watch?v=SvWgSs2_f00
I was going to post that! :) I’m glad someone found it. I have been studying laser etching (decapsulation) technology since about 2007. I work for Control Laser, the company that makes the FALIT in the video. I wanted to comment on this particular encapsulate and why the CO2 laser seemed to work so well with it over other videos people may have seen.
The encapsulate in the original article has a very low filler content. This means that the material is mostly made up of an epoxy and carbon. We refer to this type of encapsulate as a potting compound over an actual mold compound. The lack of filler material allows the CO2 laser to interact directly with the epoxy chains to melt away the material. In this way, it is not unlike many of the other plastics that the CO2 interacts with, however, the amount of heat that is generated can cause metalization reflow where the layers of the die become mended together. The CO2 laser will generally not penetrate the passivation layer that is on top of the die. This means that provided the heat can be controlled, it is theoretically possible to hit the die with this laser and have the part continue to work afterwards. It is not entirely practical, however, because of the high absorption rate of the compound at this wavelength.
The encapsulate in most molded semiconductors has fillers, such as alumina and silicon dioxide. The fillers are tiny balls, that help with thermal and mechanical issues. When the CO2 laser is used on these types of mold compounds it usually does one of two things: it melts the filler together or makes the part catch on fire. This is because the CO2 laser imparts enough energy so that the glass transistion temperature is met very quickly. Once you heat up the part to this point, you cannot get the newly-created glass off except with maybe Hydroflouric acid.
So, how does the laser in the video that Sumira posted work so efficiently? It operates at a 10-times shorter wavelength, which means that photon energy is higher, thus ablation, instead of absorption, occurs. Having the right laser for the job also helps; the laser in the FALIT by Control Laser is a proprietary laser that was developed specifically for this process. While we are not yet able to reliably hit the die of a semiconductor with this laser, it has been done and the process is being perfected. What this means is that instead of acid, the laser will be used, possibly with a non-toxic chemical that is environmentally friendly. This makes the semiconductor industry as a whole more “green” while also being more efficient, thus decreasing product cycle development and increasing semiconductor revenue. It’s all very fascinating and I enjoy coming across articles like this. Every time I see the FALIT in action, even so many years later, I am amazed.