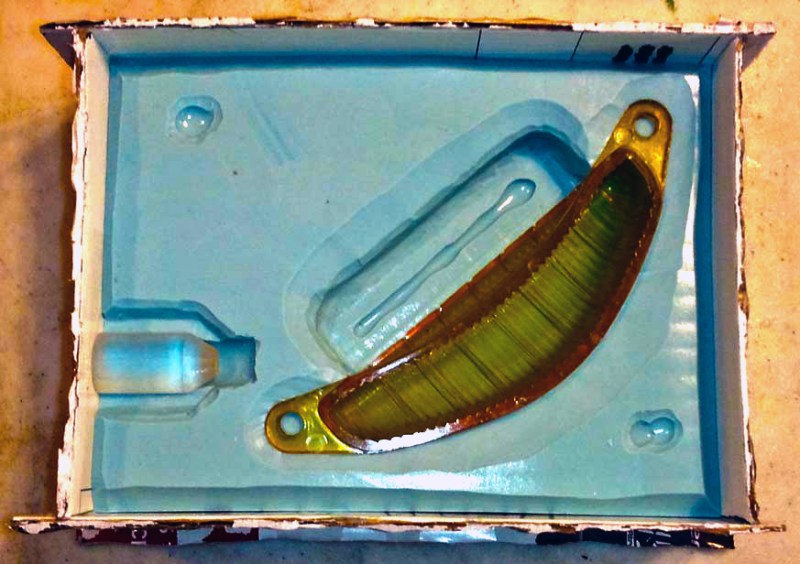
[Gregg Eshelman] reproduces plastic parts for antique car restorations for a living; likewise, he’s very good at it. Greg always chimes in with helpful hints whenever we post about resin casting. Shown above is a lens for a car turn signal. Manufactured in 1941, having [Gregg] cast a few copies is an easy option for replacing the rare part.
[Gregg] uses a similar method to us, but it is easy to see that he has done it more and his process has been refined by lots of experience. We really liked how he avoids using expensive foam core by wrapping cardboard in packing tape, or using the kind that has a plastic coating on it; the kind most retail packaging is made out of. He also has better techniques for keying the part to be manufactured, and prepping difficult geometry between different mold halves. It also never would have occurred to us to use Dremel cutting disks to cut the sprues and air vents in the silicone, a surprisingly tricky material to cut precisely with a knife.
It’s always nice when a professional takes time to write about their processes for the hobbyist trying to emulate it. We hope [Gregg] writes more tutorials, and continues to contribute in the comment section. If you have your own fabrication techniques to share we’d love to hear about it on the tips line.


Is it just me getting déjà vu about this post?
I swear I’ve seen that picture on HaD before…
Am I finally going slowly mad?
A couple years ago there was this: http://hackaday.com/2013/03/12/molding-rubber-for-a-pre-production-prototype-use-a-3d-printed-model/
Yup, we’ve seen this post before.
here you go: https://hackaday.com/tag/banana/
A lot of good craft technique information in the linked page.
Hi Greg,
I went thru your tutorial carefully. What I am confused with, is the last photo on the bottom of page. could you explain what is shown there? I understand all before staps, specially with the wents for evacuation of air. But on last photo the purpose of this window is different… I see that shape of this window is exactly as shape of cardboard few pictures above, but why it’s there?
It’s so the mold can be flexed to pull it away from the inside of the lens, making it easier to remove the casting. I have some larger lenses that are wider/deeper on the inside. For those I use cardboard to build a “boat” shape to fill up most of the space, leaving about 3/4″ between it and the inside of the lens. That’s for stiffer silicone like Silicones Inc. P60. For their softer P45 I’ll leave more space or make a board with a permanent support to use for clamping that side of the mold.
To reinforce the “boat” I coat it inside and out with resin so it’s smooth and will hold its shape.
Corrugated cardboard is a very versatile material for mold forms. If you need more strength, glue layers together with the channels at right angles, like how plywood alternates the wood grain.
For large molds cut strips of cardboard with the channels along the length. Make three evenly spaced creases lengthwise to divide it in 4ths. Fold and overlap into a triangular tube. Those can be used to reinforce the sides of the forms and to bridge across to hold the “boat” for forming the relief cavities.
A few more things here. https://www.flickr.com/photos/27748767@N08/albums/72157622235005867
The large clear lens was the first casting for a 1954 Hudson tail light. I cast it in clear just in case it didn’t fill properly. The round reflectors are Stimsonite No. 8. They were used on several models of cars, including 1952-1957 Nash and 1955-1957 Hudson. Clear ones fit inside the 1954 Hudson lenses and the lenses for the 1952-1953 Hudson Wasp.
Next up is making the master for a Space Battleship Yamato belt buckle. (The 1974 Anime, not the 2010 live action movie.) I poured some resin into that soap dish, then cut a section out of the middle of the casting to shorten it in height. The halves were stuck together with super glue. To make the X I milled a pocket in a piece of plywood, filled it with resin then milled that flat. The X was cut with a 1/4″ ball end mill. After sanding the X grooves smooth I waxed it and poured in some resin.
The bumps in the soap dish were a pain due to the dimples they made in the casting. It took a lot of filling and sanding and I still had visible rings around each of them.
After filling and sanding on the dimples, I cut the X to fit. Lots of fiddly work with a Dremel to fit the ends to the curved outer ring. Still required some spot putty to fill gaps.
After priming and sanding and priming more and *still* having the rings around the filled dimples, I applied masking tape. That was a bit of a problem. The tape adhesive contains latex. Latex inhibits curing of RTV silicone. That’s why the rough surface on those areas. Baking the mold in the dehydrator for several hours made it finish curing.
To make the buckles I first filled the mold with resin just until it covered the flats. Then I used 1/8″ welding rod, bent into a rectangle wide enough to fit over the belt. The join buried inside the buckle has the rod bent to go over and out where the hook is. The hook and loop will never pull out. That is set into the mold and more resin poured over it.
After that cures, the final step is to fill the front with just a little black resin.
The three clear items are plastic replicas of jaws for a 3″ diameter 3 jaw metal lathe chuck, as used on a Grizzly 7×10″ lathe. (Same chuck is used on all the 7x Chinese metal lathes.)
The last picture is a mold for program cartridge shells for the TI-99/4 and TI-99/4A Home Computer. People on the TI mailing list kept grumping about having to take shells from other cartridges for special projects like RAM carts and Supercarts and wishing someone would make new ones. So I said if someone will pay for the materials and send me a shell, I’ll make a mold for *someone else* to use to make new shells. I’m doing car parts, don’t have time for making those too. So the person I made the mold for has it, but I don;t know if he’s ever got around to casting new shells. The black shell in it is the second casting. The first I did in clear with a drop of transparent blue dye. Later I sold the one of a kind “Ice Blue” TI cartridge shell on eBay. IIRC it went to somewhere in Austria.
Just wondering why pressure is used instead of vacuum. Pressure reduces the size of bubbles; vacuum removes them (almost) completely. A pressure pot that can handle several atmospheres of internal pressure ought to be able to handle one atmosphere of external pressure… Plus, once the bubbles are out the vacuum can be released, while pressure must be maintained during the entire curing process. Horrible Freight’s vacuum pumps are quite reasonable.
I know of people who cast polyurethane mixtures using vacuum. Some use a simple heavy stainless steel mixing bowl as the vacuum chamber, with a 1/2″ polycarbonate lid fitted with ball valves from the hardware store to connect to the vacuum pump and to vent the chamber.
If I was reading the post properly, the idea is that at high pressure the bubbles go away as they are dissolved into the silicone
Using either technique is good. Using both is best. Degass then pressurize.
IMHO you use a vacuum chamber to degas the raw material before pouring. This takes the bubbles out of the mix. Typically if a process doesn’t do this you’ll see people pouring the ‘silicone’ from a height, so the stream tapers and many large bubbles are removed.
Then you use a pressure pot when waiting for the resin in the mold to set. This reduces and bubbles to very small in the final part.
Often only one of these is mandatory for good parts. Both is very good practice.
Of course caveats for pressurising a mold that wasn’t formed pressurised – you may change its shape.
If you pressure cast in a mold that wasn’t itself pressure cast, any bubbles just beneath the cavity surface will collapse, forming lumps or spikes on the casting. The bubbles can also break and let the resin inside. Then you get little resin balls stuck on the casting. Those can be broken off and the casting sanded and polished, but it’s a lot of work. Also, those balls tear at the mold when the castings are removed.
For some reason, bubbles in the silicone will float up and away from horizontal or steeply angled surfaces on the master. On vertical surfaces the bubbles will ‘stick’ and not float away, leaving a very thin skin of silicone between the bubble and the mold cavity.
The advice I’d gotten years ago was to not ever pressure cast the silicone and I made several molds not doing that. If the item was fairly simple, without any sharp inside corners and no vertical or near vertical surfaces, it would work, most of the time.
Then when I was doing the Stimsonite No. 8 reflectors and wasted a bunch of silicone on not getting all the sharp corners of the reflector filled, despite blowing on it with air and poking into all corners with toothpicks – I just said “Hell with everyone saying to not pressure cast the silicone, I’m going to try it.”. Worked beautifully and I’ve pressure cast all my molds since.
That’s also when I started using the cardboard for forms, because the wooden “L” boards and the C clamps wouldn’t fit into the pressure tank. I had to come up with something to use, and somewhere I’d noticed that drips of cured silicone didn’t stick to the shiny surfaced cardboard.
The “L” boards I’d made and put much work into getting smooth and square have slowly over the years been getting cut up for other things whenever I need a chunk of wood about that thick.
3D scan > 3D print > done. Someday it will be that easy.
As long as you don’t mind finite resolution stepped copies with poor optical qualities