Restoration Of A Self-Crêpe Machine

A few years ago [Tweepy], one of the Hackaday readership’s global band of pancake enthusiasts, took possession of an aged “Self-Crêpe” machine. Judging by the look of the date codes on the ICs in the early 1980s, this machine cooked and sold a fresh crêpe on the insertion of a 1 Franc coin (about 17 U.S. cents in those days) for about thirty years.

Sadly, it would no longer produce crêpes. The aged control logic was the culprit, and rather than debug it [Tweepy] decided to replace it with a microcontroller (French language, Google Translate link). The one he chose (marked “RSF2127″, can anyone identify it?) came in a QFP package, so attaching it to a 0.1” prototyping board required some soldering wizardry with fine wires, but it was soon up and running. Some track-cutting and wiring into the original PCB, and the custom C code was ready to go.

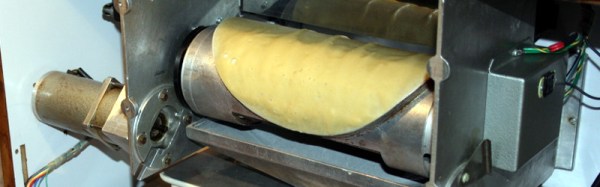
The crêpe-making part of the machine features a heated roller not unlike the one in our recently featured South African endless pancake machine in whose comment thread [Tweepy] mentioned it, but appears to use only a single-sided cooking process. The roller has a round crêpe-sized raised area. To start the cooking process, a loading bath of batter is brought up under the roller which is then rotated so that the round raised area passes through the surface of the batter. As the roller turns, it cooks the crêpe, which is then diverted from the roller to the output chute. The whole process relies on a reservoir of pre-made batter, sadly it’s not a crêpe replicator. On the other hand, a single crêpe takes about 40 seconds to create, and the machine can produce them on a continuous basis as long as you keep it stocked with batter.

We like the crêpes, we like the machine, and we like what [Tweepy] has done with it. If any of these machines made it beyond the borders of France, we’ve never seen one in our corners of the Anglophone world. This is a shame, for who wouldn’t want one of those next to the kettle and microwave oven in their hackspace! They would have needed to work on that name, though, for the English-speaking market.

We’ve recently done a round-up of pancake-related hacks here at Hackaday, so there is no point in repeating it. This is however not the first vending machine hack we’ve seen. There was this stealth-upgraded soda dispenser, this Tweeting beer dispenser, or how about this open-source software machine that definitely didn’t vend.

Bartop Arcade RetroPie Powered Laser Cut

[hhtat] wanted to build an arcade cabinet since his days in high-school. Only recently have the tech planets aligned. Looking into the night sky he saw a laser cutter, the Raspberry Pi, and lowering prices on key components and thought, “this is the year.”

Much like an arcade cabinet we posted earlier, this one sits on a counter top. With full controls and a nice screen, it provides a lot of the experience without the additional explaining to the SO why the living space should house a giant decaled MDF box.

The frame was designed in SketchUp and vectors were made in Inkscape. The frame was lasercut out of MDF and Acrylic. Decals were printed and applied. The resulting case, build from tab and slot construction, is attractive.

The internals are simple. A Raspberry Pi with a fast SD card acts as the brain. Rather than make it difficult on himself, [hhat] bought a pre-made controls kit from eBay. Apparently there is a small market for this stuff. He also purchased an IPS screen with built in controller. The IPS panel gives the arcade cabinet a desireable wide viewing angle.

The final product looks like a lot of fun and we can see it turning at least one person into an unintentional loner at any house party.

Laser-Cut Lamp With Magic Switch

This laser-cut lamp is an awesome example of what you can do with a laser cutter and a bit of creativity. It was completely laser cut and features no fasteners, except for a bit of glue.

[PaisleyGarbage] has been making lamps for a while now and had the concept for this one early on. After rendering a model of it on the computer, he decided it was finally time to try making it. It wasn’t quite as easy as he thought it’d be, but the challenges along the way only help you to learn when doing a project like this.

He laser cut alternating strips of wood and acrylic to create the unique sandwiched light look of the final product. Instead of using fasteners or anything, he even slid the pieces together on acrylic dowels keeping the design as minimalist and clean as possible. But the part we really like is the magnetic switch.

Continue reading “Laser-Cut Lamp With Magic Switch”

Live From The Midwest RepRap Festival

It’s time once again for the world’s premier DIY 3D printer event, the 2016 Midwest RepRap Festival.

The 2016 Midwest RepRap festival is a yearly celebration of blue tape, aqua net, and tangled strands of 3D printer filament held at the Elkhart county fairgrounds in Goshen, Indiana. This year, the fairgrounds has fiber Internet, and we have a Dropcam. This can only mean one thing: live streaming from the best 3D printer convention on the planet.

The livestream is down because MRRF is over

This stream should be active the entire weekend, with the requisite breaks for sleep and to take the entire crew to the Chinese buffet down the street. Of course, if you’re in the area, you’re more than welcome to stop by. Registration is free, although a small donation would be appreciated.

The schedule for the event is as follows:

  • Friday: now until 10pm Eastern
  • Saturday: 10am to 6pm Eastern
  • Sunday: 10am to 3pm Eastern

The (incomplete) list of speakers (which might be livestreamed) is as follows:

  • E-Nable 3D printed prosthetics
  • B3 Innovations From MRRF to retail
  • IMade3D STEM + Jellybox
  • MakerOS Make Money with 3D Printing
  • J. Conway 3D Printer Adaptive Scanning Technologies

Hacking The Raspberry Pi WiFi Antenna For More DB

I’ve been testing out the Raspberry Pi 3, and one thing I have found is that the WiFi antenna that was added in this new model is not especially good: the Pi has trouble connecting to my WiFi network in places that other devices have no issues. That’s not surprising, because the antenna on the Pi 3 is tiny: mounted right next to the display connector, it is just a few millimeters wide. [Ward] at DorkbotPDX agrees, so he decided to look into adding a better antenna by adding an external connector.

He tried two approaches: replacing the antenna with a tail connector, and adding a U.FL connector to the unused solder pads on the board. Both require some delicate soldering work, so they aren’t approached lightly. Replacing the antenna with an external connector produced a significant increase in signal output, which should equate with more range for the WiFi connection.

It is also interesting to note that the Pi 3 has solder pads on the board to add an external antenna connector, but that they are not used. Plus, one of the solder pads is covered by solder mask. Using these is the second approach that [Ward] used, soldering on a U.FL connector and connecting that to a small rubber duckie antenna. Again, this proved more efficient, increasing the power output of the antenna significantly.

NOTE: This hack definitely falls into “Don’t try this at home” territory. Messing with antennas voids the warranty and FCC certification for the Pi, and can cause all sorts of signal-related unpleasantness if you aren’t careful.

Beyond Measure: Instrumentation Amplifiers

In the first article about measurement systems we looked at sensors as a way to bring data into a measurement system. I explained that a sensor measures physical quantities which are turned into a voltage with a variable conversion element such as a resistor bridge. There will always be noise in any system, and an operational amplifier (op-amp) can be used to remove some of that noise. The example we considered used an op-amp in a differential configuration that removes any disturbance signal that is common to both inputs of the op-amp.

But that single application of an op-amp is just skimming the surface of the process of bringing a real-world measurement of a physical quantity into a digital system. Often, you’ll need to do more work on the signal before it’s ready for sampling with a digital-to-analog converter. Signal conditioning with amplifiers is a deep and rich topic, so let me make it clear that that this article will not cover every aspect of designing and implementing a measurement system. Instead, I’m aiming to get you started without getting too technical and math-y. Let’s just relax and ponder amplifiers without getting lost in detail. Doesn’t that sound nice?

Continue reading “Beyond Measure: Instrumentation Amplifiers”

Home Made 8mm Digitizer

The 8mm film look is making a comeback, but distributing it is an issue. [Heikki Hietala] wanted an easy way to digitally capture the 8mm movies he made. So, he built an 8mm digitizer from an Arduino, a cheap Canon camera and the guts of an old 8mm film camera. When you throw in a few 3D printed components and some odd electronics, you get an impressive build that captures 8mm film with impressive speed and quality.

This build started with a Canon Ixus 5 camera running CHDK (the Canon Hack Development Kit) to lock the settings down. This points at the film strip through a macro lens so each frame of the strip fills the frame. An Arduino then triggers the camera to take a photo using a USB cable. The same Arduino also controls a motor that winds the film and triggers the film gate from the camera that he salvaged. By reversing the function and triggering it with a servo motor, he can easily blank off the edges of the frame so no stray light shining through the film material causes any problems. Once the camera has captured every frame on the strip, he feeds the captured images into Blender, which processes them and spits out the final movie.

This is a very impressive build overall. [Heikki] has obviously put a lot of thought into it, and the whole thing looks like it runs very efficiently and quickly. The captured video looks great, as you can see from this sample. The decision to use a salvaged film gate was a smart one: there is no point in reinventing the wheel if engineers of previous generations have solved the problem. Kudos to [Heikki] for also documenting the process in a lot of detail: he has produced a 5-part series on his blog that shows how and why he made the decisions he did. This series goes over the overall view of the project, using CHDK to control the camera, 3D printing parts, wiring the Arduino and writing the code that controls the system.

This sits nicely alongside the 8mm to video camera hack that we wrote about recently. This one doesn’t involve taking apart the camera (except for the sacrificial one that supplied the gate), and you still get that wonderfully grainy, jumpy look of 8mm film.

Continue reading “Home Made 8mm Digitizer”