Poopable Cameras

Pill cameras, devices for ‘capsule endoscopy’, or in much cruder terms, ‘poopable cameras’, are exceedingly cool technology. They’re astonishingly small, communicate through a gastrointestinal tract to the outside world, and have FDA certification. These three facts also mean pill cameras are incredible expensive, but that doesn’t mean a hardware hacker can’t build their own, and that’s exactly what [friarbayliff] is doing for his entry into The Hackaday Prize.

First things first: [friarbayliff] is not building one of these for human consumption. That’s a morass of regulatory requirements and ethical issues. This pill camera is only being built as an experiment, because it would be fun to build one. The pill cams swallowed by patients every day have millions of dollars in R&D behind them before human trials. That said, given a good food-safe enclosure, I’d down one of these as an experiment.

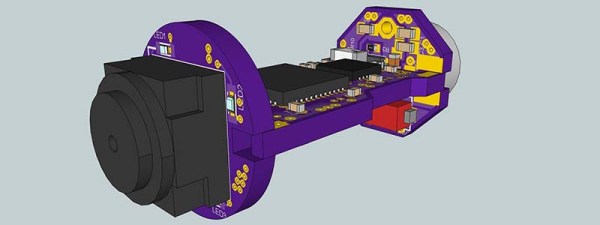
This pill camera will use a simple, off-the-shelf 2 megapixel image sensor that can be bought on eBay for less than five dollars. With a small 32-bit micro, these cameras are easy to drive and capture images from. Power is provided from a single silver oxide button cell battery and a boost converter. In total, [friarbayliff] estimates the total PCB area to be just under one square inch, making this a relatively inexpensive device to build. There will be a radio transceiver in there somewhere, but [friar] hasn’t figure that part out yet.

Pill cameras are some amazing technology, but relatively inaccessible unless you get a used one. Ew. [Mike Harrison] tore one of these pill cams apart a few years ago, and it really is an incredible device. Building one for fun – even if it won’t be used in a human – is a fantastic learning experience and a great entry for the 2016 Hackaday Prize.

The HackadayPrize2016 is Sponsored by:

From Trash To TV

In days gone by, when TVs had CRTs and still came in wooden cabinets, a dead TV in a dumpster was a common sight. Consumer grade electronic devices of the 1960s and ’70s were not entirely reliable, and the inside of a domestic TV set was not the place for them to be put under least stress. If you were electronic-savvy you could either harvest these sets as a source of free components, or with relative ease fix them for a free TV set.

With today’s LCDs, integrated electronics, and electronic waste regulations, the days of free electronics in every dumpster are largely behind us. Modern TVs are more reliable, and when they reach end-of-life we’re less likely to see them.

[Sidsingh] happened to find an LCD TV in a dumpster, and being curious as to whether he could fix it or salvage some components, cracked it open to take a look.

He found that somebody had already been into the set and that some components on the PSU and backlight boards showed evidence of magic smoke escaping, having been desoldered by the previous repairer. The signal board was intact though, a generic Chinese model based around a Mediatek MTK8227 SoC. Information was scarce on these boards, but some patient research yielded a schematic for a similar set.

Once he knew more about the circuit, he was able to identify the power lines and discovered that the 1.8v line to the SoC was faulty. This he traced to a switching regulator for which there was no equivalent in his junkbox, so he substituted a linear regulator to obtain the required voltage. The CFL backlight was then removed and replaced with LED strips, and as if by magic he had a working TV set.

This might seem a relatively mundane achievement on the scale of some of the projects we feature on these pages, but it is an important one. In these days of throwaway items it is still not impossible to repair dead electronic devices, indeed as [Sidsingh] found the power supply is most likely to be the culprit. If you score a dead LCD TV then don’t be afraid to crack it open yourself, you may be able to fix it.

As you might imagine, many repairs have made it onto Hackaday over the years. Of relevance to this one is this LCD that inexplicably worked when exposed to light, an LED backlight conversion, and this capacitor swap to return an LCD monitor to health.

Hackaday Links: April 24, 2016

TruckThe Internet Archive has a truck. Why? Because you should never underestimate the bandwidth of a truck filled with old manuals, books, audio recordings, films, and everything else the Internet Archive digitizes and hosts online. This truck also looks really, really badass. A good thing, too, because it was recently stolen. [Jason Scott] got the word out on Twitter and eagle-eyed spotters saw it driving to Bakersfield. The truck of awesome was recovered, and all is right with the world. The lesson we learned from all of this? Steal normal cars. Wait. Don’t steal cars, but if you do, steal normal cars.

In a completely unrelated note, does anyone know where to get a 99-01 Chevy Astro / GMC Safari cargo van with AWD, preferably with minimal rust?

[Star Simpson] is almost famous around these parts. She’s responsible for the TacoCopter among other such interesting endeavours. Now she’s working on a classic. [Forrest Mims]’ circuits, making the notebook version real. These Circuit Classics take the circuits found in [Forrest Mims]’ series of notebook workbooks, print them on FR4, and add a real, solderable implementation alongside.

Everyone needs more cheap Linux ARM boards, so here’s the Robin Core. It’s $15, has WiFi, and does 720p encoding. Weird, huh? It’s the same chip from an IP webcam. Oooohhhh. Now it makes sense.

Adafruit has some mechanical keyboard dorks on staff. [ladyada] famously uses a Dell AT101 with Alps Bigfoot switches, but she and [Collin Cunningham] spent three-quarters of an hour dorking out on mechanical keyboards. A music video was the result. Included in the video: vintage Alps on a NeXT keyboard and an Optimus Mini Three OLED keyboard.

A new Raspberry Pi! Get overenthusiastic hype! The Raspberry Pi Model A+ got an upgrade recently. It now has 512MB of RAM

We saw this delta 3D printer a month ago at the Midwest RepRap festival in Indiana. Now it’s a Kickstarter. Very big, and fairly cheap.

The Rigol DS1054Zed is one of the best oscilloscopes you can buy for the price. It’s also sort of loud. Here’s how you replace the fan to make it quieter.

Here’s some Crowdfunding drama for you. This project aims to bring the Commodore 64 back, in both a ‘home computer’ format and a portable gaming console. It’s not an FPGA implementation – it’s an ARM single board computer that also has support for, “multiple SIDs for stereo sound (6581 or 8580).” God only knows where they’re sourcing them from. Some tech journos complained that it’s, “just a Raspberry Pi running an emulator,” which it is not – apparently it’s a custom ARM board with a few sockets for SIDs, carts, and disk drives. I’ll be watching this one with interest.

DIY Spot Welder Doesn’t Look Like It Will Immediately Kill You

We love hacks that involve mains voltage, but most of the time, for safety’s sake, we secretly hope for that one macabre commenter that details every imaginable way the questionable design choices will result in death. This spot welder may still be dangerous, but it looks like they took some precautions to make it non-lethal, and that counts for a lot.

After their extremely questionable high speed belt sander, this one is, refreshingly, extremely well done. It starts of as a dead standard microwave spot welder build: take apart microwave, try not to die from large capacitor, remove coil, modify coil, and hook up.

After that, it gets to some nice heavy metal music fabrication. Aside from a slightly shocking number of fresh OSHA reportable hand injuries (wear gloves!) the build goes together well. A lot of planning obviously went into it, from the actively cooled transformer to what appears to be a resettable timer circuit for the weld duration, not to mention the way that it just fit together so well at the end. There were some neat ideas as far as home mechanics go that we’ll be using in some of our projects.

In the end, the proof is in the spot-weld. The timer is set, pedal gets pressed down, and when tested, the sheet metal breaks instead of the weld. Video after the break.

Continue reading “DIY Spot Welder Doesn’t Look Like It Will Immediately Kill You”

Plexitube Owl Clock Watches You Sleep

Wait, plexitube? Is that a typo? Surely we mean Nixie tubes!

For a Christmas project [Kurt] wanted to build some owl-inspired clocks — with bit of a retro feel. Given the complexities of finding and using actual Nixie tubes, he went with an alternative — a Plexitube.

lightguidescloseup
Closeup of Plexitube

Plexitubes look like futuristic Nixie tubes. They can have different stylized numbers. They’re crisp, they’re bright, and they are completely customizable. They’re made of edgelit acrylic! By laser etching the design onto pieces of acrylic and feeding LED light into the edge, very much like how a light-pipe works, it’s possible to have a neon-light effect — using nothing more than plastic and some LEDs.

He designed custom PCBs for the project, with SMD LEDs for the plexitubes. Making use of a laser cutter, he designed the actual owl to be made out of lightly formed wood cutouts — the entire thing looks absolutely fantastic.

As far as “Nixie tube” clocks this has gotta be one of the most aesthetically pleasing ones we’ve seen in a while, but if you’re looking for an all-out-Nixietube-extravaganza… take a look at this whopping thirteen tube clock.

[Thanks for the tip Lawrence!]

Energy Monitor Optically Couples To Smart Meter

Hackers love to monitor things. Whether it’s the outside temperature or the energy used to take a shower, building a sensor and displaying a real-time graph of the data is hacker heaven. But the most interesting graphs comes from monitoring overall power use, and that’s where this optically coupled smart-meter monitor comes in.

[Michel]’s meter reader is pretty straightforward. His smart wattmeter is equipped with an IR LED that pips for every watt-hour consumed, so optical coupling was a natural approach. The pulse itself is only 10 ms wide, so he built a pulse stretcher to condition the pulse for a PIC microcontroller. The PIC also reads the outside temperature with a DS18B20 and feeds everything to the central power monitor, with an LCD display and a classic Simpson meter to display current power usage. The central monitor sends the power and temperature data to Thingspeak, along with data from [Michel]’s wood-stove monitor and a yet-to-be-implemented water heater monitor.

[Michel] is building out an impressive suite of energy and environmental monitors for his Quebec base of operations. We’re looking forward to seeing how he monitors that water heater, and to see what other ideas he comes up with.

Continue reading “Energy Monitor Optically Couples To Smart Meter”

Small Experiments In DIY Home Security

[Dann Albright] writes about some small experiments he’s done in home security.

He starts with the simplest. Which is to purchase an off the shelf web camera, and hook it up to software built to do the task. The first software he uses is the free, iSpy open source software. This adds basic features like motion detection, time stamping, logging, and an interface. He also explores other commercial options.

Next he delves a bit deeper. He starts by making a simple motion detector. When the Arduino detects motion using a PIR sensor it gets a computer to text an alert. After the tutorial begins to veer a little and he adds his WiFi light bulbs to the mix. Now he can send an email and change the color of the lights.

We suppose, that from a security standpoint. It would really freak a burglar out if all the lights turned red when they walked into a room. Either way, there’s definitely a fun weekend project in playing around with all these systems.