Upgrading A 20 Year Old PDA

Before we had our iDevices and Androids, even before Blackberry, we had PDAs. The most famous of these mid-90s computing appliances are the Apple Newton and the Palm products, but the world of 90s PDAs was significantly more diverse than these two devices. Palm had a competitor in Handspring who released a cheaper and better version of a Palm OS device with the Visor. HP made hardware at one point, and you could run Windows – including Excel and Word – on a handheld device in 1998.

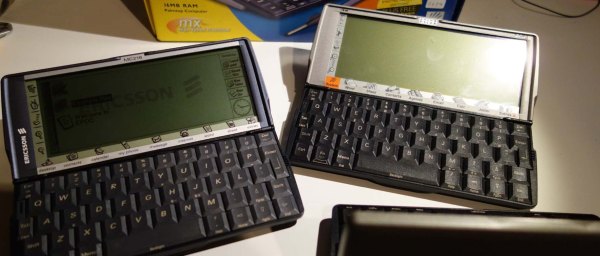
A company name Psion made PDAs with a clamshell design and a keyboard back then, too. Disregarding the operating system, these little clamshell PDAs could arguably be called the forerunners of yesterday’s netbooks and today’s Surface tablets. [RasmusB] is turning his Psion 5 PDA into something modern by replacing all the important bits while still keeping the clean design of this 20-year-old PDA.

The goal of this project is to completely replace the electronics of the Psion 5, while keeping all of the mechanics. That means the keyboard will stay the same, the device will run off of two AA batteries, and all the switches and ports will work. This effort began by making the Psion keyboard Arduino compatible by reverse engineering the keyboard matrix with a pencil and paper, and turning the keyboard into a USB keyboard.

Efforts to turn this Psion into a modern device are ongoing, but at least the outline of the main board is now in KiCad, with a microcontroller to decode the keyboard, switches for the lid and other buttons, and the correct space for the CompactFlash card and battery contacts. The next step is selecting a microprocessor and designing a circuit, but [Rasmus] is off to a great start to make this ancient PDA a modern computing device.

The HackadayPrize2016 is Sponsored by:

Shor’s Algorithm In Five Atoms

If you want to factor a number, one way to do it is Shor’s algorithm. That’s a quantum algorithm and finds prime factors of integers. That’s interesting because prime factorization is a big deal of creating or breaking most modern encryption techniques.

Back in 2001, a group at IBM factored 15 (the smallest number that the algorithm can factor) using a 7 qubit system that uses nuclear magnetic resonance. Later, other groups duplicated the feat using photonic qubits. Typical implementations take 12 qubits. However, recent work at MIT and the University of Innsbruck can do the same trick with 5 atoms caught in an ion trap. The researchers believe their implementation will easily scale to larger numbers.

Each qubit is an atom and LASER pulses perform the logic operations. By removing an electron to make each atom positively charged, an electric field can exactly hold the positively charged ions in position only microns apart.

We’ve covered quantum computing before. We’ve even talked about the effect of practical quantum computing on encryption. You might also want to read more about the algorithm involved.

Photo credit: Jose-Luis Olivares/MIT

Hackaday Links: May Day, 2016

Humble Bundle is a great way to fill up your Steam library – just pay what you want, and get some indie video games. The Humble Bundle is much more than video games, because No Starch Press just put up a bundle of books on hacking. No, there are no books about wearing balaclavas and using laptops with one hand. I haven’t written that book yet. There’s some choice books in this bundle, including [Bunnie]’s Hacking the XboxAutomate the Boring Stuff with Python, and Practical Malware Analysis.

The Raspberry Pi camera – the $25 add-on webcam that plugs directly into the Pi – is getting an upgrade. The original camera was a five Megapixel sensor that was EOL’d at the end of 2014. The Raspberry Pi foundation bought up a lot of stock, but eventually there would be a replacement. The new sensor is a Sony IMX219 eight Megapixel deal, available at the same price. We assume a NoIR version without the IR filter will be released shortly.

Here’s a little hardware review that doesn’t quite merit a full post. The Raspberry Pi Zero is great, and will be even better once production ramps up again and stock lands in warehouses. One problem with the Zero is the lack of USB ports, leading to at least two Hackaday posts with the exact same headline, ‘Yet Another Pi Zero USB Hub‘. Obviously, there’s a market for an easy to use USB hub for the Zero, and this company is stepping up to fill the need. The killer feature here is the use of pogo pins to tap into the USB differential lines, power and ground pads on the bottom of the Pi Zero. The USB hub is based on the popular FE 1.1 4-port USB hub controller, giving the Pi Zero four USB 2.0 ports. Does it work? Yeah, and it’s only $10. A pretty neat little device that will be very useful when Pi Zeros flood workbenches the world over.

It was announced in 2014, released in 2015, but the STM32F7 hasn’t seen a lot of action around these parts. A shame, because this is the upgrade to the famously powerful STM32F4 microcontroller that’s already capable of driving high-resolution displays through VGA, being an engine control unit for a 96 Ford Aspire, and being a very complex brushless motor driver. The STM32F7 can do all of these and more, and now ST is cutting prices on the F7’s Discovery Board. If you’re looking for a high-power ARM micro and don’t need to run Linux, you won’t do better elsewhere.

Need to reflow a board, but don’t have a toaster oven? Use a blowtorch! By holding a MAPP blowtorch a foot away from a board, [whitequark] was able to successfully reflow a large buck converter. There’s a lot of water vapor that will condense on the board, so a good cleaning afterward is a good idea.

A few weeks ago, [Mr. LeMieux] built a 360 degree, all-metal hinge. He’s been up to something a little more dangerous since then: building piles of mini table saws. Small table saws are useful for miniatures, models, and the like. [Mr. LeMieux]’s table saw is a piece of CNC’d aluminum, with a bearing and saw arbor that attaches to an electric drill. Dangerous, you say? Not compared to the competition. Behold the worst forty dollars I’ve ever spent. This Horror Freight mini table saw is by far the worst tool I’ve ever used. The bed was caked with streaky layers of paint, uneven, the blade wasn’t set at 90 degrees, and the whole thing was horrifically underpowered. Trust me when I say the CNC electric drill version is safer.

WISP Needs No Battery Or Cable

One of the problems with the Internet of Things, or any embedded device, is how to get power. Batteries are better than ever and circuits are low power. But you still have to eventually replace or recharge a battery. Not everything can plug into a wall, and fuel cells need consumables.

University of Washington researchers are turning to a harvesting approach. Their open source WISP board has a sensor and a CPU that draws power from an RFID reader. To save power during communication, the device backscatters incoming radio waves, which means it doesn’t consume a lot of its own power during transmissions.

The big  news is that TU Delft has contributed code to allow WISP to reprogram wirelessly. You can see a video about the innovation below. The source code is on GitHub. Previously, a WISP had to connect to a PC to receive a new software load.

Continue reading “WISP Needs No Battery Or Cable”

Home Made Diodes From Copper Oxide

We’re all familiar with semiconductor devices, and we should remember the explanation from high-school physics classes that they contain junctions between two types of semiconductor material. “N” type which in the for-schoolchildren explanation has a surplus of electrons, and “P” type which has “Holes”, or a deficit of electrons.

Unless our careers have taken us deep into the science of the semiconductor industry though that’s probably as close as we’ve come to the semiconductors themselves. To us a diode or a transistor is a neatly packaged device with handy wires. We’ve never really seen what’s inside, let alone made any real semiconductor devices ourselves.

[Hales] though has other ideas. With the dream of creating a paintable semiconductor layer for ad-hoc creation of simple diodes, he’s been experimenting with oxidising copper to make a surface of cupric oxide onto which he can make a contact for a simple diode.

What makes his experiments particularly impressive though is not merely that he’s created a working diode, albeit one with a low reverse breakdown voltage. He’s done it not in a gleaming laboratory with a full stock of chemicals and equipment, but on his bench with a candle, and drops of water. He takes us through the whole process, with full details of his semiconductor manufacture as well as his diode test rig to trace the device’s I/V curve. Well worth a read, even if you never intend to make a diode yourself.

We’ve featured a cuprous oxide diode once before here at Hackaday, albeit a rather fancier device. If this article has piqued your interests about diodes, may we direct you to this informative video on the subject?

The diode looks black, leading me to believe it’s cupric oxide and not cuprous oxide. Feel free to argue that point in the comments anyway – Ed.

Precision CNC With Epoxy Granite

Epoxy granite is an overlooked material when it comes to making home CNC builds. As far as time and money goes, when you add in all the equipment it comes out cheaper than an aluminum casting set-up. Epoxy granite has mechanical properties better than cast iron, increased dimensional stability, better vibration damping, and looks awesome when done right. Also, you can cast precision surfaces and threaded holes into your design, which is pretty cool.

In these two videos by [Jørgen Hegner] we get to watch him and a friend make a matching set of precision CNC machines. It’s built in a similar style to other nice builds we’ve featured. This way of making it needs a bigger footprint than a gantry mill and can’t be built as large. However, it solves a lot of mechanical issues and squaring with the gantry design while not being as difficult to get right as a box or knee mill.

After casting they machined the material embedded in the granite to mount the ways. The ways are linear bearings and ball screws. Expensive, but as the footage shows, very accurate.  The rest of the machine is assembled and tuned. Then it gets installed in a home made 80/20 enclosure. We really like the LCD panel that’s incorporated into the front shield of the machine. They really went all out with the CNC control panel. It looks like they can do anything from jog the axis to monitor and control the water cooling for the spindle.

It appears that all the precision work is put to good use as there are some shots at the end of video two of a beautiful clock CNC’d on this machine. Videos after the break.

Continue reading “Precision CNC With Epoxy Granite”

Minimal 433 MHz Web Home Automation

How minimal can a decent home automation setup be? If you need an HTML frontend, you’re going to need a webserver. An ESP8266 will do the trick. And then you need to be able to control your electronics. The cheapest and easiest way to do that is with the ubiquitous 433 MHz remote-controlled outlets and a $1 radio unit from an online auction site. Add in a cheap ESP8266 module, and your total outlay is going to be under $20.

That’s exactly what [Nikos Kantarakias] did. He combined a bunch of available ESP8266 Arduino libraries — one for driving the 433 MHz radio modules, [Paul Stoffregen]’s libraries for keeping time and for setting alarms, and another for keeping track of time zones — with some of his own code for setting up WiFi access, and it’s done.

It’s all available on GitHub for your perusal. The code does some strange things — like requiring a complete reboot every time you set an alarm — but it does let you set recurring and one-off activations of the attached devices with a web interface that’s served off the ESP8266 itself. If you want your coffee machine to turn itself on in the mornings, and want a system that’s easy for the other inhabitants of your house to configure, something like this might be just the ticket.

But if you’re looking for a project on the other end of the ESP-tech spectrum, [CNLohr] wrote a standalone Ethernet controller for the thing. Woah.