Detecting Beetles That Kill Trees, Make Great Lumber

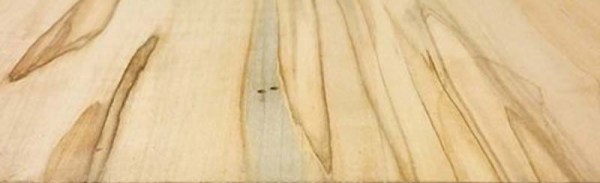
All across southern California there are tiny beetles eating their way into trees and burrowing into the wood. The holes made by these beetles are only about 1mm in diameter, making them nigh invisible on any tree with rough bark. Trees infested with these beetles will eventually die, making this one of the largest botanical catastrophes in the state.

AmbrosaMaple
Ambrosia maple, the result of these beetles boring into maple trees. Although ambrosia maple is arguable prettier, it is significantly cheaper than hard maple, making trees infested with beetles less valuable. Image source: [ironoakrva]
For [Joan]’s project for the 2016 Hackaday Prize, she’s working on a project to detect the polyphagous shothole borer, the beetle that drills into trees and eats them from the inside out. This is a surprisingly hard problem – you can’t look at the inside of a tree without cutting it down – so [Joan] has turned to other means of detecting the beetle, including listening for the beetle’s mastications with a stethoscope.

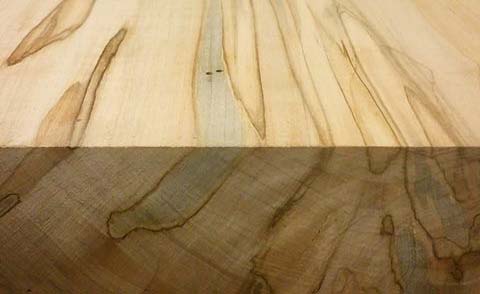
Although these ambrosia beetles will burrow into trees and kill them, there is another economic advantage to detecting these tiny, tiny beetles. The fungi deposited into these beetle bore holes make very pretty wood, but this wood is less valuable than lumber of the same species that isn’t infested with beetles. It’s a great project for the upcoming Citizen Science portion of the Hackaday Prize, as the best solution for detecting these beetles right now is sending a bunch of grade school students into the woods.

The HackadayPrize2016 is Sponsored by:

Who Needs The MSP430 When You Have TI’s Other Microcontroller, The TI-84?

We’re sure there are more expensive LED controllers out there, but the TI-84 has got to be up there. Unless you have one on hand, then it’s free. And then you’ll doubtless need an SPI library for the famously moddable graphing calculator.

[Ivoah] is using his library, written in assembly for the Z80 processor inside the TI, to control a small strip of DotStar LEDs from Adafruit. The top board in the photograph is an ESP8266 board that just happened to be on the breadboard. The lower Arduino is being used as a 5V power supply, relegated to such duties in the face of such a superior computing device.

Many of us entertained ourselves through boring classes by exploring the features of TI BASIC, but this is certainly a step above. You can see his code here on his GitHub.

After his proof-of-concept, [Ivoah] also made a video of it working and began to program a graphical interface for controlling the LEDs. Video after the break.

Continue reading “Who Needs The MSP430 When You Have TI’s Other Microcontroller, The TI-84?”

Simple Robot Arm With Steppers Has Pleasingly Smooth Motion

The usual go-to when building a simple robot arm is the ever-pervasive hobby servo. However, these devices are not precise, and are typically jerky and unreliable. They have their advantages, but if strength is not needed a stepper motor would provide much better motion in the same price range.

Those are the lines along which [Bajdi] was thinking when he forked the Mearm project, and adapted it for small stepper motors. First he tried printing out the servo version on thingiverse. It worked, but the parts were not ideal for 3D printing, and he didn’t like the movement.

So he purchased some 28BYJ-48 motors. These are tiny little geared steppers that tend to show up in the odd project. He modified and simplified the files in FreeCAD. With the addition of a CNC shield and an Arduino he had every thing he needed for the upgrade. A servo is now only used for the gripper.

The robot is almost certainly weaker in its payload ability, but as you can see in the before and after videos after the break, it is dramatically smoother and more accurate.

Continue reading “Simple Robot Arm With Steppers Has Pleasingly Smooth Motion”

Amazing Oscilloscope Graphics

From what we can understand, [ompuco] has built a 2D audio output on top of the Unity game engine, enabling him to output X and Y values from his stereo soundcard straight to an oscilloscope in XY mode. His code simply scans through all the vertexes in the scene and outputs the right voltages into the left and right audio streams. He’s using this to create some pretty incredible animations. Check out the video “additives” below for an example. (See if you can figure out what’s being “added”.)

Continue reading “Amazing Oscilloscope Graphics”

Curiously Delightful Things Done With Lasers And Projectors

Seb Lee-Delisle has built a career around large installations that use powerful lasers and high-end projects to make people happy. It’s a dream job that came to fruition through his multi-discipline skill set, his charismatic energy, and a mindset that drives him to see how he can push the boundaries of what is possible through live interaction.

His talk at the Hackaday | Belgrade conference is about his Laser Light Synth project, but we’re glad he also takes a detour into some of the other installations he’s built. The synth itself involves some very interesting iterative design to end up with a capacitive touch audio keyboard that is lit with addressable LEDs. It controls a laser that projects shapes and images to go along with the music, which sounds great no matter who is at the keyboard thanks to some very creative coding. As the talk unfolds we also hear about his PixelPyros which is essentially a crowd-controlled laser fireworks show.

See his talk below and join us after the break for a few extra details.

Continue reading “Curiously Delightful Things Done With Lasers And Projectors”

Blue Ribbon Microphone

Edmund_Lowe_fsa_8b06653If you’ve ever seen an old movie or TV show where there was a radio announcer, you’ve probably seen a ribbon microphone. The RCA 44 (see Edmund Lowe, on right) had exceptional sound quality and are still valued today in certain applications. The name ribbon microphone is because the sound pickup is literally a thin strip of aluminum or other conductive material.

Unlike other common microphones, ribbons pick up high frequencies much better due to the high resonant frequency of the metallic ribbon. This is not only better in general, but it means the ribbon mic has a flatter frequency response even at lower frequencies. Another unique feature is that the microphone is bidirectional, hearing sounds from the front or back equally well. It is possible to build them with other directional patterns, although you rarely see that in practice.

Invention

In the early 1920s, Walter Schottky and Erwin Gerlach developed the ribbon microphone (and, coincidentally, the first ribbon loudspeaker). Harry Olson at RCA developed a ribbon mic that used coils and permanent magnets which led to the RCA Photophone Type PB-31 in 1931. Because of their superior audio response, they were instant hits and Radio City Music Hall started using the PB-31 in 1932. A newer version appeared in 1933, the 44A, which reduced reverberation.

Continue reading “Blue Ribbon Microphone”

These 20 Projects Won $1000 In The Hackaday Prize

Since March, hundreds of hardware hackers around the globe have been hard at work designing and planning their entry into this year’s Hackaday Prize. The second challenge is now under way, a brand new chance for you to enter your own project. For inspiration, here are the top twenty entries from the first part of the Hackaday Prize.

The first challenge, Design Your Concept had 555 entries which we’ve spent the past week poring over. Now it’s time to reward the best of that first round with $1000 and a chance at winning the Hackaday Prize – $150,000 and a residency at the Supplyframe Design Lab in Pasadena.

The winners of Design Your Concept, in no particular order, are:

These twenty projects continue on to compete in the last phase of the Hackaday Prize. Congrats! Now get to work: you have a lot to do before the Hackaday Prize finals in October.

If your project didn’t make the cut – or you haven’t started one yet – don’t worry. Until the end of May we’re running the second challenge for this year’s Hackaday Prize. Anything Goes in this round and we’re looking for the craziest, most ostentatious, and most nonconformist project out there. Want to put the Internet of Socks on the blockchain? This challenge is right up your alley.

Anything Goes is a brand new challenge to solve a problem with technology and Build Something That Matters. Until the end of May, we’re opening up the gates for hackers, designers, and engineers to build whatever they want.

If you don’t have a project up on Hackaday.io, you can start one right now and submit it to The Hackaday Prize. If you already have a project up, add it to the Anything Goes challenge using the dropdown menu on the left sidebar of your project page.

The HackadayPrize2016 is Sponsored by: