Hackaday Prize Entry: A Very Small Password Keeper

One of the more popular security builds in recent memory is USB password vaults. These small thumb drive-sized devices hold all the passwords you have to deal with, and are locked behind a authentication code on the drive itself. For their Hackaday Prize entry, [Miguel] and [Noel] asked how inexpensively one of these devices could be made. The answer, coming in the form of their Memtype project, is very inexpensively.

The Memtype project is based on the cheapest and most simplistic USB implementation on the planet. It’s built around an ATtiny85 and V-USB‘s software only implementation of a USB keyboard, requiring only a few resistors and diode in addition to the ‘tiny85 itself.

The device can only be unlocked with a four-digit pin, input through the clever use of a small SMD joystick. After inputting the correct code, the Memtype grants the user access to all the stored passwords. As far as security goes, [Miguel] and [Noel] have implemented NOEKEON in assembly, however it should be noted that all security is weaker than a pipe wrench. For managing the passwords, [Miguel] and [Noel] built a small, simple GUI app to set the PIN and write credentials to the device.

[Miguel] and [Noel] already have a demo video up for the Memtype, you can check that out below.

Continue reading “Hackaday Prize Entry: A Very Small Password Keeper”

Graphene Optical Boom Emits Light With No Diode

When a supersonic aircraft goes faster than the speed of sound, it produces a shockwave or sonic boom. MIT researchers have found a similar optical effect in graphene that causes an optical boom and could provide a new way to convert electricity into light.

The light emission occurs due to two odd properties of graphene: first, light gets trapped on the surface of graphene, effectively slowing it down. In addition, electrons pass through at very high speeds. Interestingly, the speeds are nearly the same–that is, electrons and trapped light travel at almost the same speed. The researchers found a way to make the electrons move faster than the speed of light (in the graphene) and thus created Cerenkov emissions. Because of the structure of graphene, the resulting light is intense and tightly focused.

The researchers speculate that this technique could be important in building graphene-based optical chips. We’ve talked about mixed graphene and semiconductor chips before. Graphene is pretty exotic stuff. It can even fold itself.

Hackaday Links: June 19, 2016

Wait a minute. We’re almost through June and we haven’t seen anyone’s ‘DIY air conditioning’ setup. Oh the shame! How could we ever argue about thermodynamics otherwise? Here’s some copper tubing wrapped around a fan. Does it make sense? Assuming you’re making the ice (or cold whatever) in a room separated from the crappy air con, and you don’t have to pay for electricity (or ice), and you don’t mind hauling buckets of ice every few hours, yes. It’ll work. Now we can argue if you should put salt in the ice water…

I know I mentioned this in last week’s links post, but [Arsenijs]’s Raspberry Pi project is growing by leaps and bounds. He already has more than 33 followers to this project (awesome!) and 3.3k views on his project page. Not only is it climbing in popularity, but this is also a great use for the Raspberry Pi. You don’t see projects like this come around very often.

The Goliath is a quadcopter powered by a lawnmower engine. It was an entry in the first Hackaday Prize, but the project literally never got off the ground. There’s now a Mk. II version in the works. Goliath is getting a new frame made out of aluminum tube and rivets. There’s going to be ducts on the props, and this version might actually fly.

You did know Hackaday has it’s own Hackaspace, right? Technically it’s the Supplyframe Design Lab, but there are still a few skull ‘n wrenches hidden in the rafters. The Design Lab is hosting an open house this week on June 23rd, and the design lab residencies will begin July 1st. If you have an idea for something you’d like to build, here’s the residency application.

The LimeSDR is a powerful next generation software defined radio that’s currently on CrowdSupply The crowdfunding campaign ends in just a few days. It’s a very impressive tool, able to send and receive anything from 100 kHz to 3.8 GHz.

Last week one of our writers posted a review on the Monoprice MP Select Mini 3D printer. This printer is becoming stupidly popular, and Monoprice has depleted their inventory twice since then. I’ve been watching the product page for this printer for a while now, and here’s what happens: 1) Printer is out of stock, with an ETA of about a month in the future. 2) Printer is still out of stock, ETA is a few days away. 3) Monoprice has this printer in stock. This cycle seems to repeat every week or so.

Arduino Raycasting. When you think of raycasting, you probably think about Wolfenstein 3D, or other barely 3D games. You don’t need a powerful CPU like a 386 for raycasting – you can do it on an Arduino. The display is a 32×16 matrix of LEDs, control is through a Wii Nunchuck, and yes, head-bobbing is implemented. Here’s a video.

Soldering Challenge To Challenge You

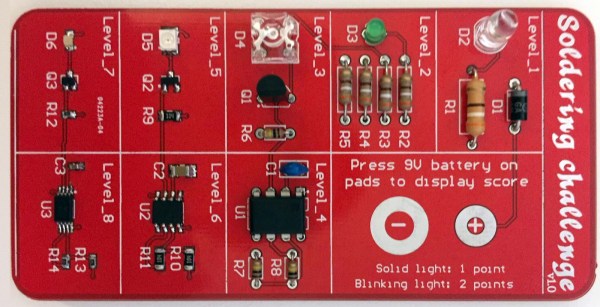
[Rick] knew that the blinking, beeping microcontroller kits that are commonly used for educational soldering workshops just would not cut it for a serious combat among SMD reworking professionals. The “Soldering Challenge” he created to fill this gap is a little PCB with eight difficulty levels from large through hole components to the smallest hand solderable SMDs. After assembly, the circuit assesses the skill level of the soldering aspirant based on a built-in scoring system.

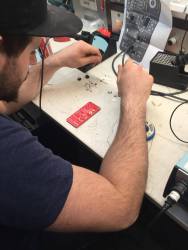
soldering_challenge_ongoingThe challenge is meant to be played on a time limit. There are no two same-sized components of different value, so contestants may focus on soldering fast. Little rubber pads on the backside of the board provide for good ground contact in the curves. After the starting signal, you will be confronted with a few through hole resistors, a capacitor, different LEDs and a DIP-8 IC. Here it’s all about the speed and efficiency as you tackle a track full of bends and cut-off resistor legs. Over the course of the challenge, the components get smaller and smaller, until you finally reach the 0603 level, with a tiny SC-85 MOS-FET and a TSSOP 555 timer at the finishing line.
Continue reading “Soldering Challenge To Challenge You”

Recreating Chiptunes In Verilog

The semester is wrapping up at Cornell, and that means it’s time for the final projects from [Bruce Land]’s lab. Every year we see some very cool projects, and this year is no exception. For their project, [Andre] and [Scott] implemented the audio processing unit (APU) of the Nintendo Entertainment System (NES). This is the classic chiptune sound that regaled a generation with 8-bit sounds that aren’t really eight bits, with the help of a 6502 CPU that isn’t really a 6502 CPU.

Unlike the contemporaneous MOS 6581 SID, which is basically an analog synthesizer on a chip, the APU in the NES is extraordinarily spartan. There are two pulse wave channels, a triangle wave channel, a random noise channel, and the very rarely used delta modulation channel (DMC) used to play very low quality audio samples. This is a re-implementation of the NES APU for a university lab; it is very understandable that [Andre] and [Scott] didn’t implement the rarely used DMC.

Everything about the circuitry of the NES is well documented, so [Andre] and [Scott] had a great wiki for their research. At the highest level, the APU runs on a 894kHz clock and controls three channels through dedicated registers. These outputs are fed through a mixer, which the guys scaled and combined into a 16-bit output played through a Wolfson WM8731 audio codec.

After implementing the NES APU, [Andre] and [Scott] added an SD card reader that can read the Nintendo Sound Format – the standard distribution format for NES chiptunes – and emulated a 6502 to control the registers. The result is a relatively simple device that plays NES chiptunes with amazing accuracy. The sound files on the project report sound like the real thing, but this is entirely emulated on modern hardware.

Build A Rhizotron: Image The World Beneath Your Feet

The world of the subsoil is a fascinating place. Our whole ecosystem depends on its variety of fungus, bacteria and detritivore creatures that break down and decay dead matter and provide the nutrients to sustain plants that bring in the energy from the sun.

It’s easy enough to study what is happening beneath the surface, just reach for a trowel. But of course, that’s an imperfect technique, for it only gives a picture of a world you have destroyed, and then at best only a snapshot.

Fungal hypha growth in action

What if you could image underground, take pictures and video of the decay process and the creatures that are its engine? [Josh Williams] was curious how this could be achieved, so after early experiments with buried webcams proved unimpressive he created the Rhizotron. A flatbed scanner waterproofed for burial with plenty of silicone, and driven by a Raspberry Pi. The result was particularly successful, and though he has lost several scanners to water ingress he has collected some impressive imagery which he has posted on the project’s blog. Below the break we’ve included one of his videos taken with the scanner in a compost bucket, in which you can see decomposition aplenty, mating millipedes, spreading fungal hyphae and much more.

Continue reading “Build A Rhizotron: Image The World Beneath Your Feet”

Turn Down The Bed, Turn Down The Lights

Home automation seems to be working its way to a computer-controlled future in which humans will be little more than an afterthought. Eventually they will take over Skynet-style, but until then, we will enjoy the relative comfort that a good home automation project provides. The latest from [Clement] certainly goes a long way towards this goal by automating his bed (Google Translate from French).

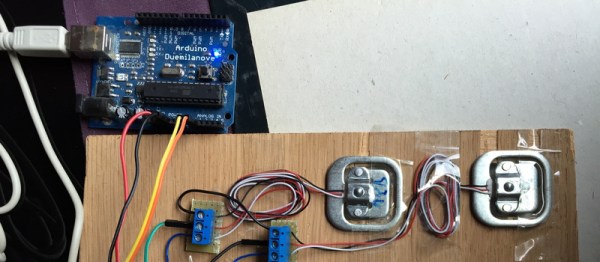
With four load cells and a microcontroller, [Clement]’s bed can tell whether or not he is sleeping. After taking a weight reading, the bed can send commands to the rest of his home automation system and tell it to turn off his stereo and turn the lights off in the house (or change them to a different color). And it doesn’t stop with just going to bed, but when he wakes up as well. The system can begin turning on lights, starting the coffee machine, and opening the blinds without any interaction from him at all.

This project goes well beyond simple home automation. With a little configuration and extrapolation, [Clement] can tell where in the bed he slept at night, what stages of sleep he was in at specific times, and the overall quality of his sleep. This could go a long way for someone who has a hard time sleeping and needs a little more information on how to correct the problem.

While we’ve seen various takes on tying a bed into one’s home automation system, this one goes above and beyond with the amount of data collected. You could even go one step further and have it turn on some Barry White if the normal weight in the bed suddenly doubles, for whatever reason. Maybe that will be a feature in Version 2.