If the [realjohnnybravo] is the one from the show, it appears he finally managed to get a girlfriend, marry her, and produce at least one son. As the old schoolyard rhyme goes, first comes love, then comes marriage, then comes filling the whole *!$&# backyard with brightly colored plastic garbage. One of these items, a Power Wheels quad bike, suffered a blow from planned obsolescence leaving behind a traumatized child. [realjohnnybravo] decided to fix it.
He made frequent mention of how one could go to a store and purchase replacement gears for the toy. Perhaps it’s a German thing. Regardless, he shows experience with internet comments by justifying his adventure in gear manufacturing with, paraphrased, “I’m having fun and learning so back off you pedantic jerks.”
Resin casting is great, and is often overlooked vs 3D printing. He purchased some hardware store RTV silicone and some slow-cure resin. The faster cure resin would get too hot with this much volume and potentially burn.
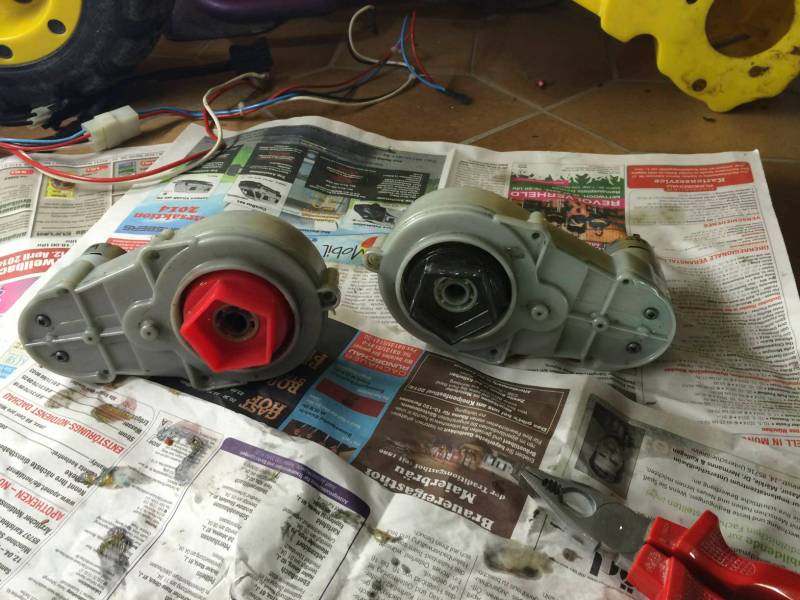
Materials procured he took apart both gearboxes from the machine. He first made a silicone mold of the broken parts (from the good copies out of the working gearbox) and removed the master. Without a vacuum or pressure casting chamber, the molds came out a little rough and bubbly, but it’s nothing some work with a carpet knife can’t fix. For big gears like this it hardly matters. Next he poured the two part resin into the molds and waited.
After some finishing with regular woodworking tools the parts fit right into the voids in the defective gearbox. His son can once again happily whir around the lawn, until the batteries die anyway.


Someone send him the information on supercaps and let him “fix” that problem too.
Brilliant. Bravo Mr.Bravo
I’ve done a small one before with 2 part epoxy glue, and blue tack/sticky tack (What the flip is the generic name for that stuff?) … turned out just usable, had some slight deformation from mould.
I will be very surprised if the resin holds up for any significant time.
It’s probably stronger than the original injection molded part.
A lot of common resins tend to be much more brittle than injection molded plastics.
In the prior millennium (circa 1996 or so), I obtained an Exabyte 8500 tape drive – an 8mm tape drive with a native storage capacity of 5GB, which absolutely dwarfed the capacities of HDs which were perhaps a couple hundred MB on a performace desktop. As awesome as it was, there was a problem – one of the gears for the tape loader was sheared. Fortunately, the device had two (one on each side), and I disassembled and made a silicone mould, then cast a new part. A couple of attempts yielded a usable gear. The first had voids in the gear because I didn’t agitate the mixture sufficiently – plunging a toothpick into the resin and moving it about as I poured gear #2 solved that. The drive served duty until its capacity was no longer suitable for my storage needs. I probably expended more effort in carefully disassembling the device to access the gears than I did in casting the replacement. These were small gears and the resin reproduced them very faithfully, and was durable.
I live on the US West Coast, and we have a chain of plastics stores called “TAP Plastics” out here which carries all sorts of casting supplies. It is also a fave place to go rummage their cutoffs bin for discount acrylic for laser cutting.
I thought it was a cool story.
For anyone who wants more useful dates, wikipedia has more useful information about the EXB-8500 : it came out in 1990, when typical desktop hard drives were very approximately 200MB in size.
People may or may not want to read random tangentially-related anecdotes, but I’m confident no-one wants to read your sniping.
TAP Plastics is very interesting. Why don’t we have cool things like that on the east coast?
Mechanical agitation can help release bubbles to rise to surface… the classic trick being to have your mould on a solid board, and smack that down on the bench a few times. If you want to get fancy, maybe get the orbital sander involved.
Excellent! There’s nothing like thwarting a manufacturer’s plan to make you buy a new, upgraded and “improved” toy.
interesting that one would use the stock gearbox and motor with all that work and not scavenge something else or switch to a belt or chain drive. Ive done only small pieces and nothing that takes torque with resins