Hackaday Prize Entry: Low Cost, DIY Thermal Imaging

A few years ago, thermal imaging sensors – cameras that could see heat – became very cheap. FLIR was going all-in with their Lepton module, and there were a number of clip-on cellphone accessories that gave the computer in your pocket the ability to see infrared.

Fast forward a few years, and you can still buy a thermal imaging sensor for your cellphone, and it still costs about the same as it did in 2013. For his Hackaday Prize project, [Josh] is building a more modern lower cost thermal imaging camera. It won’t have the resolution of the fancy $1000 FLIR unit, but it will be very inexpensive with a BOM cost of about $50.

[Josh] is building his low-cost thermal camera around Panasonic’s Grid-EYE module. This thermopile array contains 64 individual infrared sensors, giving this ‘camera’ a resolution of 8×8 pixels. That’s nothing compared to the thousands of pixels found in devices using the FLIR Lepton, but the Grid-EYE is very cheap.

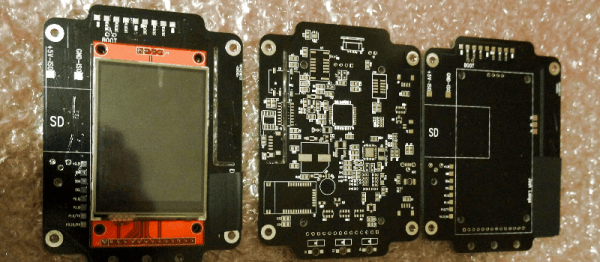
Right now, [Josh]’s build is using an ARM Cortex M0+ and a cheap touch screen LCD he picked up from AliExpress. There’s an optional component to this build in the form of a visible light camera, giving [Josh] the ability to overlay thermal sensor data over a visible light image, just like the fancier, more expensive units.

With a total BOM cost of $44.50, [Josh]’s build is easy on the pocketbook, but still good enough to get some useful information. It’s a great build, and a great entry for The Hackaday Prize.

Impressive Custom Built Blacksmith’s Forge

[EssentialCraftsman] is relatively new to YouTube, but he’s already put out some impressive videos. We really enjoyed an episode dedicated to a fixture in his shop, his large custom blacksmith’s forge.

The forge is a custom cast vault of refractory that sits on a platter of fire bricks suspended on a heavy-duty rotating frame. Two forced air natural gas burner provide the heat.  The frame is plasma CNC cut steel welded together.

A lot of technical challenges had to be solved. How does one hold a couple hundred pound piece of refractory in such a way that it can be lifted, especially when any steel parts exposed to the heat of the forge would become plastic and fail? When the forge turns off, how do you keep the hot air in the forge from rising into the blowers and melting them? There were many more.

We were really impressed by the polished final appearance of the forge, and the cleverness of its design. Everything is well thought out, and you can even increase the height of the forge by propping it up on more fire bricks. We hope [EssentialCraftsman] will continue to produce such high quality videos. We also enjoyed his episode on Anvils as well as a weirdly informative tirade on which shape of stake (round or square) to use when laying out concrete jobs. Videos after the break.

Continue reading “Impressive Custom Built Blacksmith’s Forge”

1980s Toy Robot Arm Converted To Steam And Other Explorations

We were doing our daily harvest of YouTube for fresh hacks when we stumbled on a video that eventually led us to this conversion of a 1980s Armatron robot to steam power.

The video in question was of [The 8-bit Guy] doing a small restoration of a 1984 Radio Shack Armatron toy. Expecting a mess of wiring we were absolutely surprised to discover that the internals of the arm were all mechanical with only a single electric motor. Perhaps the motors were more expensive back then?

The resemblance is uncanny.

The arm is driven by a Sarlacc Pit of planetary gears. These in turn are driven by a clever synchronized transmission. It’s very, very cool. We, admittedly, fell down the google rabbit hole. There are some great pictures of the internals here. Whoever designed this was very clever.

The robot arm can do full 360 rotations at every joint that supports it without slip rings. The copper shafts were also interesting. It’s a sort of history lesson on the prices of metal and components at the time.

Regardless, the single motor drive was what attracted [crabfu], ten entire years ago, to attach a steam engine to the device. A quick cut through the side of the case, a tiny chain drive, and a Jensen steam engine was all it took to get the toy converted over. Potato quality video after the break.

Continue reading “1980s Toy Robot Arm Converted To Steam And Other Explorations”

An Apple II Joystick Fix For Enjoyable Gameplay

We all remember the video games of our youth fondly, and many of us want to relive those memories and play those games again. When we get this urge, we usually turn first to emulators and ROMs. But, old console and computer games relied heavily on the system’s hardware to control the actual gameplay. Most retro consoles, like the SNES for example, rely on the hardware clock speed to control gameplay speed. This is why you’ll often experience games played on emulators as if someone is holding down the fast forward button.

The solution, of course, is to play the games on their original systems when you want a 100% accurate experience. This is what led [FozzTexx] back to gameplay on an Apple II. However, he quickly discovered that approach had challenges of its own – specifically when it came to the joystick.

The Apple II joystick used a somewhat odd analog potentiometer design – the idea being that when you pushed the joystick far enough, it’d register as a move (probably with an eye towards smooth position-sensitive gameplay in the future). This joystick was tricky, the potentiometers needed to be adjusted, and sometimes your gameplay would be ruined when you randomly turned and ran into a pit in Lode Runner.

The solution [FozzTexx] came up with was to connect a modern USB gamepad to a Raspberry Pi, and then set it to output the necessary signals to the Apple II. This allowed him to tune the output until the Apple II was responding to gameplay inputs consistently. With erratic nature of the original joystick eliminated, he could play games all day without risk of sudden unrequested jumps into pits.

The Apple II joystick is a weird beast, and unlike anything else of the era. This means there’s no Apple II equivalent of plugging a Sega controller into an Atari, or vice versa. If you want to play games on an Apple II the right way, you either need to find an (expensive) original Apple joystick, or build your own from scratch. [FozzTexx] is still working on finalizing his design, but you can follow the gits for the most recent version.

Electrostatic Loudspeakers: High End HiFi You Can Build Yourself

If you have an interest in audio there are plenty of opportunities for home construction of hi-fi equipment. You can make yourself an amplifier which will be as good as any available commercially, and plenty of the sources you might plug into it can also come into being on your bench.

There will always be some pieces of hi-fi equipment which while not impossible to make will be very difficult for you to replicate yourself. Either their complexity will render construction too difficult as might be the case with for example a CD player, or as with a moving-coil loudspeaker the quality you could reasonably achieve would struggle match that of the commercial equivalent. It never ceases to astound us what our community of hackers and makers can achieve, but the resources, economies of scale, and engineering expertise available to a large hi-fi manufacturer load the dice in their favour in those cases.

The subject of this article is a piece of extreme high-end esoteric hi-fi that you can replicate yourself, indeed you start on a level playing field with the manufacturers because the engineering challenges involved are the same for them as they are for you. Electrostatic loudspeakers work by the attraction and repulsion of a thin conductive film in an electric field rather than the magnetic attraction and repulsion you’ll find in a moving-coil loudspeaker, and the resulting very low mass driver should be free of undesirable resonances and capable of a significantly lower distortion and flatter frequency response than its magnetic sibling.
Continue reading “Electrostatic Loudspeakers: High End HiFi You Can Build Yourself”

Single Board Revolution: Preventing Flash Memory Corruption

An SD card is surely not an enterprise grade storage solution, but single board computers also aren’t just toys anymore. You find them in applications far beyond the educational purpose they have emerged from, and the line between non-critical and critical applications keeps getting blurred.

Laundry notification hacks and arcade machines fail without causing harm. But how about electronic access control, or an automatic pet feeder? Would you rely on the data integrity of a plain micro SD card stuffed into a single board computer to keep your pet fed when you’re on vacation and you back in afterward? After all, SD card corruption is a well-discussed topic in the Raspberry Pi community. What can we do to keep our favorite single board computers from failing at random, and is there a better solution to the problem of storage than a stack of SD cards?

Continue reading “Single Board Revolution: Preventing Flash Memory Corruption”

Rocking An Acoustic Guitar By Making It Electric

Brothers [Armand] and [Victor] took their acoustic guitar to the next level, making their own pickups to turn it into an electric guitar. The result is that awesome electric guitar sound.

The pickups are homemade magnetic pickups. Each string has a steel bolt behind it with three ceramic magnets on each bolt. A coil is also wrapped around all the pickups. That coil is what’s connected to the wires going to the amplifier. When a string vibrates, it changes the magnetic field in the pickup which induces a current in the coil and that is then sent on to the amplifier to be altered as desired and turned back into sound. Of course that meant the guys had to replace their nylon strings for steel ones.

With just the volume amplified the sound isn’t very different but when the amplifier’s gain is turned up and the volume turned down the sound is undoubtedly electric. As you can hear in the video below, Johnny B. Goode, Paint it Black and Satisfaction take their acoustic guitar’s sound to a whole new level.

Continue reading “Rocking An Acoustic Guitar By Making It Electric”