When A CRT Isn’t Retro Enough: LEDs

When we think of an old-style computer terminal, it has a CRT screen: either one of the big 1970s VDUs with integrated keyboard, or maybe one from a later decade with more svelte styling. You would have found other displays in use in previous decades though, and one of them came our way that we think it worthy of sharing.

16 segments in action. (PD) Wikimedia Commons.

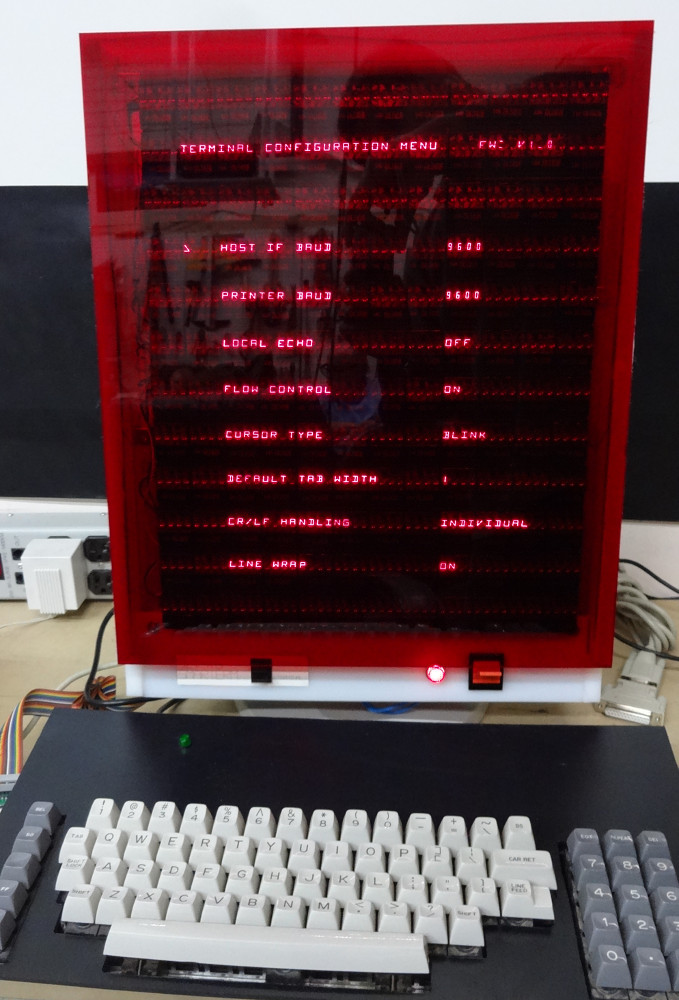
[Dan Julio] was given several tubes of Siemens DL1416B 4-digit 17-segment LED displays by a friend, and decided to use them as an unusual retro display for his terminal project. These devices are an alphanumeric display with a parallel interface that can show a subset of the ASCII character set as well as a cursor. He had 213 of them, so made plans for a 64 character by 16 line display, however on discovering a quantity of the parts were non-functional he had to scale back to 12 lines of 48 characters.

The terminal in action.

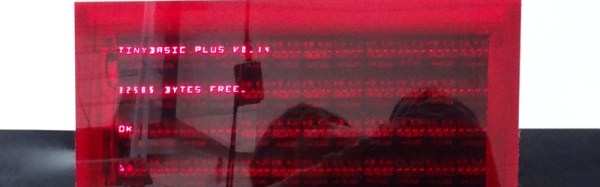
The displays are mounted on PCBs in groups of four, controlled by a PIC16F1459 and some shift registers. These boards are then daisy-chained via a TTL serial line. The whole display shares one of the three serial ports on a Teensy 3.1 with his retro keyboard that has its own PIC controller, the others serving a serial printer port and the terminal serial port. The Teensy software has two modes: serial terminal or a Tiny Basic interpreter, and the relevant repositories are linked from the project page.

Since each set of DL1416Bs takes 250 mA, the whole display consumes about 9 A at 5 volts. On top of that the keyboard uses another 500 mA, so a sufficiently powerful supply had to be incorporated. This is mounted along with the Teensy in a very well-made enclosure, and the whole is mounted on what looks like a surplus monitor stand for a very professional finish.

To take us through the terminal’s features he’s posted a YouTube video that we’ve placed below the break. It comes across as a surprisingly usable machine, as he logs into a Raspberry Pi and edits a file, and takes us through some features of the BASIC interpreter.

Continue reading “When A CRT Isn’t Retro Enough: LEDs”

Simple Hearing Amplifier

Hearing aids are probably more high-tech than you think. They are tiny. They have to go through a lot of trouble to prevent feedback. They need a long battery life. The good ones match their amplification to the inverse of your hearing loss (amplifying only the bands where you don’t hear as well).

[NotionSunday] put together a hearing amplifier project that probably doesn’t hit many of those design criteria. However, thanks to a 3D printed case, it looks pretty good. The device uses a dual opamp to boost the output from two microphones and feeds it to a conventional headphone.

Continue reading “Simple Hearing Amplifier”

The Travelling Hackerbox Is Going International

Over the last year, Hackaday.io has seen an incredible project. It’s a migratory box of random electronic junk, better known as the Travelling Hackerbox. The idea behind this mobile electronic surplus store is simple: receive the box, take out some cool electronic gizmos, add some of your own, and send it on to the next person on the list. It is the purest expression of the hacker aesthetic, all contained in a cardboard box.

The previous travels of the Travelling Hackerbox
The previous travels of the (second) Traveling Hackerbox

Last week, the Travelling Hackerbox appeared at the Hackaday Superconference where it was torn asunder. Its silicon and plastic innards were spilled for a badge hacking competition. The body of the box is gone from this world but the spirit lives on. Parts were collected, pins straightened, the contents of anti-static bags condensed, and now it’s time for the Travelling Hackerbox to leave the nest. It’s going down to the post office, sending in its passport application, and it’s finally heading out into far-flung lands that are not the United States.

Over the last year, and despite some jerk in Georgia, the Traveling Hackerbox has racked up the miles. From Maine to Flordia, and from Alaska to Hawaii, the Hackerbox has distributed parts to dozens of labs and workstations. If you want to get an idea of the box, the last recipient, Carl Smith, put together a great summary and photo log of what he found in this magical box.

I’ve always promised the Hackerbox would go international after racking up 25,000 miles – the distance around Earth’s equator. Now, it’s finally time. This is happening, and I’m looking for volunteers to take care of the box.

How this is going to go down

Right now, the Travelling Hackerbox is sitting at the Hackaday Overlords office in Pasadena. The next trip will be to Canada, hopefully around Vancouver, where it will eventually make it to the Maritimes. From there, the box will travel to Europe (West to East, possibly ending in Russia). The box will then travel through Africa, ending South Africa, and head over the Indian Ocean to Australia. The rest of Oceania, Southeast Asia, India, and China will be next, possibly followed by South and Central America. With any luck, the Travelling Hackerbox will arrive back at home base by next year.

Of course, this all depends on how many members of the hackaday.io community would like to receive the box and where those people are located. If you want to receive the box, this is the sign-up form [the sign up form is now closed]. This form will be open for the next week, afterwards I will look at the responses, consider each of them, and plan this epic trip around the world.

The current state of the box

The Travelling Hackerbox was originally based on a US Postal Service flat rate box. Because flat rate boxes are for US destinations only, the physical manifestation of the box must change. At the very least, this gives me an opportunity to laminate a new box in packing tape and reinforce the edges of the cardboard.

The new body for the Travelling Hackerbox is a 12x12x3 inch (about five liters) cardboard box, lovingly protected and reinforced with stickytape. This does reduce the overall volume of the somewhat, which required the disposal of a few parts that weren’t really cool. I assure you, nothing of great value was lost, and I only removed the larger, bulkier components I remember seeing the last time I had it.

All the coming travels will be planned next week when I get a few submissions to the international sign-up form.

Alexa in Billy Bass singing fish

Alexa Brings Back Singing Fish, This Time It’s A Good Thing

Remember Big Mouth Billy Bass? That’s the singing fish with which you could torture family members by having it endlessly perform a rendition of either “Take Me to the River” or “Don’t Worry Be Happy”.

Now [Brian Kane], a teacher at the Rhode Island School of Design, has connected Amazon’s Alexa to the fish. Speak the “wake word”, “Alexa”, and the fish’s head turns to face you. Then ask it any question you’d normally ask Alexa and Alexa’s voice answers while the fish opens and closes its mouth in time to the words. Want to know the weather? Ask the fish, which you can see [Brian] do in the video below.

[Brian] hasn’t given details on how he’s done it but he’s likely made use of the Alexa Skills Kit, an SDK from Amazon that let’s you use the Alexa voice recognition and speech service with your own hardware (wetware, aquaware?), just as Amazon does with their home assistant, Echo .

Continue reading “Alexa Brings Back Singing Fish, This Time It’s A Good Thing”

MP3 Player And Handheld GPS Is An Odd Combo Work Of Art

We think [Brek Martin] set out to build a handheld GPS and ended up adding an mp3 Player to it. Regardless, it’s beautifully constructed. Hand built circuit boards and even a custom antenna adorn this impressive build.

The core of the build is a 16 bit microcontroller a dsPIC33FJ128GP802 from Microchip. It’s a humble chip to be doing so much. It uses a UBlox NEO-6M positioning module for the location and a custom built QFH antenna built after calculations done with an online calculator for the GPS half. The audio half is based around a VLSI VS1003b decoder chip.

The whole build is done with protoboard. Where the built in traces didn’t suffice enamel and wire wrap wire were carefully routed and soldered in place. There’s a 48pin LQFP package chip soldered dead bug style that’s impressive to behold.  You can see some good pictures in this small gallery below.

Continue reading “MP3 Player And Handheld GPS Is An Odd Combo Work Of Art”

Perceptrons In C++

Last time, I talked about a simple kind of neural net called a perceptron that you can cause to learn simple functions. For the purposes of experimenting, I coded a simple example using Excel. That’s handy for changing things on the fly, but not so handy for putting the code in a microcontroller. This time, I’ll show you how the code looks in C++ and also tell you more about what you can do when faced with a more complex problem.

Continue reading “Perceptrons In C++”

Helicopter Pendulum Is PID-licious

If you’ve ever tried to tune a PID system, you have probably encountered equal parts overwhelming math and black magic folk wisdom. Or maybe you just let the autotune take over. If you really want to get some good intuition for motion control algorithms, PID included, nothing beats a little hands-on experimentation.

To get you started, [Clovis] wrote in with his budget propeller-based PID demo platform (Portuguese, translated shockingly well here).

The basic setup is a potentiometer glued to a barbecue skewer with a mini-quadcopter motor and rotor on the end of it. A microcontroller reads the voltage and PWMs the propeller through a MOSFET. The goal is to have the pendulum hover stably in midair, controlled by whatever algorithms you can dream up on the controller. [Clovis]’ video demonstrates on-off and PID control of the fan. Adding a few more potentiometers (one for P, I, and D?) would make hands-on tweaking even more interactive.

In all, it’s a system that will only set you back a few bucks, but can teach you more than you’d learn in a month in college. Chances are good that you’re not going to have exactly the same brand of sardine can on hand that he did, but some improvisation is called for here.

If you don’t know why you’d like to master open-loop closed-loop control algorithms, here’s one of the best advertisements that we’ve seen in a long time. But you don’t have to start out with hand-wound hundred-dollar motors, or precisely machined bits. As [Clovis] demonstrates, you can make do with a busted quadcopter and whatever you find in your kitchen.

Continue reading “Helicopter Pendulum Is PID-licious”