There was a time when instruments sporting a GPIB connector (General Purpose Interface Bus) for computer control on their back panels were expensive and exotic devices, unlikely to be found on the bench of a hardware hacker. Your employer or university would have had them, but you’d have been more likely to own an all-analogue bench that would have been familiar to your parents’ generation.
![A GPIB/IEEE488 plug. Alkamid [CC BY-SA 3.], via Wikimedia Commons](https://hackaday.com/wp-content/uploads/2016/10/a_gpib_plug.jpg)
So there you are, with an instrument that speaks a fully documented protocol through a physical interface you have plenty of spare sockets for, but if you’re a Linux user and especially if you don’t have an x86 processor, you’re a bit out of luck on the software front. Surely there must be a way to make your computer talk to it!
Let’s give it a try — I’ll be using a Linux machine and a popular brand of oscilloscope but the technique is widely applicable.
It’s easy with a VISA
We are fortunate in that National Instruments have produced a standard bringing together the various physical protocols and interfaces used, and their VISA (Virtual Instrument Software Architecture) is available as precompiled libraries for both Windows and Linux(x86). Talking to VISA is a well-trodden path, for example if you are a Python coder there is a wrapper called PyVISA through which you can command your instruments to your heart’s content. And if you’ve spotted the glaring gap for architectures with no NI VISA library, they’ve got that covered too. PyVISA-py is a pure Python implementation of VISA that replaces it.
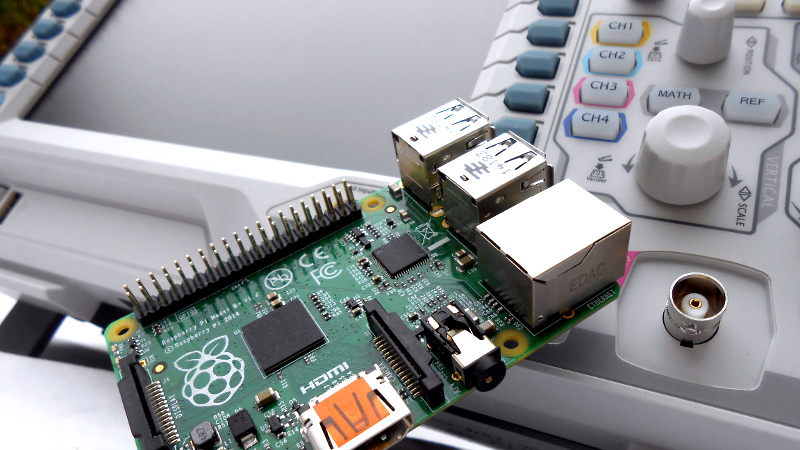
As a demonstration, we’ll take you through the process of using PyVISA-py and PyVISA on a Raspberry Pi for basic communication with an instrument over USB. We’ve used both a Raspberry Pi Zero and a Raspberry Pi 3 each running the latest Raspbian distro, but a similar path should apply to most other Linux environments and like instruments. Our instrument here is a Rigol DS1054z oscilloscope.
We start by installing the Python libraries for USB, PyVISA-py, and PyVISA. We’re assuming you already have python and pip, if not here’s a page detailing their installation. Type the following lines at the command prompt:
 sudo pip install pyusb

sudo pip install pyvisa

sudo pip install pyvisa-py
You should now be able to test the installation from the Python interpreter. Make sure the instrument is both turned on and connected via USB, and type the following:
sudo python
This should give you a version and copyright message for Python, followed by a three-arrow >>> Python interpreter prompt. Type the following lines of Python:
import visa

resources = visa.ResourceManager('@py')

resources.list_resources()
The first line imports the VISA library, the second loads a resource manager into a variable, and the third queries a list of connected instruments. The ‘@py’ in line 2 tells the resource manager to look for PyVISA-py, if the brackets are empty it will look for the NI VISA libraries instead.
If all is well, you will see it return a list of resource names for the instruments you have connected. If you only have one instrument it should be similar to the one that follows for our Rigol:
(u'USB0::6833::1230::DS1ZA123456789::0::INSTR',)
The part in the single quotes, starting with USB0:: is the VISA resource name for your instrument. It is how you will identify it and connect to it in further code you write, so you will either need to run the Python code above in your scripts and retrieve the resource name before you connect, or as we are doing in this demonstration copy it from the prompt and hard-code it in the script. Hard-coding is not in any way portable as the script may only work with your particular instrument, however it does provide a convenient way to demonstrate the principle in this case.
If you are still within the Python interpreter at this point, you can leave it and return to the command prompt by typing a control-D end-of-file character.
Towards Something More Useful
Assuming all the steps in the previous paragraphs went smoothly, you should now be ready to write your own code. We’ll give you a simple example, but first there are a couple of pieces of documentation you’ll want to become familiar with. The first is the PyVISA documentation, the same as we linked to earlier, and the second should be the programming reference for your instrument. The manufacturer’s website should have it available for download, in the case of our Rigol it can be found as a PDF file (Click on the “Product manuals” link at the top).
The PyVISA manual details all the wrapper functions and has a set of tutorials, while the product manual lists all the commands supported by the instrument. In the product manual you’ll find commands to replicate all the interface controls and functions, but the ones we are most interested in are the measurement (MEAS) set of commands.
For our example, we’ll be measuring the RMS voltage on channel 1 of our Rigol. We’ll connect to the instrument directly using its resource name and querying it for its model identifier, before selecting channel 1 and querying it for an RMS voltage reading.
Copy the following code into a text editor, replacing the resource identifier with that of your own instrument, and save it as a .py file. In our case, we saved it as query_rigol.py.
#Bring in the VISA library
import visa
#Create a resource manager
resources = visa.ResourceManager('@py')
#Open the Rigol by name. (Change this to the string for your instrument)
oscilloscope = resources.open_resource('USB0::6833::1230::DS1ZA123456789::0::INSTR')
#Return the Rigol's ID string to tell us it's there
print(oscilloscope.query('*IDN?'))
#Select channel 1
oscilloscope.query(':MEAS:SOUR:CHAN1')
#Read the RMS voltage on that channel
fullreading = oscilloscope.query(':MEAS:ITEM? VRMS,CHAN1')
#Extract the reading from the resulting string...
readinglines = fullreading.splitlines()
# ...and convert it to a floating point value.
reading = float(readinglines[0])
#Send the reading to the terminal
print reading
#Close the connection
oscilloscope.close()
Enable the channel on the instrument – when you are familiar with the API you can do this with your software – and connect it to a signal. We used the ‘scope calibration terminal as a handy square wave source. You can then run the script as follows, and if all is well you will be rewarded with the instrument ID string and a voltage reading:
sudo python query_rigol.py
It’s worth noting, we have just run Python as root through the sudo command to use the USB device for the purposes of this demonstration. It’s beyond the scope of this page, but you will want to look at udev rules to allow its use as a non superuser.
With luck on this page we will have demystified the process of controlling your USB-connected instruments, and you should be emboldened to give it a go yourself. We’re not quite done yet though, the second part of this article will present a more complete example with a practical purpose; we’ll use our Raspberry Pi and Rigol to measure the bandwidth of an RF filter.


PyVISA is fantastic for USB devices and I definitely recommend it if you want something crossplatform for your lab (unlike VB). Really nice for automating parametric sweeps. I had the misfortune of working in a lab that had old equipment that only had GPIB interfaces. In addition, PyVISA isn’t able to support USB-GPIB adapters very well, and Keysight and NI suites really only support RHEL in terms of Linux.
Those programming references can get a bit dense, especially for VNAs.
VISA obviously makes things easier, but don’t forget about SCPI (which is abstracted by VISA). If you’ve got GPIB you probably have SCPI compliance.
Indeed, very true. The purpose of the article though is a simple introduction rather than a comprehensive review.
National Instruments bloatware? no thanks! I prefer to keep my sanity!
I installed this VISA-stuff because i wanted to try communicate with my DS1102E and i had a bad surprise, it messed something up on my computer. Fixing wasn’t too difficult, just delete some stuff in the registry, but yeah, this shouldn’t happen. Once this was done i was able to communicate with the scope using Perl. I however had to write a little more code because some simplified Perl-module didn’t work. Don’t ask me about details, long time ago…
i wrote a visa app for windows for my rigol dm3058e dmm https://github.com/charlie-x/x3058E , i haven’t finished it since it covered the bits i wanted, still have a few things.. just noticed i also forgot to copy the C++ source code to github though, so i’ll add it.
Baahahaa, I skimmed this article earlier thinking it was a replacement for MIDI.
I thought there would be trumpets and drums!
I bet if your instrument has steppers you could squeeze Für Elise (or the Imperial March;if that’s your jam) out of it via SCPI.
Well this is the one to beat…
https://youtu.be/Oym7B7YidKs
More than a few scanners and copiers had classical music Easter egg ‘calibration’ routines. e.g.
https://www.youtube.com/watch?v=KImkZvLOCfA
This works for Siglent scope´s also! Also work with the Visa sources.
Control commands can be found here :
http://www.siglent.eu/Downloads#Command Manuals
Shameless plugs: https://hackaday.com/2015/06/06/controlling-a-rigol-with-linux/
and
https://github.com/wd5gnr/scopesnap
What’s the benefit of Visa, compared to simple SCPI through USBTMC protocol on Linux?
USBTMC let you talk very easily to your instrument, the most useful would be to abstract SCPI commands.
You can change between different physical layer like GPIB, RS232, USB, VXI or LXI.
I agree, but most recent instruments implements USBTMC then others will works with either GPIB or RS232.
For GPIB(with prologix USB dongle) and RS232 it may be exactly the same than USBTMC, you just write SCPI commands to /dev/ttyUSBX(GPIB or rs232) or /dev/usbtmcX(USBTMC) and read response from this same inode.
It should be the same. But with Visa you can use other connections like Ethernet. And a big plus it is interchangeable over different OS.
Probably its greater abstraction as a simple introduction to the topic, in the case of this article.
I’m about to google for an GPIB implementation on the Raspberry Pi, using it’s GPIO Pins (+levelshiftprotectioncircuitry, of course)…
Visa is nice, but the hole power comes with ivi. Then you can change all components in your setup, in theory :D
The only person I know who writes a HaD blog wherein complete instructions are given.
We aim to please :)
Can you provide a listing of instruments that work with pyvisa ?
Can’t you just pull out the Commodore PET for a controller?
Legend has it that some of those computers were sold because thy were cheap controllers, so suddenly the labs with test equipment that had the bus could afford controllers.
I seem to recall the HP-150, the one from 1983 with the touch screen, it used the bus to interface to its external floppy drive.
And if course, there were HP calculators in later days which included the bus.
Michael
The was also the HP-8X and 98XX computers which often had a HPIB interface card which also was used to control the disk drives,hard drives, and printers on the system.
I have an old Tek scope with RS232, I think it was just intended to print. Can I capture the print with it?
I seem to remember doing this with a Tek TDS420 about 20 years ago. Just connected the serial to a laptop and used a terminal program to capture the output to a file. I think I might have had to set the output format to something that was printable ASCII to get the file to capture properly but I’m not sure about that.
Try and ascertain the Baud rate, start a COMMs package on the PC and type
ID? [Enter] and see if you get a response, if not, try
IDN? [Enter]
if that works, type
CURVE? [Enter]
you should get a belly full of data.
The format will be whatever the `scope is set for.
(ie Binary, Ascii, decimal…..)
GPIB was originally called HPIB. Standardized as IEEE-488. VISA is an abstraction to multiple physical layers, and a standardized API; for example VXI-11 is the LAN abstraction (later updated to LXI). VXI-11 is built on ONC-RPCs. Pretty much every HP computing device from the late 70’s to the late 90’s came with HPIB, and it was used to interface to all manner of peripherials as well as instruments.
The cheap usbgpib dongles, like Prologix are really just toys. They don’t abstract the entirety of IEEE-488 … for example, there’s no interrupt channel, so SRQs are poorly implemented. Most of the standards are online these days if you go digging. SCPI is an attempt to standardize command sets across like instruments. It’s only been partially successful at that.
Personally, I prefer to use Perl to control instruments with PDL to handle the data. Google perl VXI11::Client to find it. A really good and often cheap LANGPIB box is the HP E2050A. Beware of NI … they don’t implement VXI-11 and use a proprietary protocol.
Another shameless plug: The Syscomp instruments use an FTDI chip to interface to the USB connection, so the interface looks like a high-speed serial interface and you can talk to it with any language that can send ASCII strings to a serial port. We use Tcl, but you can even use a dumb terminal emulator to talk to the hardware. Makes debugging very straightforward.
Thanks this was very helpful
import visa
resources = visa.ResourceManager(‘@py’)
resources.list_resources()
This returns (u’ASRL/dev/ttyAMA0::INSTR’,)
inst = resources.open_resource(‘ASRL?dev?ttyAMA0::INSTR’)
print(inst.query(‘*IDN?’)) –waits here indefinitly
please help!
Same issue here !
I am experiencing the same with an HP 82357B. “lsusb” lists the interface, but no communication. I then tried to compile/install a driver (“How to enable HP 82357B USB GPIB dongle and remain sane” on LinuxQuestions.org), but still no joy.
Create a new file with the rule to give usb permission to the group “plugdev”.
/etc/udev/rules.d/00-usb-permissions.rules
SUBSYSTEM==”usb”, MODE=”0660″, GROUP=”plugdev”
Download latest keysight I/O libraries and check 82357B connection status there. Go to Settings>488 programs>check ‘Enable Keysight GPIB cards for 488 programs ‘ .
hope it will help you.
Is there an article on how to implement your instruments as classes in Python?
Not sure if this helpful to anyone but I had to modify the code to get it working on a Rigol DS2102E
#Bring in the VISA library
import visa
#Create a resource manager
resources = visa.ResourceManager(‘@py’)
#Open the Rigol by name. (Change this to the string for your instrument)
oscope = resources.open_resource(‘USB0::6833::1200::DS2D193902434::0::INSTR’)
#Return the Rigol’s ID string to tell us it’s there
print(oscope.query(‘*IDN?’))
#Select channel 1
oscope.write(‘:MEAS:SOUR CHAN1’)
#Read the RMS voltage on that channel
fullreading = oscope.query(‘:MEAS:VRMS? CHAN1’)
#Extract the reading from the resulting string…
readinglines = fullreading.splitlines()
# …and convert it to a floating point value.
reading = float(readinglines[0])
#Send the reading to the terminal
print reading
#Close the connection
oscope.close()
hey, I tried both codes but the error is
ValueError : The device has no Langid
I found debuging, but I am beginner and I do not no how to do that.
Hi there,
I’m trying to work out how to have two instruments running at the same time (I’m working on a C# driver). The program doesn’t like it if I open a resource manager for a DMM and then another one for a matrix switcher. I’d appreciate any knowledge on how I can have two resource managers running at the same time.
If this isn’t possible then I assume I’d have to switch the resource manager between the two instruments every time I needed to use each one?
Thanks :)
Hello ,how can I use the ivi driver to control the Raspberry py with a python gui via Ethernet port ?
I am already control it with requests
We are trying to code a siglent spd3303c power supply using a raspberry pi 4. We have it working using a computer (windows) but when we run the code using the raspberry pi we get a “permission denied” error. Any help appreciated!
did you try sudo python
I can’t make it work without using sudo python. I tried the directions linked on udev/rules on adding permission but still doesn’t work. I need help… Thanks!
I can only detect the USB instrument after I plug-in its USB to a Windows PC, remove it back after few seconds, and plug it back in to the Raspberry-Pi USB. Below is my python run…
1: Type “help”, “copyright”, “credits” or “license” for more information.
2: >>> import pyvisa
3: >>> import SMU_U2722A_RPi
4: >>> rm = pyvisa.ResourceManager(‘@py’)
5: >>> rm
6: <ResourceManager()>
7: >>> usbinst=rm.list_resources()
8: >>> print(usbinst[1])
9: Traceback (most recent call last):
10: File “”, line 1, in
11: IndexError: tuple index out of range
12: >>> usbinst
13: (‘ASRL/dev/ttyAMA0::INSTR’,)
14: >>> rm = pyvisa.ResourceManager(‘@py’)
15: >>> usbinst=rm.list_resources()
16: >>> usbinst
17: (‘ASRL/dev/ttyAMA0::INSTR’,)
18: >>> usbinst=rm.list_resources()
19: >>> usbinst
20: (‘ASRL/dev/ttyAMA0::INSTR’, ‘USB0::2391::16664::MY58279001::0::INSTR’)
21: >>>
Line 7 command wasn’t able to detect the UCB instrument so when I printed usbinst[1], there was nothing inside it.
I unplugged the USB and plug it back it, redid the same commands just to be sure (from line 14) and I had the same result at line 17.
Finally I unplugged the USB from the Pi, plugged it to a windows PC, wait for few seconds, unplugged it from the PC and plug it in the Pi, and issued the command from line 18. We can see from line 20 that the USB got detected.
I think windows initiated the instrument to wait for communications. I can’t find the solution anywhere.
Thanks,
Ariel
My instrument has a USB Port, tried installing all the Visa stuff,running example code etc etc etc,
nothing,
Ive already written a python script to write anything I want to anything on usb, eg proprietry devices, arduinos, and several other electronics instruments with usb ports,
Why can’t an instrument with a usb port on it, just show up as another usb device.
Is it possible to use a python-based microcontroller to do this, or is a RPI a must? Asking because of work restrictions. I already have a setup for data collection via LabView but there are some instances where I don’t want to need a dedicated computer.