Chances are good that you’ve already lost some blood to thermoforming, the plastics manufacturing process that turns a flat sheet of material into an unopenable clamshell package, tray inside a box, plastic cup, or leftover food container. Besides being a source of unboxing danger, it’s actually a useful technique to have in your fabrication toolchest. In this issue of Tools of the Trade, we look at how thermoforming is used in products, and how you can hack it yourself.
The process is simple; take a sheet of plastic material, usually really thin stuff, but it can get as thick as 1/8″, heat it up so that it is soft and pliable, put it over a mold, convince it to take all the contours of the mold, let it cool, remove it from the mold, and then cut it out of the sheet. Needless to say, there will be details.
Plastic
Plastics used in thermoforming are thermoplastics: plastics that get soft above a certain temperature and then get hard when they cool. If you look at your food containers you’ll see the PE family. ABS and PLA, the favorites for 3D printing for precisely their thermoplastic properties, are also commonly used in thermoforming. If you want to make an enclosure that is as simple as a few flat sides, consider using a sheet of hair-cell ABS. (“Hair-cell” refers to the texture on one side, which hides imperfections in the plastic.) For thin plastics, the material will come on a roll, but for thicker material the stock will be in cut sheets.
Heat
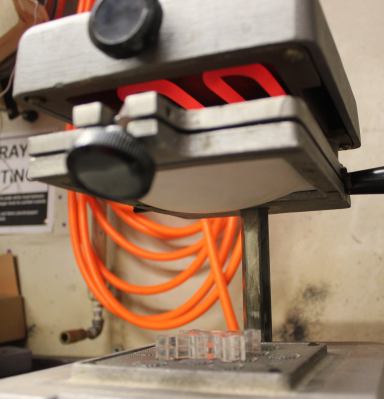
In most thermoforming machines, there’s a large oven that hovers over the sheet. The oven’s heating elements will be above the material, and this is important because as the material heats up, it sags under its own weight. If the elements were underneath, the plastic would get closer and closer as it warmed up, making it more likely that they would burn before the rest of the material got up to temperature.
Temperature is critical in thermoplastics, because there is a narrow range between which the plastic is either solid or burning. It’s easy to ruin the material, especially if it is clear or white and subject to discoloration due to overheating.
The heat can be done with a heat gun or blow dryer, though make sure not to dwell on any point for too long, and try to get everything evenly heated. When doing thermoforming manually, you usually look at how much it is sagging to know when it is ready for the mold.
Mold
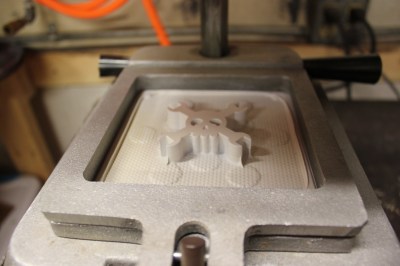
[wpvideo AaCfVGSn]Once the plastic is ready, it’s time for the mold. There are a few options here. One kind is called vacuum forming, and the idea is to have a lot of little holes in your mold, and when you put the sheet on top of the mold, you turn on a vacuum so that all the air is sucked out between the sheet and the mold, so the plastic conforms directly to the shape of the mold. Another option is to have two sides of a mold and press the two halves together with the sheet in between.
The real advantage to this method of assembly is that the mold is at low pressure and relatively low temperature, so the mold doesn’t need to be made out of expensive steel or use expensive equipment. I’ve used Lego bricks, wood, even insulation foam (though that was a one shot thing where the mold got smaller after the first run).
This advantage comes with a lot of limitations, though. Certain shapes are poor candidates for thermoforming, like sharp angles, undercuts, or deep parts. With sharp angles, the sheet won’t fold right. With undercuts the part won’t come out of the mold. On deep parts, the sheet is spread across a lot more area, and thins out significantly. Too thin, and it loses its strength.
On professional setups, the mold will usually have many cavities. A sheet that is 4 feet wide will have multiple cavities across the width and yield a lot of pieces at once. The bigger tools also have other features, like blowing the plastic up with air so it’s a giant bubble, stretching the material evenly and preparing it to go over a piece with a large depth.
Cut
The sheet then sits in the mold for a few seconds until it has cooled enough (sometimes aided by cool air or water), and it is ejected from the mold. This could be by forcing air through the same holes that were once a vacuum, or by mechanical ejector pins, or whatever. The sheet now contains a bunch of molded pieces, but is still all connected. Now it goes over to the die cutter, where custom dies are placed over the part and cut it out of the sheet. There’s often a finishing step involved as well to clean up the sharp edges of the part, like rolling the lip of the plastic cup. The leftover plastic is then re-ground and recycled.
Notes
Thermoforming is a sloppy process, so you can’t expect to start with a piece of plastic that’s laser cut with holes and then expect it to soften and fit over your mold perfectly with the holes in the right spot. Operations are usually done to the part after it has been molded. That’s not to say you can’t thermoform a printed piece of plastic and have the printed features line up as intended, just that usually there’s some tolerance allowed. We did recently show off a technique called computational thermoforming, but it’s not in widespread manufacturing yet.
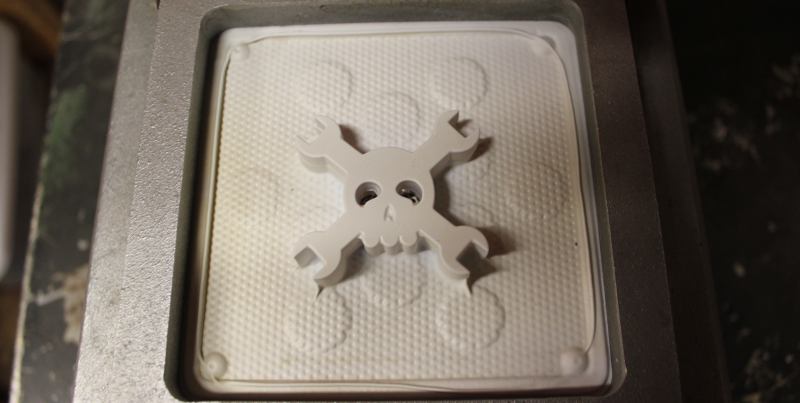
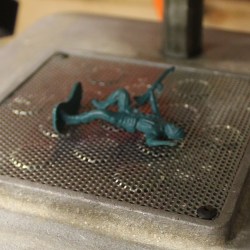
Some pieces do not lend themselves to thermoforming. Parts with undercut will be difficult to remove. Parts with insufficient draft will not slide out, either, and if the part is too deep it will stretch the plastic really thin. Sharp angles can create folds in the plastic. You’ll notice the eyes on the hackaday logo were stretched too thin and popped, and at the edges of the wrenches there are folds. Also, because there was no draft, removing the acrylic that was used as the mold nearly destroyed the thermoformed plastic. For an example of a really bad candidate for thermoforming, we went through the exercise with an army man we’ll name Han, for no reason at all.


Most of the thermoforming process is possible with tools at home. A frame into which you clamp the plastic, a heat gun to heat up the material, a mold made of whatever material you want, placed onto a bed with lots of small holes, and a shop vac hooked up to that bed. You could make your own, quite possibly with materials you already have. Another advantage of thermoforming is that there aren’t harsh chemicals involved, and the worst-case scenario is that you burn yourself briefly. Since it is at low temperature and low pressure, thermoforming is a LOT more accessible than injection molding.
The following video does a decent (though commercial) job of showing off thermoforming in a factory setting:
Uses
Now that you’ve got your thermoformed plastic piece, what do you do with it? It’s often used for art or non-structural pieces. You can use it as a mold to cast resin parts or soap. You could just leave it over the part and have a nice finish. Or you could use it in packaging. Once you build a thermoforming setup, you’ll find ways to use it. It’s a fun tool to have around.


An article on thermoforming with no mention of the classic Mattel Vac-u-form?
http://www.spookshows.com/toys/vacuform/vacuform-front-of-box.jpg
A friend had one and I was soooo envious of him.
Beat me to it!
I imagine those who do cosplay may be familiar with this material.
Hehe. I still have one of those huge (80x80cm I think) formech vader heads in storage :-)
The give them away at exhibitions.
Many portapotties are made this way, and welded together.
What are some sources to get inexpensive sheets of plastic?
I’ve bought numerous large sheets from a plastics supply. Best to go there in person as you will be amazed at all the demonstration pieces and types of plastics they usually have on display in their front office. At any rate, if flat sheet is all that is required then it is WAY cheaper than buying Evergreen, which is mostly useful for their specialist extrusions (and they have some really good ones for scale models).
We made a little video of the thermoforming class at our makerspace, Nova Labs, in the DC area: https://www.facebook.com/NovaLabsVA/videos/1119064188116084/
Han will be well preserved.
Thermoforming in perfection. With the right tools. Either with match-metal technology. Or steel rule (SR) technology. We offer you both options. So we will have the right solution for every application.
It’s awesome that this article talked about vacuum forming doesn’t need expensive steel or expensive equipment. My friend told me that their project involves sheet metal fabrication. I think it’s best to work with a company with the right equipment for the job.