FORTRAN For The Web

There’s an old saying: “I don’t know what programming language scientists and engineers will use in the 22nd century, but I know it will be called FORTRAN.” FORTRAN was among the first real programming languages and, along with LISP, one of the oldest still in common use. If you are one of those that still loves FORTRAN, you no longer have to be left out of the Web development craze thanks to Fortran.io.

Naturally, the Fortran.io site is served by — what else — FORTRAN. The system allows for Jade templates, SQLite databases, and other features aimed at serving up web pages. The code is hosted on GitHub, and you can find several examples there, as well.

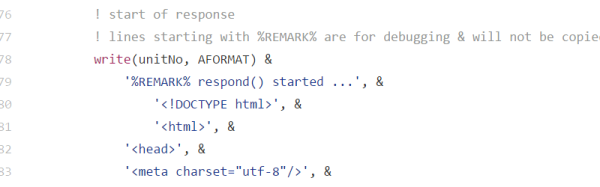
If you’ve ever wanted to do formatted I/O to a web page, here’s your chance. Come to think of it, why not? We’ve seen servers in BASIC and even in Linux shell script. Of course, today’s FORTRAN isn’t the one we learned back in the 1970’s (we assume if you didn’t learn about FORTRAN in the 1970’s, you quit reading this post a while back… prove us wrong and show us your FORTRAN projects).

Jenkins Lights The Christmas Tree

Jenkins is open-source automation software that tries to automate parts of the software development process. When you submit code, for example, Jenkins will grab it, build the project with it and run any tests on it. If you have a large number of people submitting new code or data, Jenkins will wait and grab a bunch of the submissions to build. Depending on the size of the project, this can take a while, and if there’s a problem, you need to know quickly so that people aren’t waiting on a broken build. Email’s fine for this, but [dkt01] saw one of the desktop LED Christmas tree projects on Hackaday, and integrated it into his Jenkins system.

Like the other projects, WS2812b LED rings are used as the tree, and an Arduino Pro Mini runs the show, with an Ethernet LAN Module to communicate with the Python script that monitors the Jenkins build job. The Python script sends commands to the Arduino, which in turn lights up the LEDs. They light up green on a successful build and red if something fails, but during the build process, the LEDs show the current state of the build, tracking Jenkins’ progress as it builds.

Our previous Jenkins post used a big, red LED light that would light up if the build failed. [dkt01]’s build lets you know if the build is successful or has failed, but the build progress is a great addition.

Continue reading “Jenkins Lights The Christmas Tree”

Extracting Sounds With Acid And UV

Toaplan was a Japanese video game developer in the 80s and early 90s, most famous for Zero Wing, the source of the ancient ‘All Your Base’ meme. Memeology has come a long way since the Something Awful forums and a pre-Google Internet, but MAME hasn’t. Despite the completionist nature of MAME aficionados, there are still four Toaplan games with no sound in the current version of MAME.

The sound files for these games is something of a holy grail for connoisseurs of old arcade games, and efforts to extract these sounds have been fruitless for three decades. Now, finally, these sounds have been released with the help of sulfuric acid and microscopes.

The sounds for Fire SharkVimanaTeki Paki, and Ghox were stored on their respective arcade boards inside the ROM for a microcontroller, separate from the actual game ROM. Since the fuse bits of this microcontroller were set, the only way to extract the data was decapsulation. This messy and precise work was done by CAPS0ff, who melted away the epoxy coating of the chip, revealing the microcontroller core.

Even without a microscope, the quarry of this hunt was plainly visible, but there was still no way to read out the data. The built-in read prevention bit was set, and the only way to clear that was to un-set a fuse. This was done by masking everything on the chip except the suspected fuse, putting it under UV, and checking if the fuse switched itself to an unburnt state.

The data extraction worked, and now the MAME project has the sound data for games that would have otherwise been forgotten to time. A great success, even if the games are generic top-down shooters.

Semi-automatic Mouse Requires No Permit

When [Kerry]’s son asked him if there was a way to make a mouse click rapidly, he knew he could take the easy way and just do it in software. But what’s the fun in that? In a sense, it’s just as easy to do it with hardware—all you have to do is find a way to change the voltage in order to simulate mouse clicks.

[Kerry] decided to use the venerable 555 timer as an astable oscillator. He wired a momentary button in parallel with the left mouse button. A 50k mini pot used as the discharge resistor allows him to dial in the sensitivity. [Kerry] found that he maxed out around 5 clicks per second when clicking the regular button, and ~20 clicks per second with the momentary button as measured here. The mouse still works normally, and now [Kerry]’s son can totally pwn n00bs without getting a repetitive stress injury. M1 your way past the break to check out [Kerry]’s build video.

There are lots of other cool things you can do with an optical mouse, like visual odometry for cars and robots.

Continue reading “Semi-automatic Mouse Requires No Permit”

Ken Shirriff Takes Us Inside The IC, For Fun

[Ken Shirriff] has seen the insides of more integrated circuits than most people have seen bellybuttons. (This is an exaggeration.) But the point is, where we see a crazy jumble of circuitry, [Ken] sees a riddle to be solved, and he’s got a method that guides him through the madness.

In his talk at the 2016 Hackaday SuperConference, [Ken] stepped the audience through a number of famous chips, showing how he approaches them and how you could do the same if you wanted to, or needed to. Reading an IC from a photo is not for the faint of heart, but with a little perseverance, it can give you the keys to the kingdom. We’re stoked that [Ken] shared his methods with us, and gave us some deeper insight into a handful of classic silicon, from the Z80 processor to the 555 timer and LM7805 voltage regulator, and beyond.

Continue reading “Ken Shirriff Takes Us Inside The IC, For Fun”

Liar’s 3D Printing: Multiple Colors With One Extruder

Good 3D printers now have multiple hot ends. You ought to be able to print in different colors or print support material. However, a lot of us don’t have multiple hot ends. Turns out, you don’t have to have multiple hot ends to print in multiple colors. To accomplish that you need a lot of patience and the willingness to tell bald-faced lies. Don’t worry, though, you’ll only be lying to some computer hardware and software, so that doesn’t count.

You may have seen people talk about putting a pause between layers to switch from one color to another. That works, but it limits your options. For example, if you want to put some colored text on a different colored background, you have to either have the text poke out, or it has to be “under” the background. It can’t be flush if you only have a single extruder and hot end. My method is a lot more trouble, but it can generate good results.

Keep in mind, with hobby-grade printers, multiple color printing has a lot of problems even if you do have multiple extruders. This isn’t a panacea. But you can get results on par with a similar printer that has multiple heads.

Bottom Line Up Front

Here are a few pictures of test prints that use this technique. A Monoprice Mini printer with the stock extruder and hot end created them using different PLA filament. On the left is a test cube, with a color spot in the middle of the layers (as well as some spots on the top surface you can’t see). To the right is a plate with my call sign in a contrasting color. It is hard to tell in the picture, of course, but there is one surface. The text is at the same height as the yellow surface.

I didn’t spend a lot of time making these prints since I was more focused on perfecting the methodology. The layer heights aren’t very fine, the infill is sparse, and the print speed was fast. However, you could invest time into making better-looking prints. You can also use the usual techniques that you use with a “real” multi-extrusion printer (such as priming towers, ooze shields, etc.).

Continue reading “Liar’s 3D Printing: Multiple Colors With One Extruder”

33C3: Chris Gerlinsky Cracks Pay TV

People who have incredible competence in a wide range of fields are rare, and it can appear deceptively simple when they present their work. [Chris Gerlinksy]’s talk on breaking the encryption used on satellite and cable pay TV set-top boxes was like that. (Download the slides, as PDF.) The end result of his work is that he gets to watch anything on pay TV, but getting to watch free wrestling matches is hardly the point of an epic hack like this.

The talk spans hardware reverse engineering of the set-top box itself, chip decapping, visual ROM recovery, software reverse analysis, chip glitching, creation of custom glitching hardware, several levels of crypto, and a lot of very educated guessing. Along the way, you’ll learn everything there is to know about how broadcast streams are encrypted and delivered. Watch this talk now.

Some of the coolest bits:

  • Reading out the masked ROM from looking at it with a microscope never fails to amaze us.
  • A custom chip-glitcher rig was built, and is shown in a few iterations, finally ending up in a “fancy” project box. But it’s the kind of thing you could build at home: a microcontroller controlling a switch on a breadboard.
  • The encoder chip stores its memory in RAM: [Chris] uses a beautiful home-brew method of desoldering the power pins, connecting them up to a battery, and desoldering the chip from the board for further analysis.
  • The chip runs entirely in RAM, forcing [Chris] to re-glitch the chip and insert his payload code every time it resets. And it resets a lot, because the designers added reset vectors between the bytes of the desired keys. Very sneaky.
  • All of this was done by sacrificing only one truckload of set-top boxes.

Our jaw dropped repeatedly during this presentation. Go watch it now.