RooBee One, An Open-source SLA/DLP 3D Printer

[Aldric Negrier] is no stranger to the 3D printing world. Having built a few already, he designed and built an SLA/DLP 3D printer, named RooBee One, sharing the plans on Instructables. He also published tons of other stuff, like a 3D Printed Syringe Pump Rack and a 3D Scanning Rig And DIY Turntable. It’s really worth while going through his whole Instructables repository.

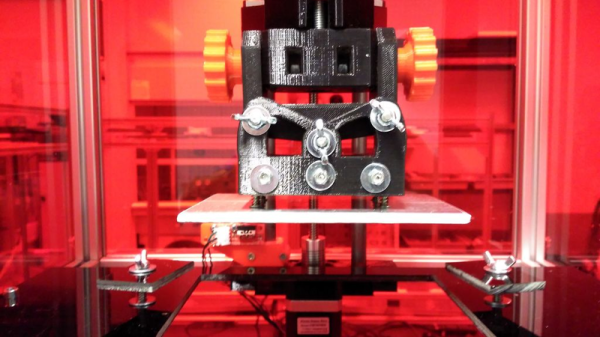
This open-source 3D printer was inspired by the Cristelia – SLA/LCD 3d printer and the Vulcanus MAX 3D printer (that he designed). RooBee One has an aluminium frame and an adjustable print area of 80x60x200 mm, with up to 150x105x200mm build volume using an ACER DLP projector. In addition, a fan on top of the printer was added to extract the toxic vapours outside and away from the printer operator. The electronics are based on the Arduino MEGA with the RAMPS 1.4 shield and one NEMA 17 stepper motor. As for the Arduino Mega firmware, [Aldric] choose to use Repetier, which he usually uses in his other printers.

The SLA resin he used is the Standard Blend Resin from Fun to Do Resins. These resins tend to release toxic airborne particles, so extra care should be taken to ventilate the area while printing and also do a proper cleaning afterwards.

You can get a glimpse of the printer making a small gear come to life in the following video:

Continue reading “RooBee One, An Open-source SLA/DLP 3D Printer”

Mechano-Robotic Flute Made From An Old Shotgun

If you take an object and turn it into something else, does that constitute a hack?  Can a musical robot call to question the ethics of firearms exports? If you take a disabled shotgun and turn it into a flute, does it become an art piece? Deep questions indeed — and deliberately posed by [Constantine Zlatev] along with his collaborators [Kostadin Ilov] and [Velina Ruseva].

The Last Gun — a mechano-robotic flute, as [Zlatev] calls it — is built from recovered industrial parts, played using compressed air, and controlled by an Arduino and Raspberry Pi. After graphing the annual arms exports from the United States, the installation plays a mournful tune for each year that they rise, and a jubilant theme for each year they fall.

Continue reading “Mechano-Robotic Flute Made From An Old Shotgun”

Hackaday Links: The 2017 One

You screwed everything up last night. The end of 2016 had a leap second, so instead of the seconds going up from 57, 58, 59… 00, there was a 61st second in the last minute of the year. Yeah, 2016 just wouldn’t quit. [Michel] built a device to keep track of 2016’s leap second using GPS, and everything worked beautifully.

Remember MechWarrior? There’s a reason those mid-90s games used mechs instead of more organic characters. Computers couldn’t draw that many polygons, making MechWarrior a stylistic choice driven by the limitations of technology. Here’s a real MechWarrior that could rip your head off without trying.

The Hackaday Retro Edition is a Web 1.0 version of our main blog, and a challenge to retrocomputing enthusiasts. [PK] recently got his Psion Series 3a surfing the interwebs with a little help from PPP and a Raspberry Pi. He also got a Psion Series 7 online using the same method, but that was a little more anti-climatic.

The NES Classic Edition costs too much, the cords are too short, and you can’t play anything but the pre-installed games. There’s a solution to this: [Andrew] has been working on the Beagle Entertainment System for a while now, and it’s ready for a proper release. The BES uses the SNES9X, VBA-M, and Nestopia emulators, with the original ROMs, and has a ‘shield’ for SNES gamepads. You can’t do better than this, and it’s cheaper than the NES Classic Edition.

Vacuum pens, or vacuum pickup tools, or whatever you want to call them, are really useful when working with SMD parts. You can build your own out of an aquarium pump, duct tape, a lighter, paperclip, and a mechanical pencil, but that lacks the elegance of a footswitch-operated, solenoid valve pickup tool. [Dave] built a great version of a vacuum pickup tool from scratch for less than $200. There’s NTP fittings on here, so you know it has to be great.

fundungeonTerrible news! I’m in Vegas next week for CES. While I’ll be spending most of my time figuring out ‘which internet of things is best internet of things’, I might have some time for a Hackaday CES meetup.

The best idea I have for a Hackaday CES meetup is the Fun Dungeon in the Trashy Castle. It has Skee Ball and Crazy Taxi. If you have a better idea of where Hackaday fans and aficionados can meet up for an hour or two, leave a note in the comments below.

Circuit Bent CD Player Is Glitch Heaven

Circuit bending is the art of creatively short circuiting low voltage hardware to create interesting and unexpected results. It’s generally applied to things like Furbys, old Casio keyboards, or early consoles to create audio and video glitches for artistic effect. It’s often practiced with a random approach, but by bringing in a little knowledge, you can get astounding results. [r20029] decided to apply her knowledge of CD players and RAM to create this glitched out Sony Discman.

Continue reading “Circuit Bent CD Player Is Glitch Heaven”

Wifi-Controlled Christmas Ornaments!

Trimming one’s Christmas tree can be an enjoyable tradition year after year, but every once in a while some variation on  the established order can be just as fun. Seeking some new ornaments to and desiring to flex his skills, Instrucables user [Gosse Adema] created a LED-illuminated, phone-controlled, deltrahedron Christmas tree ornaments.

Wemos DI Mini Pros are the brains of these little guys, WS2182b RGB LED strips — being the superb go-to’s that they are — light the ornament, and a 5 V power supply keep them lit. [Adema] used the Wemos specifically to create a web server unique to each ornament, and goes into incredible detail on how to program each one — now there’s an arrangement of words you wouldn’t expect to see — providing all the code he used, as well as the models to 3D print the deltahedron.

Continue reading “Wifi-Controlled Christmas Ornaments!”

Adding An IKEA Wireless Charger To A Project

IKEA sometimes seems like a DIY store disguised as a furniture store. We may go there looking for a new sofa or kitchen table, but, to the DIY enthusiast, it’s a shop full of possibilities. While wandering through the local IKEA, [Erich Styger] noticed they had some Qi wireless chargers and receivers for a very reasonable price, so he bought a few and added wireless charging to his Mikroelektronika Hexiwear.

toothpicking-the-coil
Removing the wireless charger

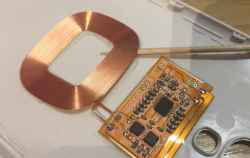
[Erich Styger] didn’t like the clumsiness of the Hexiwear’s USB charging options and, at the price he got the IKEA Vitahult Qi phone case wireless receivers at, he couldn’t resist buying a few for his projects. After carefully separating the circuitry from the phone cases they came in he opening up the Hexiwear. He removed the battery connector and soldered the charger to battery charging circuit. [Erich Styger] then 3D printed a new back to the Hexiwear’s case to fit the new circuitry. A quick test with the IKEA charging pad proved the hack had worked.

IKEA has become something of a DIY enthusiasts go-to shop, with everything from weather stations to a camera slider at a decent price. Walking through the maze inside the store, the DIYer doesn’t see lamps and boxes and shelves, they see light projectors and enclosures and, well, everyone needs shelves.

SST Is A Very Tidy ESP8266 Smart Thermostat

The smart thermostat has become in a way the public face of the Internet of Things. It’s a demonstration that technological uptake by the general public is driven not by how clever the technology is, but by how much use they can see in it. A fridge that offers your recipes or orders more eggs may be a very neat idea, but at street level a device allowing you to turn your heating on at home before you leave work is much cooler. Products like Nest or Hive have started to become part of normal suburban life.

There is no reason though for an IoT thermostat to be a commercial product like the two mentioned. Our subject today demonstrates this; SST is a Wi-Fi smart thermostat using an ESP8266 that can be controlled by an app, thanks to its use of the open-source Souliss IoT Framework.

The build is very well finished, with PCBs, colour display and other components in a neat 3D-printed box. It’s a project that you could put in front of an end-user, it’s finished to such a high standard. Physical entity files are available from the hackaday.io page linked above, while its firmware is available in a GitHub repository. THere is a video showing some of the device’s capabilities, which we’ve put below the break.

Continue reading “SST Is A Very Tidy ESP8266 Smart Thermostat”