A Ten Turn Pot, For Not A Lot

If you have a traditional regulated power supply that you want to make adjustable, you’ll have somewhere in the circuit a feedback line driven by a potential divider across the output. That divider will probably incorporate a variable resistor, which you’ll adjust to select your desired voltage.

The problem with using a standard pot to adjust something like a power supply is that a large voltage range is spread across a relatively small angle. The tiniest movement of the shaft results in too large a voltage change for real fine-tuning, so clearly a better means of adjustment is called for. And in many cases that need is satisfied with a ten-turn potentiometer, simply a pot with a 10 to 1 reduction drive built-in.

[Dardo] had just this problem, and since 10-turn pots are expensive to buy and expensive to ship to his part of the world he built his own instead of buying one.

Continue reading “A Ten Turn Pot, For Not A Lot”

Laser-Cut Gingerbread Trailer Home

Ah, the holiday gingerbread house. A traditional — if tedious — treat; tasking to create, delicious to dismantle, so why not try applying some maker skills to making the job of building it easier? [William Osman] decided to try two unorthodox approaches to the gingerbread construct; first, he opted to build a gingerbread mobile home. Secondly, he cut the pieces out with a laser cutter.

After the tumultuous task of baking the gingerbread sheets, [Osman] modeled the trailer in SolidWorks and set to work cutting it out on his home-built, 80W laser cutter. Twice. Be sure to double check the home position on any laser cutting you do, lest you ruin your materials. Also — though this might be especially difficult when modelling food in any CAD programs — be sure to account for the thickness of your materials, otherwise you’ll end up with a lot of trimming on your hands. At least gingerbread cuts easily.

Hot glue and royal frosting secured the pieces together — as well as some improvisation of the final details — making for a picture perfect holiday scene — from a certain point of view.

Continue reading “Laser-Cut Gingerbread Trailer Home”

Getting The Amiga 500 Online

If you were lucky enough to have a Commodore Amiga or one of its competitor 16-bit home computers around the end of the 1980s, it’s probable that you were doing all the computing tasks that most other people discovered a few years later when they bought their first 486 or Pentium. So in the mid 1990s when all your friends were exclaiming at Paint Shop Pro or their Soundblaster cards you’d have had an air of smugness. Multitasking? Old hat! Digital audio? Been there! Graphics manipulation? Done that!

There was one task from that era you almost certainly wouldn’t have done on your Amiga though, and that was connect it to the Internet. The Internet was certainly a thing back in the late 1980s, but for mere mortals it was one of those unattainable marvels, like a supercomputer with a padded seat round it, or a Jaguar XJ220 supercar.

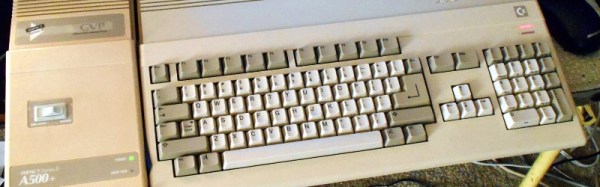
Later Amigas received Internet abilities, and Amiga enthusiasts will no doubt be on hand to extol their virtues. But the machine most people will think of as the archetype, the Amiga 500, lacks the power to run most of the software required to do it. If your 500 with its tasteful blue and orange desktop colour scheme is languishing though, never fear. [Shot97] has produced a guide to getting it online.

It’s important to understand that an Amiga 500 is never going to run a copy of Chrome or play a YouTube video. And he makes the point that any web browsers that might have surfaced for hardware of this class delivered a painful browsing experience. So instead he concentrates on getting the 500 online for something closer to the online scene of the day, connecting to BBSs. To that end he takes us through setting up a PC with  Hayes modem emulator, and connecting it to the Amiga via a null modem cable. On the Amiga is a copy of the A-Talk terminal emulator, and as far as the Amiga is concerned it is on a dial-up Internet connection.

The PC in this case looks pretty ancient, and we can’t help wondering whether a Raspberry Pi or even an ESP8266 module could be put in its place given the appropriate software. But he has undeniably got his A500 online, and shown a way that you can too if you still have one lurking in the cupboard. He has also produced a video which we’ve put below the break, but be warned, as it’s nearly an hour long.

Continue reading “Getting The Amiga 500 Online”

Old fashioned polygraph

Retro-Style DIY Polygraph: Believe It Or Not

A polygraph is commonly known as a lie detector but it’s really just a machine with a number of sensors that measure things like heart rate, breathing rate, galvanic skin response and blood pressure while you’re being asked questions. Sessions can be three hours long and the results are examined by a trained polygraph examiner who decides if a measured reaction is due to deception or something else entirely. Modern polygraphs feed data into a computer which analyses the data in real-time.

Cornell University students [Joyce Cao] and [Daria Efimov] decided to try their hand at a more old fashioned polygraph that measures heart and breathing rates and charts the resulting traces on a moving strip of paper as well as a color TFT display. They had planned on measuring perspiration too but didn’t have time. To measure heart rate, electrodes were attached to the test subject’s wrists. To measure breathing they connected a stretch sensor in the form of a conductive rubber cord around three inches long to a shoelace and wrapped this around the test subject’s abdomen.

While the output doesn’t go into a computer for mathematical analysis, it does go to a PIC32 for processing and for controlling the servos for drawing the traces on the paper as well as displaying on the TFT. The circuit between the breathing sensor and the PIC32 is fairly simple, but the output of the heart rate electrodes needed amplification. For that they came up with a circuit based off another project that had a differential amplifier and two op-amps for filtering.

Since parts of the circuit are attached to the body they made some effort to prevent any chance of electrocution. They used 12 volts, did not connect the test subject to power supply chassis ground, and tested the heart rate electrodes with a function generator first. They also included DC isolation circuitry in the form of some resistors and capacitors between the heart rate electrodes and the amplifier circuit. You can see these circuits, as well as a demonstration in the video below. The heart rate output looks a little erratic, no surprise given that the body produces a lot of noise, but the breathing trace looks very clear.

Continue reading “Retro-Style DIY Polygraph: Believe It Or Not”

Derek Schulte: Path Planning For 3D Printers

[Derek Schulte] designed and sells a consumer 3D printer, and that gives him a lot of insight into what makes them tick. His printer, the New Matter MOD-t, is different from the 3D printer that you’re using now in a few different ways. Most interestingly, it uses closed-loop feedback and DC motors instead of steppers, and it uses a fairly beefy 32-bit ARM processor instead of the glorified Arduino Uno that’s running many printers out there.

The first of these choices meant that [Derek] had to write his own motor control and path planning software, and the second means that he has the processing to back it up. In his talk, he goes into real detail about how they ended up with the path planning system they did, and exactly how it works. If you’ve ever thought hard about how a physical printhead, with momentum, makes the infinitely sharp corners that it’s being told to in the G-code, this talk is for you. (Spoiler: it doesn’t break the laws of physics, and navigating through the curve involves math.)

Continue reading “Derek Schulte: Path Planning For 3D Printers”

Ditch OpenSCAD For C++

There’s an old saying that a picture is worth a thousand words. If you’ve ever tried to build furniture or a toy with one of those instructions sheets that contains nothing but pictures, you might disagree. 3D design is much the same for a lot of people. You think you want to draw things graphically, but once you start doing complex things and making changes, parametric modeling is the way to go. Some CAD tools let you do both, but many 3D printer users wind up using OpenSCAD which is fully parametric.

If you’ve used OpenSCAD you know that it is like a simple programming language, but with some significant differences from what you normally use. It is a good bet that most Hackaday readers can program in at least one language. So why learn something new? A real programming language is likely to have features you won’t find readily in OpenSCAD that, in theory, ought to help with reuse and managing complex designs.

I considered OpenJSCAD. It is more or less OpenSCAD for JavaScript. However, JavaScript is a bit of a scripting language itself. Sure, it has objects and some other features, but I’m more comfortable with C++. I thought about using the OpenCSG library that OpenSCAD uses, but that exposes a lot of detail.

Instead, I turned to a project that uses C++ code to generate OpenSCAD output, OOML (the Object Oriented Mechanics Language)). OpenSCAD does the rendering, exporting, and other functions. Unfortunately, the project seems to have stalled a few years back and the primary web-based documentation for it seems to be absent. However, it is very usable and if you know how to find it, there is plenty of documentation available.

Why not OpenSCAD?

Continue reading “Ditch OpenSCAD For C++”

Modified Baby Monitor Interrupts Your Groove In Case Of Emergency

You try to be good, but the temptation to drown out the noise of parenthood with some great tunes is just too much to resist. The music washes over you, bringing you back to simpler times. But alas, once you plug in the kids started running amok, and now the house is on fire and there’s the cleaning up to do and all that paperwork. Maybe you should have tried modifying a baby monitor to interrupt your music in case of emergency?

Starting with an off-the-shelf baby monitor, [Ben Heck] takes us through the design goals and does a quick teardown of the circuit. A simple audio switching circuit is breadboarded using an ADG436 dual SPDT chip to allow either the baby monitor audio or music fed from your favorite source through to the output. [Ben] wisely chose the path of least resistance to detecting baby noise by using the volume indicating LEDs on the monitor. A 555 one-shot trips for a few seconds when there’s enough noise, which switches the music off and lets you listen in on [Junior]. The nice touch is that all the added components fit nicely in the roomy case and are powered off the monitor’s supply.

Maybe you’d prefer listening to the nippers less than watching them? In that case, this impromptu eye-in-the-sky baby camera might be a better choice.

Continue reading “Modified Baby Monitor Interrupts Your Groove In Case Of Emergency”