Wearable Predicts Tone Of Conversation From Speech, Vital Signs

If you’ve ever wondered how people are really feeling during a conversation, you’re not alone. By and large, we rely on a huge number of cues — body language, speech, eye contact, and a million others — to determine the feelings of others. It’s an inexact science to say the least. Now, researchers at MIT have developed a wearable system to analyze the tone of a conversation.

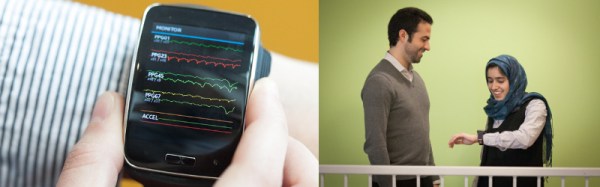
The system uses Samsung Simband wearables, which are capable of measuring several physiological markers — heart rate, blood pressure, blood flow, and skin temperature — as well as movement thanks to an on-board accelerometer. This data is fed into a neural network which was trained to classify a conversation as “happy” or “sad”. Training consisted of capturing 31 conversations of several minutes duration each, where participants were asked to tell a happy or sad story of their own choosing. This was done in an effort to record more organic emotional states than simply eliciting emotion through the use of more typical “happy” or “sad” video materials often used in similar studies.

The technology is in a very early stage of development, however the team hopes that down the road, the system will be sufficiently advanced to act as an emotional coach in real-life social situations. There is a certain strangeness about the idea of asking a computer to tell you how a person is feeling, but if humans are nothing more than a bag of wet chemicals, there might be merit in the idea yet. It’s a pretty big if.

Machine learning is becoming more powerful on a daily basis, particularly as we have ever greater amounts of computing power to throw behind it. Check out our primer on machine learning to get up to speed.

Continue reading “Wearable Predicts Tone Of Conversation From Speech, Vital Signs”

Gliding To Underwater Filming Success

If you are a fan of nature documentaries you will no doubt have been wowed by their spectacular underwater sequences. So when you buy a GoPro or similar camera and put it in a waterproof case accessory, of course you take it with you when you go swimming. Amazing footage and international documentary stardom awaits!

Of course, your results are disappointing. The professionals have years of experience and acquired skill plus the best equipment money can buy, and you just have your hand, and a GoPro. The picture is all over the place, and if there is a subject it’s extremely difficult to follow.

[Steve Schmitt] has an answer to this problem, and it’s a refreshingly simple one. He’s built an underwater glider to which he attaches his camera and launches across the submerged vista he wishes to film. Attached to a long piece of line for retrieval, it is set to glide gently downwards at a rate set by the position of the camera on its boom.

Construction is extremely simple. The wing is a delta-shaped piece of corrugated plastic roofing sheet, while the fuselage is a piece of plastic pipe. A T-connector has the camera mount on it, and this can slide along the fuselage for pre-launch adjustments. It’s that simple, but of course sometimes the best builds are the simple ones. He’s put up a video which you can see below the break, showing remarkable footage of a test flight through a cold-water spring.

Continue reading “Gliding To Underwater Filming Success”

Hackaday Links Column Banner

Hackaday Links: February 5, 2017

A lot of people around here got their start in electronics with guitar pedals. This means soldering crappy old transistors to crappy old diodes and fawning over your tonez, d00d.  Prototyping guitar pedals isn’t easy, though, and now there’s a CrowdSupply project to make it easier The FX Development Board is just that — a few 1/4″ jacks, knobs, pots, power supply, and a gigantic footswitch to make prototyping guitar pedals and other musical paraphernalia easy. Think of it as a much more feature-packed Beavis Board that’s still significantly cheaper.

How do Communicators in Star Trek work? Nobody knows. Why don’t the crew always have to tap their badge before using it? Nobody knows. How can the com badge hear, ‘Geordi to Worf’, and have Worf instantly respond? Oh, we’ve argued about this on IRC for years now. Over on Hackaday.io, [Joe] is building a Star Trek com badge. The electronics are certainly possible with modern microcontrollers, but for the enclosure, we’ll have to review a few scenes from Time’s Arrow and The Enemy.

[Alois] was working with an Intel Edison on a breadboard. He was generating a signal, and sending it through a little tiny breadboard wire to an oscilloscope. The expected waveform should have been a nice square wave at 440MHz. What he got out of this wire was a mess. You shouldn’t use long wires when probing circuits. That little breadboard wire was a perfect radiator for 440MHz, and the entire setup turned into an antenna.

[Douglas] is running a Kenwood TM-D710A as his amateur radio rig. This radio does APRS stuff, but it requires an external GPS and power source to do it right. GPS receivers are now very small and very cheap, so [Douglas] just stuffed a GPS module inside his radio. The module itself is a GP-20U7, a tiny GPS module the size of a postage stamp, and wired it up to a few pads on the radio PCB.

Here’s an upcoming Kickstarter that’s going straight to the front page of Boing Boing. It’s Pong, in coffee table format which we first saw last Spring. Instead of racing the beam, this version of Pong is mechanical. The ball is a cube, the paddles are slightly longer cubes, and the entire game is a highly refined CNC machine. Here’s something from seven years ago that’s also Pong in coffee table format. Pongmechanik is electromechanical Pong, built entirely out of switches, relays, and a few motors.

Sync Your Pocket Synth With Ableton

The Teenage Engineering Pocket Operators are highly popular devices — pocket-sized synthesizers packed full of exciting sounds and rhythmic options. They’re also remarkably affordable. However, this comes at a cost — they don’t feature MIDI connectivity, so it can be difficult to integrate them into a bigger digital music setup. Never fear, little-scale’s got your back. This Max patch allows you to synchronize an Ableton Link network to your Pocket Operators.

little-scale’s trademark is creating useful software and hardware devices using cheap, off-the-shelf hardware wherever possible. The trick here is a simple Max patch combined with a $2 USB soundcard or Bluetooth audio adapter. It’s all very simple: the Pocket Operators have a variety of sync modes that sync on audio pulses, essentially a click track. They use stereo 3.5mm jacks on board, generally using one channel for the synth’s audio and one channel for receiving sync pulses. It’s a simple job to synthesize suitable sync pulses in Ableton, and then pump them out to the Pocket Operators through the Bluetooth or USB audio output.

The Pocket Operators sync at a rate of 2 PPQN — that’s pulses per quarter note. little-scale says that KORG volcas & monotrons should also work with this patch, as they run at the same rate, but it’s currently untested. If you happen to try this for yourself, let us know if it works for you. Video below the break.

We’ve seen pocket synths on Hackaday before, with this attractive mixer designed for use with KORG Volcas.

Continue reading “Sync Your Pocket Synth With Ableton”

Olimex Announces Their Open Source Laptop

A few months ago at the Hackaday | Belgrade conference, [Tsvetan Usunov], the brains behind Olimex, gave a talk on a project he’s been working on. He’s creating an Open Source Hacker’s Laptop. The impetus for this project came to [Tsvetan] after looking at how many laptops he’s thrown away over the years. Battery capacity degrades, keyboards have a fight with coffee, and manufacturers seem to purposely make laptops hard to repair.

Now, this do it yourself, Open Source Hardware and hacker-friendly laptop is complete. The Olimex TERES I laptop has been built, plastic has been injected into molds, and all the mechanical and electronic CAD files are up on GitHub. This Open Source laptop is done, but you can’t buy it quite yet; for that, we’ll have to wait until Olimex comes back from FOSDEM.

The design of this laptop is completely Open Source. Usually when we hear this phrase, the Open Source part only means the electronics and firmware. Yes, there are exceptions, but the STL files for the PiTop, the ‘3D printable Raspberry Pi laptop’ are not available, rendering the ‘3D printable’ part of PiTop’s marketing splurge incongruent with reality. If you want to build a case for the Open Source laptop to date, [Bunnie]’s Novena, random GitHub repos are the best source. The Olimex TERES I is completely different; not only can you simply buy all the parts for the laptop, the hardware files are going up too. To be fair, this laptop is built with injection molded parts and will probably be extremely difficult to print on a standard desktop filament printer. The effort is there, though, and this laptop can truly be built from source.

As far as specs go, this should be a fairly capable laptop. The core PCB is built around an Allwinner ARM Cortex-A53, sporting 1GB of DDR3L RAM, 4GB of eMMC Flash, WiFi, Bluetooth, a camera, and an 11.6″ 1366×768 display. Compared to an off-the-shelf, bargain-basement consumer craptop, those aren’t great specs, but at least the price is consummate with performance: The TERES I will sell for only €225, or about $250 USD. That’s almost impulse buy territory, and we can’t wait to get our hands on one.

Building A Wavetable Synth

Every semester at one of [Bruce Land]’s electronics labs at Cornell, students team up, and pitch a few ideas on what they’d like to build for the final project. Invariably, the students will pick what they think is cool. The only thing we know about [Ian], [Joval] and [Balazs] is that one of them is a synth head. How do we know this? They built a programmable, sequenced, wavetable synthesizer for their final project in ECE4760.

First things first — what’s a wavetable synthesizer? It’s not adding, subtracting, and modulating sine, triangle, and square waves. That, we assume, is the domain of the analog senior lab. A wavetable synth isn’t a deep application of a weird reverse FFT — that’s FM synthesis. Wavetable synthesis is simply playing a single waveform — one arbitrary wave — at different speeds. It was popular in the 80s and 90s, so it makes for a great application of modern microcontrollers.

The difficult part of the build was, of course, getting waveforms out of a microcontroller, mixing them, and modulating them. This is a lab course, so a few of the techniques learned earlier in the semester when playing with DTMF tones came in very useful. The microcontroller used in the project is a PIC32, and does all the arithmetic in 32-bit fixed point. Even though the final audio output is at 12-bit resolution, the difference between doing the math at 16-bit and 32-bit was obvious.

A synthesizer isn’t useful unless it has a user interface of some kind, and for this the guys turned to a small TFT display, a few pots, and a couple of buttons. This is a complete GUI to set all the parameters, waveforms, tempo, and notes played by the sequencer. From the video of the project (below), this thing sounds pretty good for a machine that generates bleeps and bloops.

Continue reading “Building A Wavetable Synth”

DIY Wire Spooler With Clever Auto-Tensioning System

[Solarbotics] have shared a video of their DIY wire spooler that uses OpenBeam hardware plus some 3D printed parts to flawlessly spool wire regardless of spool size mismatches. Getting wire from one spool to another can be trickier than it sounds, especially when one spool is physically larger than the other. This is because consistently moving wire between different sizes of spools requires that they turn at different rates. On top of that, the ideal rate changes as one spool is emptying and the other gets larger. The wire must be kept taut when moving from one spool to the next; any slack is asking for winding problems. At the same time, the wire shouldn’t be so taut as to put unnecessary stress on it or the motor on the other end.

There aren’t any build details but the video embedded below gives a good overview and understanding of the whole system. In the center is a tension bar with pulleys on both ends though which the wire feeds. This bar pivots at the center and takes up slack while its position is encoded by turning a pot via a 3D printed gear. Both spools are motor driven and the speed of the source spool is controlled by the position of the tension bar. As a result, the bar automatically takes up any slack while dynamically slowing or speeding the feed rate to match whatever is needed.

Continue reading “DIY Wire Spooler With Clever Auto-Tensioning System”