[Solarbotics] have shared a video of their DIY wire spooler that uses OpenBeam hardware plus some 3D printed parts to flawlessly spool wire regardless of spool size mismatches. Getting wire from one spool to another can be trickier than it sounds, especially when one spool is physically larger than the other. This is because consistently moving wire between different sizes of spools requires that they turn at different rates. On top of that, the ideal rate changes as one spool is emptying and the other gets larger. The wire must be kept taut when moving from one spool to the next; any slack is asking for winding problems. At the same time, the wire shouldn’t be so taut as to put unnecessary stress on it or the motor on the other end.
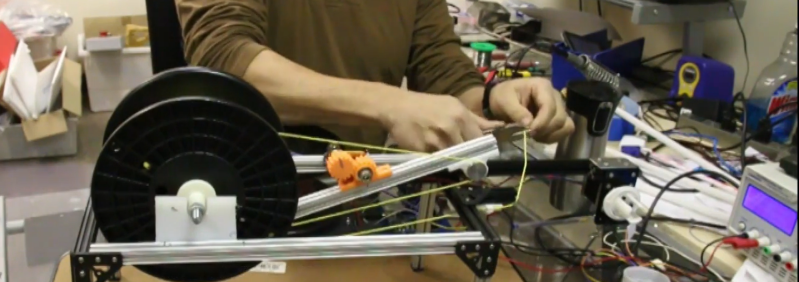
There aren’t any build details but the video embedded below gives a good overview and understanding of the whole system. In the center is a tension bar with pulleys on both ends though which the wire feeds. This bar pivots at the center and takes up slack while its position is encoded by turning a pot via a 3D printed gear. Both spools are motor driven and the speed of the source spool is controlled by the position of the tension bar. As a result, the bar automatically takes up any slack while dynamically slowing or speeding the feed rate to match whatever is needed.
There’s nothing like facing down a repetitive and lengthy task to get a good solution brewing. This reminds us of another DIY automation solution to a wire-related need: a contraption to cut 1,000 pieces of wire.


Hmmm, been on my Ma’s sewing machine design since 1887.
Somehow, I don’t think your ma’s sewing machine can handle bobbins or spools quite that size. Just because he re-used an existing concept and scaled it up for his application doesn’t make it less useful or noteworthy.
You make that sound like a bad thing. Most hacks, or invention of anything is iterative, or a rediscovery of what exists already. Sewing machine tech and wire/3d filament winding would be a leap of weird logic to some, others it’s a ‘duh of course’ thing. Heck, chipmakers ‘stole’ traditional lithography techniques used for photo reproduction in newspapers for better chip production…. and then you take could that idea and you could jump to resin curing in laser based 3d printing… just ‘slice’ printing with light instead of plastic and a heating element stolen from a toaster.
Or you could be flippant, but Aristotle was doing that to Plato in 347 BC.
I believe the tension arm provides feedback to the wind drive to prevent over or under-run. This prevents drawing-in to the bundle, which can kink or break the wire when it is unspooled, and birdsnesting, which can require cutting the tangle out and wasting the wire.
I would guess that your sewing machine has the same tension system mine does: friction on the spool to reduce overrun and friction disks on the thread for needle tension.
Similar concepts are probably already used in existing industrial spooling equipment and for sure they are – or were :-) – used in magnetic tape drives.
Very clever indeed. Would an electromagnet winder along these lines work?
A neat solution but I’m not sure I understand the problem.
Why does the wire need to be on the small spool instead of the large one?
Are they selling it, packing it up for travel, part of a small pick-and-place set up? Why is spool transfer such a common occurrence that the time developing a jig is justified?
For general ’round the shop use isn’t working from the main spool just as convenient?
If it’s a ‘because I can’ project cool, but the problem for this solution isn’t very well explained.
Suppose he wants to wind a lot of coils for his maglev home domestic robot project?
Perhaps, but why the spools then?
Don’t mag lev coils generally get potted on a dedicated spool? This looks like refilling a spool for a purpose. Most of the time a lathe or drill does just fine.
All their other builds are wearables or solar BEAMbots. I don’t see what this is used for, hence the motivation to build it.
40 strands of 0.08mm wire in super-flexible heat-resistant sleeve. Don’t knock it until you try it (btw, we’re giving samples away with each order).
It. puts PVC-coated wire to shame. Same reason I don’t use “KrazyGlue” over a quality cyanoacrylate. Both work, but one is so much nicer to work with.
it might be to fit inside the enclosure of a prebuilt printer.
i know i could rewind the spools inside the davinci cartridges if i really wanted to, since i have the pro there is no drm on the filament, but since i didnt want to bother i printed a spool holder that would fit on the outside allowing for pretty much any spool size to be used.
I’m sure it could be used for that but they designed it for wire. Specifically ‘Noodle wire’ which is some sort of high purity copper insulated by a very flexible coating. Seems to be popular in RC and wearables.
Hey all!
We fell in love with silicone wire a while ago, and wanted to get some in for our own projects. We couldn’t find anybody to sell in 100M lengths, so after a quite a search, discovered it would take a 50,000M investment (50 kilometers – 31 miles!) to get exactly what we wanted regarding strand count and color. When you buy 50km, they’ll (try to) do Pantone matching, and even will custom print on the side. Cool.
Sooo, what to do with the excess? Spool and sell it as individual and 7-color sets! We looked at getting it spooled for us, but as we didn’t exactly know how much we wanted to convert to spools, we decided on spooling it ourselves. Yes, we looked at buying a commercial unit, but it was overkill. Thread winders for sewing were too light-duty. So, the natural conclusion was to build-it-ourselves.
Pretty happy with most of the design choices. Investigated doing a PID loop for the tensioner, but a simple lookup table for PWM vs resistance worked out just fine. Feed that PWM through a nice beefy FET driving a hacked cordless screwdriver with a 3D-printed spindle mount, and we’re good to go.
We had a bunch of cable bearings/pulleys sets from a PCB feeder for a dead pick-and-place machine that suited the wire perfectly, and 3D printed mounts with semi-captive channels to keep the wire on the pulley when fully slack.
The only think I’d really like to change is feedback trimpot. That should be optical grey-coded to avoid wiper wear, but I imagine this audio-taper trimpot will see waaay less wear than say, a traditional hobby servo. Oh, and I have to put in a spring instead of using that (doomed-to-fail) rubber band return.
And again, that OpenBeam makes it so easy to build and tweak. Love the stuff.
A variable speed hand drill and an arbor on the takeup spool, a vertical screwdriver in held in a vise with the supply spool resting on a rag friction brake on the vise. Done. Simple.
When dropping the sounding line for determining the depth of the Atlantic prior to laying the first cable, the line had to be spooled back up. Then set sail and do it again. They had a spool with more than two miles on it. When reeled up the first time from a great depth the reel imploded due to the built up stress on it’s core. So they developed slack control. The stress of all that line was added to the drum as it turned and hauled away. So a capstan did the hauling and the drum took up line with a light tension free of the stress of hauling, just like a tape recorder does.
When winding fine enameled wire on bobbins for magnetics, it is important to have very light tension on the winding process. This is why most of those things go dead or short out, a miniature version of the ship hauling up sounding line.
How about a cheap and easy to build version of the level wind mechanism used by open baitcasting fishing reels? The ones with the reel perpendicular to the rod, with a line guide loop that runs back and forth to ensure it winds up without tangles.
I have some printer filament spools that had to have been allowed to run loose while being filled. The filament is crossed under itself a lot and I have to keep pulling it free. For long jobs I have to unspool a bunch then carefully wind it back up.
A setup that could take filament from a badly wound spool, with enough pull to yank it out of overlapped coils, and wind it properly onto another spool, would be a very nice thing. Especially if it doesn’t need any electronics. In this case the feed spool can be free running, there just needs to be some tension on the take-up spool to ensure the filament can’t wind overlap coils the wrong way.
Because that mechanism twists wire. For fishing line this is not problematic but copper is less flexible.
good one.
what if i want to maintain a set/desired tension during winding…
any ideas…
how about a spring loaded arm, like on a bicycle chain?
Use an air cylinder to preload the dancer arm/beam.