Keep The Peace In The Bedroom With A Snore Stopping Sleep Mask

Despite what my wife says, I have absolutely no evidence that I snore. After all, I’ve never actually heard me snoring. But I’ll take her word for it that I do, and that it bothers her, so perhaps I should be a sport and build this snore-detecting vibrating sleep mask so she can get a few winks more.

Part wearable tech and part life hack, [mopluschen]’s project requires a little of the threadworker’s skill. The textile part of the project is actually pretty simple, and although [mopluschen] went with a custom mask made from fabric and foam shoulder pads, it should be possible to round up a ready-made mask that could be easily modified. The electronics are equally simple – an Arduino with a sound sensor module and a couple of Lilypad Vibe boards. The mic rides just above the snore resonating chamber and the vibrators are right over the eyes. When your snore volume exceeds a preset threshold, the motors wake you up.

Whether this fixes the underlying problem or just evens the score with your sleep partner is debatable, but either way there’s some potential here. And not just for snore-correction – a similar system could detect a smoke alarm and help rouse the hearing impaired. But if the sewing part of this project puts you off, you should probably check out [Jenny List]’s persuasive argument that sewing is not just for cosplayers anymore.

Radio And Phone Speaker Has Style

Building a crystal radio isn’t exactly rocket science. Some people who build them go for pushing them technically as far as they can go. Others, like [Billy Cheung], go for style points. The modular radio and phone speaker looks like it came out of the movie Brazil. The metallic gramophone-like speaker horn adds to the appeal and mechanically amplifies the sound, too.

The video (see below) isn’t exactly a how-to, but if you watch to the end there is enough information that you could probably reproduce something at least similar. There are actually several horns. One is made from copper, another from paper, and one from a plastic bottle.

Continue reading “Radio And Phone Speaker Has Style”

Touch Sensitive Cement With Just A Dash Of Neon

For quite some time now we’ve seen people casting their own countertops and other surfaces out of cement. It’s a combination of mold-making and surface finishing that produces a smooth and durable surface at quite a low cost, if you don’t factor in damage done to your back when lifting the thing for installation.

This offering is a little bit different. [Elliott Spelman] built his own touch sensitive cement table top. When you place your grubby hands on the polished surface, a loop of neon lighting is switched on. This is thanks to a 4:1 mix of quick setting cement and iron oxide powder. Bare copper wire was laid around the edges of the surface to be encased by the cement for making connections later.

There were some sad moments when [Elliott] was removing the cast surface from the mold. He ended up cracking it and suggests others be liberal with their use of both wax on the mold before casting, and patience in removing the cement afterward. We might also suggest a strengthening agent like fiber reinforcement. The edges and surface can be sanded to the finish desired and in this case, attaching table legs was easy since the wooden underside of the mold remains on the bottom of the cement.

The neon lighting adds a retro touch to this build. It’s sad to see this technology dying away, so a resurgence of artisanal neon is great in our book. [Elliott] found a Bay Area arts collective called the Crucible which does a lot of art glass education to help him make two hoops of glass tube and fill them with the appropriate gasses. A capacitive touch sensor (once Atmel, now Microchip part) AT42QT2120 (datasheet) monitors the wire coming from the slab and switches the power supply for the tubes using a combination of relay board and Arduino Uno.

We find the prospect of positional sensing in doped cement fascinating. Anyone have ideas for adapting this technique so that a more long and narrow slab could have positional awareness within, say, a few inches? Let us know in the comments.

Continue reading “Touch Sensitive Cement With Just A Dash Of Neon”

Tales Of A Cheap Chinese Laser Cutter

The star turn of most hackspaces and other community workshops is usually a laser cutter. An expensive and fiddly device that it makes much more sense to own collectively than to buy yourself.

This isn’t to say that laser cutters are outside the budget of the experimenter though, we’re all familiar with the inexpensive table-top machines from China. Blue and white boxes that can be yours for a few hundred dollars, and hold the promise of a real laser cutter on your table.

Owning one of these machines is not always smooth sailing though, because their construction and choice of components are often highly variable. A thorough check and often a session of fixing the non-functional parts is a must before first power-on.

[Extreme Electronics] bought one, and in a series of posts documented the process from unboxing to cutting. Starting with a full description of the machine and what to watch for out of the box, then a look at the software. A plugin for Corel Draw was supplied, along with a dubious copy of Corel Draw itself. Finally we see the machine in operation, and the process of finding the proper height for beam focus by cutting an inclined plane of acrylic.

The series rounds off with a list of useful links, and should make interesting reading for anyone, whether they are in the market for a cutter or not.

These cutters/engravers have featured here before many times. Among many others we’ve seen one working with the Mach3 CNC software, or another driven by a SmoothieBoard.

From Zero To Nano

Have you ever wanted to build your own Arduino from scratch? [Pratik Makwana] shares the entire process of designing, building and flashing an Arduino Nano clone. This is not an entry-level project and requires some knowledge of soldering to succeed with such small components, but it is highly rewarding to make. Although it’s a cheap build, it’s probably cheaper to just buy a Nano. That’s not the point.

The goal here and the interesting part of the project is that you can follow the entire process of making the board. You can use the knowledge to design your own board, your own variant or even a completely different project.

from-zero-to-nano-thumb
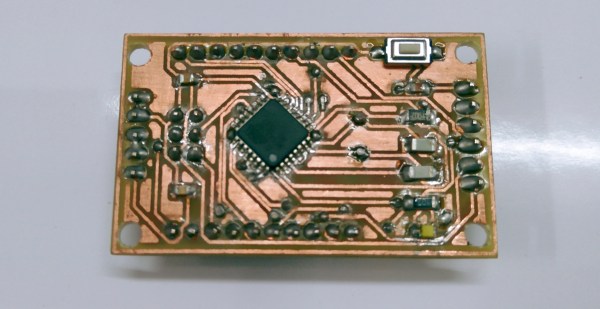
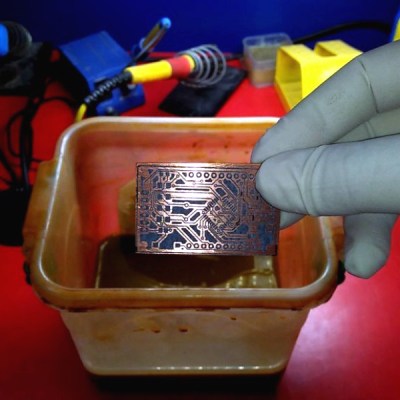
[Pratik Makwana] starts by showing how to design the circuit schematic diagram in an EDA tool (Eagle) and the corresponding PCB layout design. He then uses the toner transfer method and a laminator to imprint the circuit into the copper board for later etching and drilling. The challenging soldering process is not detailed, if you need some help soldering SMD sized components we covered some different processes before, from a toaster oven to a drag soldering process with Kapton tape.

Last but not least, the bootloader firmware. This was done using an Arduino UNO working as master and the newly created the Arduino Nano clone as target. After that you’re set to go. To run an actual sketch, just use your standard USB to UART converter to burn it and proceed as usual.

Voilá, from zero to Nano:

Continue reading “From Zero To Nano”

Harmonographs Generate Geometric Images Unique As Fingerprints

When my elder brother and I were kids back in the late 1970’s, our hacker Dad showed us this 1960-61 catalog of the Atlas Lighting Co (later Thorn Lighting) with an interesting graphic design on the cover. He told us to do a thought experiment, asking us to figure out how it would be possible to have a machine that would draw the design on that catalog cover.

Incorrectly, our first thought was that the design was created with a Spirograph. A spirograph has two main parts: a large ring with gear teeth on the inside and outside circumferences and a set of smaller, toothed wheels with holes in them for inserting a drawing instrument — usually a ball point pen. You hold the big ring, insert the pen in the smaller wheel, and then mesh and rotate the smaller wheel around the big ring. But spirographs can’t be used to draw irregular, asymmetrical figures. You could always recreate a design. Because of the nature of gears, none of them were unique, one off, designs.

A spirograph set like this cannot make the image above[Image credit: Multicherry CC-BY-SA 3.0]
A spirograph set like this cannot make the image above [Image credit: Multicherry CC-BY-SA 3.0]
We figured adding some lever arms, and additional geared wheels (compound gears) could achieve the desired result. It turns out that such a machine is called a Cycloid Drawing Machine. But even with this kind of machine, it was possible to replicate a design as often as required. You would fix the gears and levers and draw a design. If the settings are not disturbed, you can make another copy. Here’s a video of a motorized version of the cycloid machine.

The eventual answer for making such designs was to use a contraption called as the harmonograph. The harmonograph is unique in the sense that while you can make similar looking designs, it would be practically impossible to exactly replicate them — no two will be exactly the same. This thought experiment eventually led to my brother building his own harmonograph. This was way back when the only internet we had was the Library, which was all the way across town and not convenient to pop in on a whim and fancy. This limited our access to information about the device, but eventually, after a couple of months, the project was complete.

Continue reading “Harmonographs Generate Geometric Images Unique As Fingerprints”

Friday Hack Chat: Security For IoT

securityforiot-01Over the last few weeks, our weekly Hack Chats on hackaday.io have gathered a crowd. This week, we’re talking about the greatest threat humanity has ever faced: toasters with web browsers.

The topic of this week’s Hack Chat is Security for IoT, because someone shut down the Internet with improperly configured webcams.

This chat is hosted by the Big Crypto Team at the University of Pittsburgh. [Wenchen Wang], [Ziyue Sun], [Brandon Contino], and [Nick Albanese] will be taking questions about lightweight devices connected to the Internet. Discussion will include building things that connect to larger networks securely.

The Big Crypto team at UP are thinking about the roadblocks people have to implement security in their projects, and if apathy or ignorance is the main reason security isn’t even considered in the worst IoT offenders.

The Hack Chat is scheduled for Friday, February 24th at noon PST (20:00 GMT).

Here’s How To Take Part:

join-hack-chatOur Hack Chats are live community events on the Hackaday.io Hack Chat group messaging.

Log into Hackaday.io, visit that page, and look for the ‘Join this Project’ Button. Once you’re part of the project, the button will change to ‘Team Messaging’, which takes you directly to the Hack Chat.

You don’t have to wait until Friday; join whenever you want and you can see what the community is talking about.

Upcoming Hack Chats

These Hack Chats are becoming very popular, and that’s due in no small part to the excellent lineup of speakers we’ve hosted. Already, we’ve had [Lady Ada], [Sprite_tm], and [bunnie] — engineers, hackers, and developers who are at the apex of their field. We’re not resting on our laurels, though: in a few weeks we’ll be hosting Hack Chats with [Roger Thornton], an engineer with Raspberry Pi, and Fictiv, masters of mechanical manufacturing.