Beefy 100 Amp Electronic Load Uses Two MOSFETs

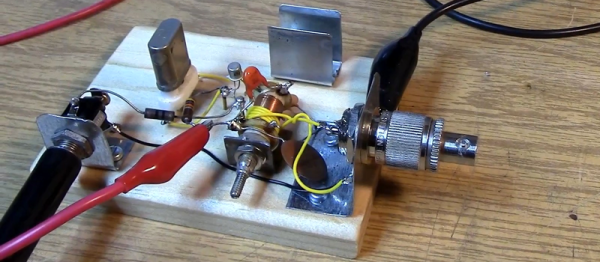
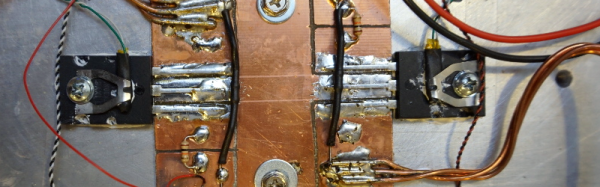
[Kerry Wong] had some extreme MOSFETs (IXTK90N25L2) and decided to create a high current electronic load. The result was a two-channel beast that can handle 50 A per channel. Together, they can sink 400 W and can handle a peak of 1 kW for brief periods. You can see a demo in the video below.

An electronic load is essentially a load resistor you can connect to a source and the resistance is set by an input voltage. So if the load is set to 10 A and you connect it to a 12 V source, the MOSFET should look like a 1.2 ohm resistor. Keep in mind that’s 120 watts–more power than a common incandescent light bulb. So you are going to need to carry some heat away.

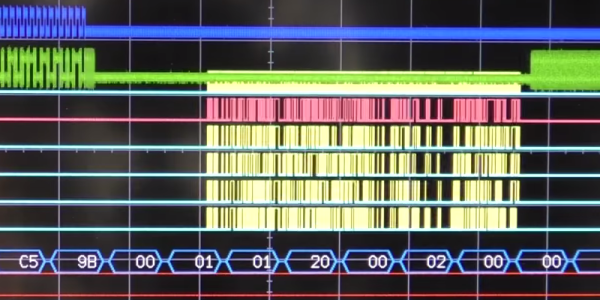
The circuit is pretty simple. The FETs accept a voltage on their gates that sets them to look effectively like a resistor that varies with the voltage. A very small source resistor develops a voltage based on current (only 75 mV for a 50 A draw). That voltage feeds a comparator which generates the gate voltage after looking at the input control voltage. Each millivolt into the comparator translates to an additional 1.33 A through the load.

Continue reading “Beefy 100 Amp Electronic Load Uses Two MOSFETs”

Looking Back At QRP Transmitters

When you get to a certain age, you get unsettled by people calling “your” music oldies. That’s how a few of us felt when we saw [Mikrowave1’s] video about Retro QRP – Solid Gold Years (see below). “QRP” is the ham radio term for low power operation, and the “solid gold” years in question are the 1960s to 1980. The videox has some good stuff, including some old books and some analysis of a popular one-transistor design from that time. He even tries a few different period transistors to see which works best.

[Mikrowave1] talks about the construction techniques used in that time frame, old transistors, and some vintage test equipment. You can even see an old ARC-5 command receiver in use to listen to the transmitter. These were made for use in military aircraft and were very common as surplus.

Continue reading “Looking Back At QRP Transmitters”

Reverse Engineering The Smart ForTwo CAN Bus

The CAN bus has become a defacto standard in modern cars. Just about everything electronic in a car these days talks over this bus, which makes it fertile ground for aspiring hackers. [Daniel Velazquez] is striking out in this area, attempting to decode the messages on the CAN bus of his Smart ForTwo.

[Daniel] has had some pitfalls – first attempts with a Beaglebone Black were somewhat successful in reading messages, but led to strange activity of the car and indicators. This is par for the course in any hack that wires into an existing system – there’s a high chance of disrupting what’s going on leading to unintended consequences.

Further work using an Arduino with the MCP_CAN library netted [Daniel] better results, but  it would be great to understand precisely why the BeagleBone was causing a disturbance to the bus. Safety is highly important when you’re hacking on a speeding one-ton metal death cart, so it pays to double and triple check everything you’re doing.

Thus far, [Daniel] is part way through documenting the messages on the bus, finding registers that cover the ignition and turn signals, among others. Share your CAN hacking tips in the comments. For those interested in more on the CAN bus, check out [Eric]’s great primer on CAN hacking – and keep those car hacking projects flowing to the tip line!

Microfluidic LEGO Bricks

Years ago, prototyping microfluidic systems was a long, time-intensive task. With inspiration from DIY PCB fabrication techniques, that time is now greatly reduced. However, even with the improvements, it still takes a full day to go from an idea to a tangible implementation. However, progress creeps in this petty pace from day to day, and in accordance, a group of researchers have found a way to use 3D printed molds to create microfluidic LEGO bricks that make microfluidic prototyping child’s play.

For the uninitiated, microfluidics is the study and manipulation of very small volumes of water, usually a millionth of a liter and smaller (nL-pL). Interestingly, the behavior of fluids at small scales differs greatly from its larger scale brethren in many key ways. This difference is due to the larger role surface tension, energy dissipation, and fluidic resistance play when distances and volumes are minimized.

By using 3D printed molds to create microfluidic bricks that fit together like LEGOs, the researchers hope to facilitate medical research. Even though much research relies on precise manipulation of minuscule amounts of liquid, most researchers pipette by hand (or occasionally by robot), introducing a high level of human error. Additionally, rather than needing multiple expensive micropipettes, a DIY biohacker only needs PDMS (a silicon-based chemical already used microfluidics) and 3D printed molds to get started in prototyping biological circuits. However, if you prefer a more, ahem, fluid solution, we’ve got you covered.

[via Adafruit]

Understanding DMA

In the world of computers, the central processing unit (CPU) is–well–central. Your first computer course probably explained it like the brain of the computer. However, sometimes you can overload that brain and CPU designers are always trying to improve both speed and throughput using a variety of techniques. One of those methods is DMA or direct memory access.

As the name implies, DMA is the ability for an I/O device to transfer data directly to or from memory. In some cases, it might actually transfer data to another device, but not all DMA systems support that. Sounds simple, but the devil is in the details. There’s a lot of information in this introduction to DMA by [Andrei Chichak]. It covers different types of DMA and the tradeoffs involved in each one.

Continue reading “Understanding DMA”

Heat Pump Gets Brain Transplant; Such Is Life In Latvia

If you buy a used heat pump that was made in China and try to use it in Northern Europe, there are bound to be issues. If said heat pump ends up encased in a block of ice that renders it ineffective, you’ve got two choices: give up and buy a proper heater, or hack a new ice-busting brain board into the heat pump and get back to life.

fnfvpksiz6c8s0h-medium
A little too icy.

[Evalds] chose the latter course, obviously, and in the process he gives us a pretty good look at how heat pumps work and how to overcome their deficiencies. In [Evalds]’ Latvia, winters can be both cold and humid, which can worsen an inherent problem with air-coupled heat pumps: they tend to ice up. As the outside coil is cooled to pick up as much heat as possible from the outside air, water vapor condenses out on the coils and freezes. Most heat pumps account for this by occasionally running in reverse, heating the outdoor coils to clear the ice buildup. [Evalds]’  had nothing more than a simple timer to kick off the defrost cycle, and it wasn’t keeping up with the Latvian winter. An Arduino replaced the OEM controller, and wired up to temperature sensors and an IR sensor that watches for ice buildup on the lower part of the coil, the heat pump is now much better behaved.

Of course it wasn’t as smooth as all that — [Evalds] has some hoops to jump through, including EMI problems and a dodgy Arduino clone. But he stuck with it and brought the heat pump back online, likely at far less expense than HVAC techs would charge for a service call.

Continue reading “Heat Pump Gets Brain Transplant; Such Is Life In Latvia”

Tesla Model S Battery Pack Teardown

We’ve heard a lot about the Tesla Model S over the last few years, it’s a vehicle with a habit of being newsworthy. And as a fast luxury electric saloon car with a range of over 300 miles per charge depending on the model, its publicity is deserved, and that’s before we’ve even mentioned autonomous driving  driver-assist. Even the best of the competing mass-produced electric cars of the moment look inferior beside it.

Tesla famously build their battery packs from standard 18650 lithium-ion cells, but it’s safe to say that the pack in the Model S has little in common with your laptop battery. Fortunately for those of a curious nature, [Jehu Garcia] has posted a video showing the folks at EV West tearing down a Model S pack from a scrap car, so we can follow them through its construction.

The most obvious thing about this pack is its sheer size, this is a large item that takes up most of the space under the car. We’re shown a previous generation Tesla pack for comparison, that is much smaller. Eye-watering performance and range come at a price, and we’re seeing it here in front of us.

The standard of construction appears to be very high indeed, which makes sense as this is not merely a performance part but a safety critical one. Owners of mobile phones beset by fires will testify to this, and the Tesla’s capacity for conflagration or electrical hazard is proportionately larger. The chassis and outer cover are held together by a huge array of bolts and Torx screws, and as they comment, each one is marked as having been tightened to a particular torque setting.

Under the cover is a second cover that is glued down, this needs to be carefully pried off to reveal the modules and their cells. The coolant is drained, and the modules disconnected. This last task is particularly hazardous, as the pack delivers hundreds of volts DC at a very low impedance. Then each of the sixteen packs can be carefully removed. The packs each contain 444 cells, the pack voltage is 24 V, and the energy stored is 5.3 kWh.

The video is below the break. We can’t help noticing some of the rather tasty automotive objects of desire in their lot.

Continue reading “Tesla Model S Battery Pack Teardown”