One Micro Bit Accomplishes Its Goal

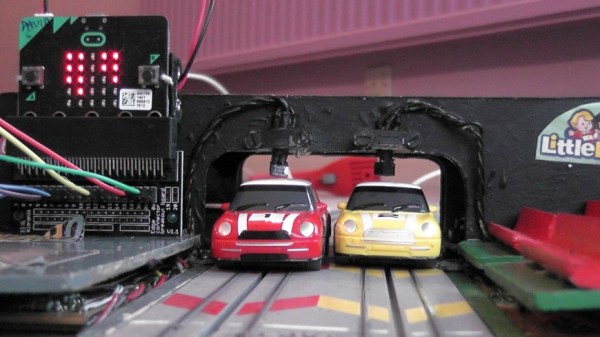
Like the Raspberry Pi, the BBC Micro Bit had a goal of being foremost an educational device. Such an inexpensive computer works well with the current trend of cutting public school budgets wherever possible while still being able to get kids interested in coding and computers in general. While both computers have been co-opted by hackers for all kinds of projects (the Pi especially), [David]’s latest build keeps at least his grandkids interested in computers by using the Micro Bit to add some cool features to an old toy.

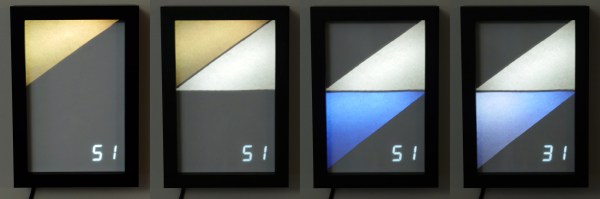
The toy in question is an old Scalextric slot car racetrack – another well-known product of the UK. But what fun is a race if you can’t keep track of laps or lap times? With the BBC Mirco Bit and some hardware, the new-and-improved racetrack can do all of these things. It also implements a drag race-style light system to start the race and can tell if a car false starts. It may be a little difficult to intuit all of the information that the Micro Bit is displaying on its LED array, but it shouldn’t take too much practice.

The project page goes into great detail on how the project was constructed. Be sure to check out the video below for some exciting races! The build is certain to entertain [David]’s grandkids for some time, as well as help them get involved with programming and building anything that they can imagine. Maybe they’ll even get around to building a robot or two.

Thanks to [Mark] for sending in this tip!

Continue reading “One Micro Bit Accomplishes Its Goal”

See The Weather At A Glance With This WiFi Wall Mounted Display

Whether you’re lodged in an apartment with a poor view of the sky like [Becky Stern] or are looking for an at-a-glance report of the current weather, you might consider this minimalist weather display instead of checking your computer or your phone every time you’re headed out the door.

The first order of business was to set up her Feather Huzzah ESP8266 module. [Becky] started with a blink test to ensure it was working properly. Once that was out of the way, she moved on to installing a few libraries. Temperature data fetched by an IFTTT feed is displayed on a seven-segment display, while additional feeds separately retrieve information for each basic weather type: sunny, overcast, rain, snow.

All it took to create the sleek display effect was a few pieces of cardboard inside a shadow box frame, a sheet of paper as a diffuser, and twelve Neopixel RGB LEDs hidden inside. Trimming and securing everything in place as well as notching out the back of the frame for the power cable finished the assembly. Check out the build video after the break.

Continue reading “See The Weather At A Glance With This WiFi Wall Mounted Display”

From 1950s Multimeter To Internet Connected Clock

We’ve seen many clocks here over the years. Some of them are conventional, some esoteric. So it’s not often that we see something novel in the world of timekeeping.

lael-450-analizzatore-hacked
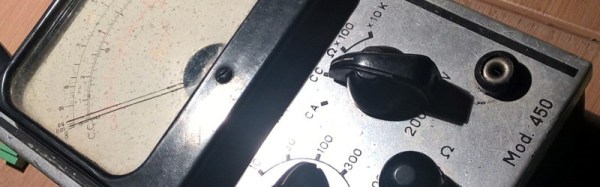
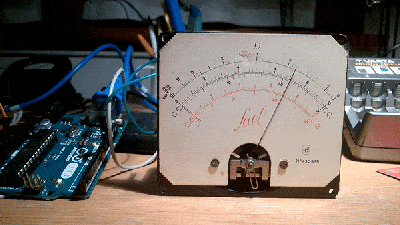
Strictly speaking, [Giulio Pons]’s clock project isn’t new at all. He’s taken a broken multimeter from the 1950s, and with the help of an Arduino Nano and an ESP8266 module, converted it into a clock that indicates the time on the multimeter’s moving-coil meter. He’s wired the multimeter’s front panel controls to the Arduino to operate the thing, and given it a speaker to play alarm sounds. A PIR motion detector activates the clock. In the hours of darkness, a photoresistor brings up a light. Time setting is automatic via the internet. [Giulio] previously experimented with an RTC module but found the network connection made changing time settings easier.

It’s by no means the perfect timepiece. For instance, [Giulio] found that driving the meter from a PWM pin gave different readings depending on the PSU load from other parts such as the light. But the clock does work, and has breathed new life into what might otherwise have remained a piece of junk.

Those of you with long memories might remember a similar project from a few years ago that used unmodified multimeters to display time as voltage. And of course, there are always frequency counter clocks.

The ‘All-Seeing Pi’ Aids Low-Vision Adventurer

Adventure travel can be pretty grueling, what with the exotic locations and potential for disaster that the typical tourist destinations don’t offer. One might find oneself dangling over a cliff for that near-death-experience selfie or ziplining through a rainforest canopy. All this is significantly complicated by being blind, of course, so a tool like this Raspberry Pi low-vision system would be a welcome addition to the nearly-blind adventurer’s well-worn rucksack.

[Dan] has had vision problems since childhood, but one look at his YouTube channel shows that he doesn’t let that slow him down. When [Dan] met [Ben] in Scotland, [Ben] noticed that he was using his smartphone as a vision aid, looking at the display up close and zooming in to get as much detail as possible from his remaining vision. [Ben] thought he could help, so he whipped up a heads-up display from a Raspberry Pi and a Pi Camera. Mounted to a 3D-printed frame holding a 5″ HDMI display and worn from a GoPro head mount, the camera provides enough detail to help [Dan] navigate, as seen in the video below.

The rig is a bit unwieldy right now, but as proof of concept (and proof of friendship), it’s a solid start. We think a slimmer profile design might help, in which case [Ben] might want to look into this Google Glass-like display for a multimeter for inspiration on version 2.0.

Continue reading “The ‘All-Seeing Pi’ Aids Low-Vision Adventurer”

Stop Printing Air With A Filament Sensor

If you have had a 3D printer for awhile, you know the heartbreak of coming in to check on an 8-hour print only to find that in hour 7 you ran out of filament (or the filament broke) and your printer has been dutifully moving around for no reason. [Chuck Hellebuyck] knows and he decided to make a filament sensor he found on Thingiverse.

Finding a part on Thingiverse and printing it probably doesn’t warrant much attention. But if you watch the video, below, it is a good example of how things from Thingiverse don’t always meet your needs. The microswitch [Chuck] had was bigger than the design used. So he loaded the STL file into TinkerCAD and fixed it. He shows you exactly how he did it. That’s a useful skill because you never know when you’ll need to modify some part you’ve found on the Internet.

Continue reading “Stop Printing Air With A Filament Sensor”

Unlocking 12V Quick Charge On A USB Power Bank

[Robert Nixdorf] frequently needs to use this high-end audio recorder, but it sucks dry a set of eight AA batteries in just a few hours. Obviously a longer lasting solution was required, and he started scouring the web looking for an answer. He bought a Quick Charge power bank and then hacked a Digispark to negotiate with the power bank to provide 12V output to Quick Charge his audio recorder.

Qualcomm’s Quick Charge system is designed to provide increased output voltages to reduce charging time in QC compatible devices such as mobile phones powered by their Snapdragon range of SoC’s. Depending on how the end-point negotiates with the charger, either 5V, 9V or 12V outputs are supported.

You can dig into the details in Qualcomm’s Quick Charge Patent [PDF] which shows how the system works. Quite simply, the voltage provided by the charger depends on the signals set on the D+ and D- data pins during the initial handshaking phase. [Robert] found it easy to get his QC charger to provide the required voltage by using a 3V3 voltage regulator and a resistive divider. But a more permanent solution would be needed if he wanted to use it on the field.

His parts bin revealed a Digispark board and he set about hacking it. He isolated the VUSB from the rest of his board since it would get pulled up to 12V when in use. And then replaced the existing 5V regulator with a 3V3 one. This required several bodges which he has documented on his blog. Some simple code flashed on the ATtiny85 handles all of the handshaking and sets up 12V output to run his audio recorder. A single charge on the power bank now lasts him almost 12 hours, so he’s pretty satisfied with the hack.

Quick Charge is currently at version 4 and supports USB-C and USB-PD hardware such as cables and connectors. But it seems using USB-C hardware outside of the current USB-C specifications is deprecated, with reports suggesting Google is asking OEM’s not to use Quick Charge but stick to USB-PD. Let’s hope this gets settled one way or another soon.

Thanks, [Frank] for the tip.

Reading The Unreadable SROM: Inside The PSoC4

Wow. [Dmitry Grinberg] just broke into the SROM on Cypress’ PSoC 4 chips. The supervisory read-only memory (SROM) in question is a region of proprietary code that runs when the chip starts up, and in privileged mode. It’s exactly the kind of black box that’s a little bit creepy and a horribly useful target for hackers if the black box can be broken open. What’s inside? In the manual it says “The user has no access to read or modify the SROM code.” Nobody outside of Cypress knows. Until now.

This matters because the PSoC 4000 chips are among the cheapest ARM Cortex-M0 parts out there. Consequently they’re inside countless consumer devices. Among [Dmitry]’s other tricks, he’s figured out how to write into the SROM, which opens the door for creating an undetectable rootkit on the chip that runs out of each reset. That’s the scary part.

The cool parts are scattered throughout [Dmitry]’s long and detailed writeup. He also found that the chips that have 8 K of flash actually have 16 K, and access to the rest of the memory is enabled by setting a single bit. This works because flash is written using routines that live in SROM, rather than the usual hardware-level write-to-register-and-wait procedure that we’re accustomed to with other micros. Of course, because it’s all done in software, you can brick the flash too by writing the wrong checksums. [Dmitry] did that twice. Good thing the chips are inexpensive.

The nitty-gritty on the ROP (return oriented programming) tricks that [Dmitry] had to pull, and a good look into the design of the system itself, are all up on [Dmitry]’s blog. We can’t wait to see what other buried treasure he’s going to find as he continues to play around with these chips. And in case you’re wondering what type of mad genius it takes to pull this off, consider that [Dmitry] runs Linux on AVRs, fools nRF24 chips into transmitting Bluetooth LE beacons, and re-writes his own airplane’s GPS.

[Main image is a PSoC4200 dev kit, and [Dmitry] has only been working with the 4000 and 4100 series. Just so you know.]