Broken Plastic? No Problem!

When a computer case has survived several decades from being a new toy through being an unloved relic to being rediscovered and finding its way into the hands of an enthusiast, it is inevitable that it will have picked up some damage along the way. It will be scuffed, maybe cracked, and often broken. If it has faced the ordeal of an international courier after an eBay sale then the likelihood of a break increases significantly.

If you receive a vintage computer in the post and find it cracked or broken, never fear. [Drygol] has a solution, a guide to plastic welding with a soldering iron.

After a thorough cleaning, the technique is to hold the sides of the break together, run the iron along it to melt the plastic together, and scrape the overflowed plastic back into the resulting trench before it solidifies. With careful sanding, a spot of polyester putty, and some spray paint, the broken case can be returned to new condition.

There is a video showing the process, in this case repairing a crack on a Commodore 64 case.

Continue reading “Broken Plastic? No Problem!”

Panel Mount Display Solves The Problem Of Drilling Square Holes

[Absolutelyautomation] has a problem with seven-segment displays. Fitting these displays in an enclosure is a pain because you can’t drill perfectly square holes, and you will invariably mess up a few enclosures with overzealous file work. There is a solution to this problem – panel mount meters.

The bezels on these panel mount meters hide the imperfections in the enclosure, and usually don’t require screws. They are, however, dedicated displays, usually for temperature, RPM, or some other measurement.

[Absolutelyautomation] took one of these dedicated panel mount displays and turned it into an all-purpose device. Basically, it’s a panel mount Arduino with three seven-segment displays.

This project is built on perfboard cut down to fit inside the enclosure of a very cheap panel meter found at the usual suppliers. Tucked away underneath this perfboard is an ATmega, a few resistors, and the support parts to make everything go. This panel mount meter can either be a serial slave or as a standalone controller, programmable with the Arduino IDE. It’s cheap, too. You can check out [Absolutelyautomaion]’s video below.

Continue reading “Panel Mount Display Solves The Problem Of Drilling Square Holes”

Electric Arc Furnace Closes The Loop

When we think of an Electric Arc Furnace (EAF), the image that comes to mind is one of a huge machine devouring megawatts of electricity while turning recycled metal into liquid. [Gregory Hildstrom] did some work to shrink one of those machines down to a practical home version. [Greg] is building on work done by [Grant Thompson], aka “The King of Random” and AvE. Industrial EAFs are computer controlled devices, carefully lowering a consumable carbon electrode into the steel melt. This machine brings those features to the home gamer.

[Greg] started by TIG welding up an aluminum frame. There isn’t a whole lot of force on the Z-axis of the arc furnace, so he used a stepper and lead screw arrangement similar to those used in 3D printers. An Adafruit stepper motor shield sits on an Arduino Uno to control the beast. The Arduino reads the voltage across the arc and adjusts the electrode height accordingly.

The arc behind this arc furnace comes from a 240 volt welder. That’s where [Greg] ran into some trouble. Welders are rated by their duty cycle. Duty cycle is the percentage of time they can continuously weld during a ten minute period. A 30% duty cycle welder can only weld for three minutes before needing seven minutes of cooling time. An electric arc furnace requires a 100% duty cycle welder, as melting a few pounds of steel takes time. [Greg] went through a few different welder models before he found one which could handle the stress.

In the end [Greg] was able to melt and boil a few pounds of steel before the main 240 V breaker on his house overheated and popped. The arc furnace might be asking a bit much of household grade electrical equipment.

Continue reading “Electric Arc Furnace Closes The Loop”

There’s A Mew Underneath The Truck Next To The SS Anne

Before we dig into this, I need to spend a paragraph or two conveying the knowledge of a twelve-year-old in 1996. Of course, most Hackaday readers were twelve at least once, but we’re just going to do this anyway. The payoff? This is an arbitrary-code-execution virus for Pokemon, and maybe the most amazing Game Boy hack of all time.

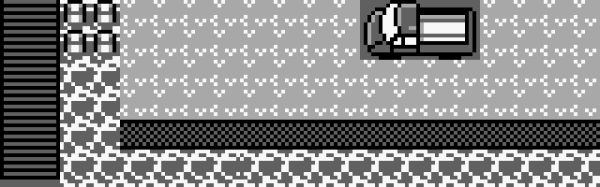
In the first generation of Pokemon games, there is a spectacularly rare Pokemon. Mew, the 151st Pokemon, could learn every move in the game. It was a psychic type, which was overpowered in the first gen. You could not acquire a Mew except by taking your Game Boy to a special event (or to Toys R Us that one time). If someone on the playground had a Mew, they really only had a GameShark.

There was a mythos surrounding Mew. Legend said if you went to the SS Anne and used Strength to move a truck sprite that appeared nowhere else in the game, a Mew would appear. Due to the storyline of the game, you didn’t have the ability to get to this truck the first time you passed it. However, if you started a new game – thus losing all your progress and your entire roster of Pokemon – you could test this theory out. Don’t worry, you can just trade me all your good Pokemon. I’ll give them back once you have a Mew. Screw you, Dylan. Screw you.

Now the Mew truck trick is real. You can do it on a copy of Red or Blue on an original Game Boy. If this hack existed in 1998, kids would have lost their god damned minds.

The basis for this hack comes from [MrCheeze], who created a ‘virus’ of sorts for the first generation of Pokemon games. Basically, given the ability to manually edit a save file, it is possible to replicate this save file over a Game Link cable. The result is a glitchy mess, but each Pokemon game has the same save file when it’s done.

Combine this virus with arbitrary code execution, and you have something remarkable. [MrCheeze] created a save file that allows you to move the truck next to the SS Anne. When the truck is moved, a Mew appears. It’s exactly what everyone was talking about over the sound of their sister’s Backstreet Boys marathon.

The new ‘Mew Truck virus’ is not as glitchy as the first attempt at a self-replicating save file. In fact, except for the music glitching for a few seconds, nothing appears abnormal about this Pokemon virus. It’s only when the Mew truck trick is attempted does something seem weird, and it’s only weird because we know it shouldn’t happen. Combine the self-replicating nature of this virus, and you have something that would have drawn the attention of Big N. This is a masterpiece of Pokemon-based arbitrary code execution and a hack that may never be equaled.

You can check out the video below.

Continue reading “There’s A Mew Underneath The Truck Next To The SS Anne”

Count Your Zombies! A Left4Dead 2 Stat Tracker

Sure, you’re getting further and further into the game and finishing missions, but the true progress for a zombie shooter is how many zombies you’ve killed, right? [Evan Juras] agreed, so he set off to build a hardware stat tracker for Left4Dead 2!

Left4Dead 2 tracks a bunch of stats and at the end of each level, those stats are updated on your Steam page. [Evan] used a Python script running on a Raspberry Pi to connect to the internet and grab four different stats from your Steam profile. Those stats are displayed on an RGB 16×2 display. To house the project, a case for it was designed and [Evan] had it 3D printed. There are two buttons on the case: one to update the stats and another to cycle through them. If no buttons are pressed then the display cycles through the stats every minute and updates the stats every 24 hours.

The video below shows a summary of the build process and describes the hardware and software used. [Evan] has plans for tracking stats from other games through Steam and his python code is available on Github. Python is becoming the go-to tool for interacting with video game bots and now, stats — see this list of Pokemon Go bots. Also, check out this feature about running MicroPython on an ESP8266 if you wanted to build something similar to this without the Raspberry Pi.

Continue reading “Count Your Zombies! A Left4Dead 2 Stat Tracker”

How To Use A Photo Tachometer

If you’re into anything even vaguely mechanical on the broad hacking spectrum, you’ve come into contact with things that spin. Sometimes, it’s important to know precisely how fast they are spinning! When you’ve got the need to know angular speed, you need a device to measure it. That device is a tachometer. And the most useful tachometer is the non-contact photo-tachometer.

Continue reading “How To Use A Photo Tachometer”

The Custom Clicky Shortcut Keypad

You’re not cool unless you have a mechanical keyboard. Case in point: if you were to somehow acquire an identical keyboard to the one I used to type this, it would set you back at least seven hundred dollars. Yes, it’s mechanical (Topre), and yes, I’m cooler than you. Of course, you can’t be as cool as me, but you can build your own mechanical keyboard. [Robin] is, I presume, a pretty cool dude so he built his own keyboard. It’s the amazing shortcut keyboard, and it can be programmed graphically.

The idea for this keyboard came when [Robin] was studying as an engineer. We assume this is code for wearing out the Escape key on AutoCAD, but many other software packages have the same problem. The solution to [Robin]’s problem was a shortcut keypad, a 3 by 4 matrix of Cherry switches that could be programmed for any task.

The design of this keyboard started out as an Adafruit Trellis matrix keypad. This was combined with some software written in Processing that assigned macros to each button. This was a sufficient solution, but the switches in the Adafruit trellis look squishy. These are not the right switches for someone who craves a soft snap under every fingertip. It’s not the keyboard of someone who desires the subtle thickness of laser etched PBT keycaps. The Adafruit keypad doesn’t have the graceful lines of a fully sculpted set of keycaps. Oh my god, it’s doubleshot.

[Robin]’s completed keyboard has gone through a few revisions, but in the end, he settled on PCB-mounted switches and a very clever 3D printed standoff system to hold an Arduino Pro Micro in place. The enclosure, too, is 3D printed, and the end result is a completely custom keyboard that’s perfect for mashing key combos.

You can check out a video of this keyboard in action below.

Continue reading “The Custom Clicky Shortcut Keypad”