STM32 Analog Converter Phase Noise

[Avian] has been using STM32 ARM processors to sample RF for a variety of applications. At first, he was receiving relatively wide TV signals. Recently, though, he’s started dealing with very narrow signals and he found that his samples had a lot of spread in the frequency domain that he didn’t expect.

What followed was some detective work that resulted in a determination that phase noise was the culprit. But why? [Avian] took some measurements and noticed that the phase noise almost exactly matched the phase noise specification for the STM32’s phase locked loop (PLL).

Unfortunately, there didn’t seem to be a good way to avoid using the PLL without major changes to the rest of the circuit. However, it was quite the learning experience and something to be aware of when counting on built-in converters for high-accuracy measurements.

One of the best things about this post is the references to more information. There’s a great explanation of phase noise, as well as a specific application note about clock jitter and analog converters.

We’ve talked about phase noise in direct digital synthesis a few times. But usually, it is pretty obvious like when you are asking a CPU to double as an RF transmitter. [Avian’s] post was a bit more of a detective story.

Flooded house

Honey, When Did We Get An Indoor Pool?

Is it too much to ask for a home to have a little ‘smart’ built-in? If you’ve ever woken up (or come home) to your dwelling being flooded, you’ll know how terrible it feels, how long it can take to recover from, and how stressful it can be. Yeah, it’s happened to us before, so we really feel for [David Schneider]. He woke up one Sunday morning to a whole lot of water in his house. The inlet valve for his washing machine somehow got stuck in the open position after putting a load of laundry in the previous night.

[David] took progressively complex measures to prevent a broken water feed flood from happening in the future. First, he lined the entire floor of his laundry closet with a steel tray. OK, that’s a good start but won’t prevent another disaster unless it is caught very quickly. How about a simple audible water alarm? That’s good and all if you’re home, but what if you’re not?

Next, he installed a valve with a mechanical timer on the water line for the washing machine which closes automatically after 2 hours of being opened. Much better, but what about all the other thirsty appliances around the house? After searching online a little, he found plenty of whole house systems that would work for him, but there were 2 problems with these. First, most were network-based and he didn’t want to IoT-ify his house’s water system. Second, they were overpriced.

Of course the solution was to put together his own system! First, he purchased a few mostly inexpensive things — a wireless alarm, some water sensors, and a motorized ball valve. Then he collected the last few things he needed from what he had on hand around the house, and got to work connecting the 4 LEDs on the alarm to 4 analog input pins on his Arduino. Next, he added a relay between the Arduino and the motorized ball valve.

If a sensor detects water, it tells the alarm about it (wirelessly), which triggers the Arduino to energize a relay that is connected to the motorized ball valve, causing it to shut off the main water line for the entire house. Disaster averted! Sure, it’s a fairly simple hack, but it works, meets his requirements, and now he sleeps better at night knowing he won’t wake up (or come home) to an indoor swimming pool.

It’s surprising that we haven’t seen more hacks like this given it’s such a common problem. The closest thing we can remember is an overflow sensor for an aquarium. If homes came standard with a water main shutoff system, it would remove a stressful event from our lives and maybe even lower our insurance premium.

Adding A Debugger To A Teensy 3.5/3.6

The Teensy is a powerful ARM-based development board with loads of features that can do fun stuff with USB as well. Like many dev boards, it uses a less powerful processor as an interface. Teensy designer [Paul Stoffregen] added a debug header to allow direct SWD JTAG access to the main chip, but the interface microcontroller has to be silenced for that to work, and the code to do so is still in progress.

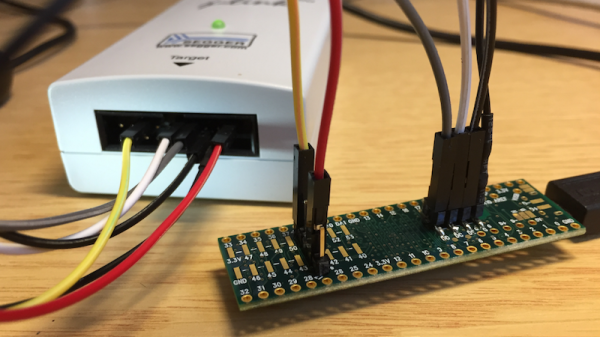
Impatient, [Erich Styger] documents the changes he made to add support for the J-Link SWD protocol by removing the offending NXP Kinetis KL02Z that serves as the as the onboard interface and bootloader that helps the Arduino IDE talk to the K64F which is the main chip. After the KL02Z was removed, [Erich] populated the debug headers and then wired up the Segger J-Link to the board and tested it out with Eclipse, GDB, and standard SWD debug tools.

The end result is a Cortex M4F board that can work with standard tools at a third of the price of the Kinetis’ development board. [Paul Stoffregen] confirms that the debugging functionality will be added to the bootloader code soon but until then, a hardware hack is a working, if brutal, approach to debugging on the platform.

More information on the JTAG interface is available for the interested. And if Teensy isn’t your thing, you might consider an STM32-based development board.

The Raspberry Pi Becomes A SCSI Device

SCSI devices were found in hundreds of different models of computers from the 80s, from SUN boxes to cute little Macs. These hard drives and CDROMs are slowly dying, and with that goes an entire generation of technology down the drain. Currently, the best method of preserving these computers with SCSI drives is the SCSI2SD device designed by [Michael McMaster]. While this device does exactly what it says it’ll do — turn an SD card into a drive on a SCSI chain — it’s fairly expensive at $70.

[GIMONS] has a better, cheaper solution. It’s a SCSI device emulator for the Raspberry Pi (original link dead, here’s the new location of this writeup). It turns a Raspberry Pi into a SCSI hard drive, magneto-optical drive, CDROM, or an Ethernet adapter using only some glue logic and a bit of code.

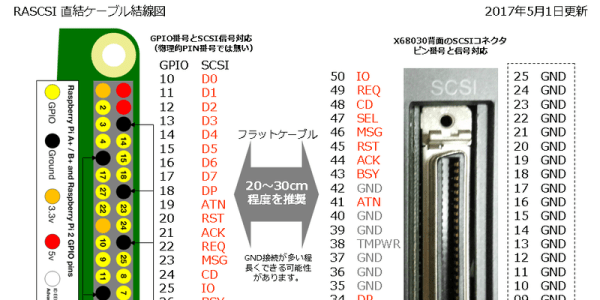
As far as the hardware goes, this is a pretty simple build. The 40-pin GPIO connector on the Pi is attached to the 50-pin SCSI connector through a few 74LS641 transceivers with a few resistor packs for pullups and pulldowns. The software allows for virtual disk devices – either a hard drive, magneto-optical drive, or a CDROM – to be presented from the Raspberry Pi. There’s also the option of putting Ethernet on the SCSI chain, a helpful addition since Ethernet to SCSI conversion devices are usually rare and expensive.

Officially, [GIMONS] built this SCSI hard drive emulator for the x68000 computer, developed by Sharp in the late 80s. While these are popular machines for retrocomputing aficionados in Japan, they’re exceptionally rare elsewhere — although [Dave Jones] got his mitts on one for a teardown. SCSI was extraordinarily popular for computers from the 70s through the 90s, though, and since SCSI was a standard this build should work with all of them.

If your retrocomputer doesn’t need a SCSI drive, and you’re feeling left out of the drive-emulation club, the good news is there’s a Raspberry Pi solution for that, too: this Hackaday Prize entry turns a Pi into an IDE hard drive.

Thanks [Gokhan] for the tip!

Hackaday Prize Entry: Hacker Calculus

Mathematics, as it is taught in schools, sometimes falls short in its mission to educate the pupils. This is the view of [Joan Horvath] and [Rich Cameron], particularly with respect to the teaching of calculus, which they feel has become a purely algebraic discipline that leaves many students in the cold when it comes to understanding the concepts behind it.

Their Hacker Calculus project aims to address this, by returning to [Isaac Newton]’s 1687 seminal work on the matter, Philosophiae Naturalis Principia Mathematica. They were struck by how much the Principia was a work of geometry rather than algebra, and they are seeking to return to [Newton]’s principles in a bid to make the subject more accessible to students left behind when it comes to derivatives and integrals. They intend to refine the geometric approach to create a series of practical items to explain the concepts, both through 3D printed items and through electronics.

We can see that this is an approach that has considerable merit, given that most Hackaday readers will have at some time or other sat through a maths lesson and come away wondering what on earth the teacher was talking about and having been baffled by further attempts to explain it through impenetrable maths-speak. If you were the kid who “got” calculus when the relationship between speed and acceleration – another thing we have [Newton] to thank for describing – was explained in your physics lessons, then you will probably understand.

The pair have some Hackaday Prize history, you may remember them from such previous entries as their 3D prints for the visually impaired project from last year.

A Brief History Of Radioactivity

More than one hundred years ago, Henri Becquerel discovered that uranium emitted penetrating rays similar to those used by Wilhelm Röntgen to take the first X-ray image (of his wife’s hand), starting a new era of far-reaching applications. There are of course many dangers that come with the use of radioactivity, but there are also many beneficial uses for our society.

Continue reading “A Brief History Of Radioactivity”

IuT ! IoT

Let’s build the Internet of USEFUL Things, not just the Internet of Things. IuT ! IoT

That’s what we’ll be doing over the next five weeks. The second challenge of the 2017 Hackaday Prize begins today. We’re looking for the best ideas we can find for useful connected devices. Twenty entries will recieve $1,000 and move on to the final round to vie for the top prizes ranging from $5,000 to $50,000.

There is no doubt that the future is connected. It has been our future since the advent of the telegraph, and we’re unarguably becoming more connected at a faster rate. The phone in your hand, pocket, or bag connects you to the bulk of human knowledge. But it doesn’t yet connect you to very many “things”. It won’t be that way for long.

Already we’ve seen cameras (security, baby monitor, and everything in between) appear as some of the earliest connected devices, and they’ve brought with them all of the unintended consequences of poorly secured computer gear connected to the wider Internet. At least remote cameras have a purpose; there have been more than enough product launches for things that don’t. Our go-to counter-example is the Internet-connected toaster which is the topic of our wonderful art from Joe Kim this morning. Who needs to toast remotely? Nobody.

Let’s Invent the IoT

Here is our chance to do it right. How can Internet of Things make life better? What things become more meaningful when added to a network and what does that look like? How do we continue to connect our world while safeguarding privacy and being mindful of security. Finding answers to these questions will lead you to Build Something that Matters.